Why so down Ironhide? Or fixing the head tilt problem
I will post this in both the kitbashing forum and the toy forum, as I believe more people will see it there.
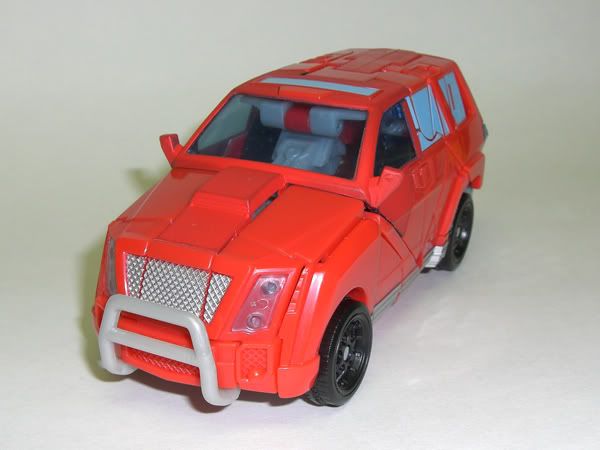
Poor ole Ironhide. he just can’t catch a break with his head can he? For as long as we’ve known he’s gotten screwed when it comes to his head. First he had no head, then he had it blown off in the movie, and now with Universe the poor bastard just can’t stop looking at his boots.
If you’ve been wanting to fix this as much as I have then I have some good news for you, and I have some bad news. The good news is that it can be fixed! Yes, yes hooray, you may love me now. The bad news is, is that it is a fairly extensive (albeit overall easy) mod that takes a good deal of cutting and sanding. Booo! You suck. I know.
So if you’re still with me (and if you love Ironhide you’d better be) here’s what you need.
First tools. Not a lot really. You’ll need a small phillips head screwdriver, and X-acto knife, some sand paper, and a small flat surface like a popsicle stick to wrap the sand paper around.
There are three major culprits in Ironhides head tilt, and how this got passed engineering is beyond me. The first is his “lower spine.” This piece folds down and presses against his rear bumper in robot mode. The problem is that there is too much plastic to allow it to sit flush, so that has to go. First partially transform him and then remove the three screws that hold the roof on like so.
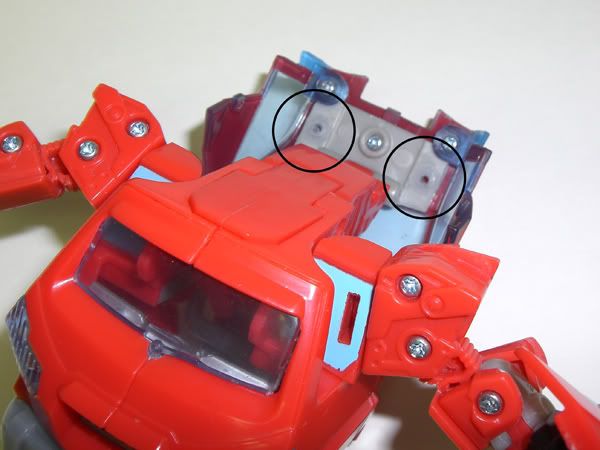
You will also find it easier to work with him if you remove the “lower spine” from the upper body. Just pull the pieces apart.
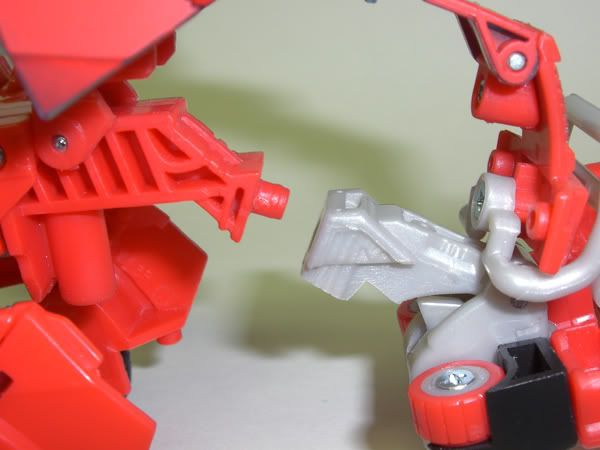
It may be a little tight at first but I have removed and put this piece back together at least fifty times and it still works perfectly. Now carefully cut and sand the shown areas until you can push the spine to the bumper and his head sits flush when you reattach the spine. Remember to go slowly with the cutting and the sanding. You can always take more off, but you can’t put it back on. It took me a good hour to get this how I wanted it, granted I was being supremely careful.
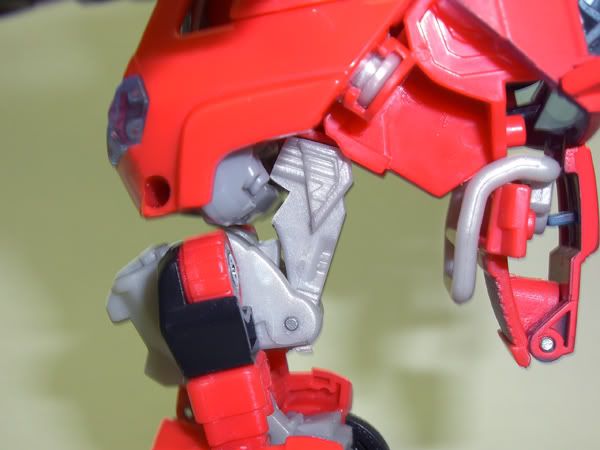
Now it would be nice if that was the only problem, but unfortunately it’s not. We have two other problems to deal with. The next one that we will deal with is the hinge that is between his headpiece and the roof of the car. The problem here is that when his wheels come up into his backpack the wheel wells hit the underside of this hinge. What needs to be done here is to cut out a triangular shape on both sides so that the wheels can slide into them. I marked where the pieces were hitting with a marker and went from there. After finishing I’ve found that a good place to cut is parallel with the second “line” on this hinge as shown. The other cut for this triangular piece should be at about a 45 degree angle to the first cut. Once again you will have to keep test fitting until you get it just right, and again slow and steady.
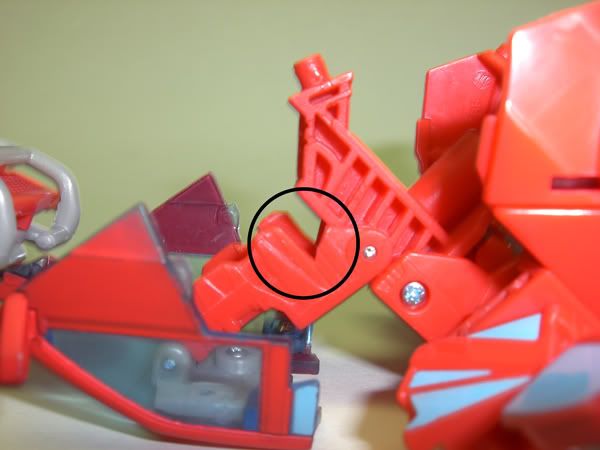
Now onto the last problem that we have that’s got ole Ironhide lookin’ down. Remember those three screws that you took out to take backpack off? You can get rid of two of them because they are part of our last problem. The two screw pegs on the outside of this piece are keeping the tire from fully coming up into his backpack. They’ve got to go. You can cut these little buggers completely flush to the larger piece of plastic and then sand them smooth.

Do you have to take them all the way off you may ask? The answer is yes you do, and I should know, I spent about two hours carefully sanding these down little by little, fitting and refitting to see if they could still be used. They can’t. Don’t worry about the roof no longer being secure either. It is still plenty sturdy with just the center screw in there, and if it bothers you that much it can be glued on too.
Now put all pieces back together and voila! No more looking down for Mr. Hide. Now a few additional notes. The head won’t be quite perfectly flush, but it’s damn close. Also if you look at the rotating pelvis area it won’t go quite the whole way back, as it’s hitting the automorph bumper. Honestly this isn’t at all noticeable unless you’re looking at him from underneath. I didn’t even notice it for a couple of hours after I finished the mod.
Lastly I would highly recommend clear coating the backpack pieces. Mine were scarily tacky right out of the box, and I haven’t had that problem on any of my other figures. I recommend Testors Dullcote for this. I used it and it worked great, and the sheen on the figure isn’t that different either. Remember to mask of the windows though or you’ll end up with foggy ugly windows. I also painted his face silver with Games Workshop boltgun metal, followed by chainmail, but you can use whatever you want.
I would consider this mod to be of intermediate difficulty only because of how much plastic you’re actually getting rid of. It’s more time consuming than anything. I also may be a little biased having about 25 years of model building experience, but I’m sure that if you’re careful anyone can do it.
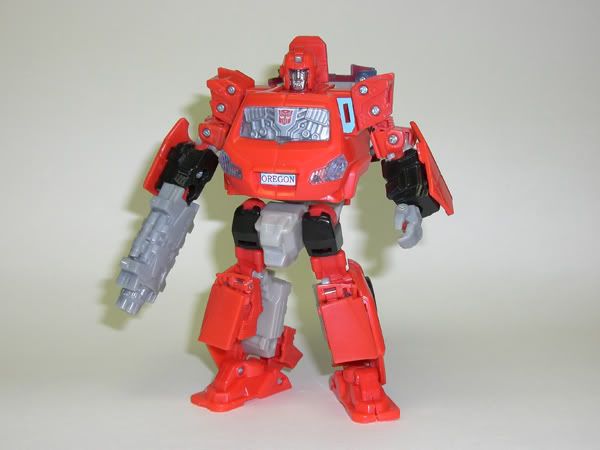

Poor ole Ironhide. he just can’t catch a break with his head can he? For as long as we’ve known he’s gotten screwed when it comes to his head. First he had no head, then he had it blown off in the movie, and now with Universe the poor bastard just can’t stop looking at his boots.
If you’ve been wanting to fix this as much as I have then I have some good news for you, and I have some bad news. The good news is that it can be fixed! Yes, yes hooray, you may love me now. The bad news is, is that it is a fairly extensive (albeit overall easy) mod that takes a good deal of cutting and sanding. Booo! You suck. I know.
So if you’re still with me (and if you love Ironhide you’d better be) here’s what you need.
First tools. Not a lot really. You’ll need a small phillips head screwdriver, and X-acto knife, some sand paper, and a small flat surface like a popsicle stick to wrap the sand paper around.
There are three major culprits in Ironhides head tilt, and how this got passed engineering is beyond me. The first is his “lower spine.” This piece folds down and presses against his rear bumper in robot mode. The problem is that there is too much plastic to allow it to sit flush, so that has to go. First partially transform him and then remove the three screws that hold the roof on like so.

You will also find it easier to work with him if you remove the “lower spine” from the upper body. Just pull the pieces apart.

It may be a little tight at first but I have removed and put this piece back together at least fifty times and it still works perfectly. Now carefully cut and sand the shown areas until you can push the spine to the bumper and his head sits flush when you reattach the spine. Remember to go slowly with the cutting and the sanding. You can always take more off, but you can’t put it back on. It took me a good hour to get this how I wanted it, granted I was being supremely careful.

Now it would be nice if that was the only problem, but unfortunately it’s not. We have two other problems to deal with. The next one that we will deal with is the hinge that is between his headpiece and the roof of the car. The problem here is that when his wheels come up into his backpack the wheel wells hit the underside of this hinge. What needs to be done here is to cut out a triangular shape on both sides so that the wheels can slide into them. I marked where the pieces were hitting with a marker and went from there. After finishing I’ve found that a good place to cut is parallel with the second “line” on this hinge as shown. The other cut for this triangular piece should be at about a 45 degree angle to the first cut. Once again you will have to keep test fitting until you get it just right, and again slow and steady.

Now onto the last problem that we have that’s got ole Ironhide lookin’ down. Remember those three screws that you took out to take backpack off? You can get rid of two of them because they are part of our last problem. The two screw pegs on the outside of this piece are keeping the tire from fully coming up into his backpack. They’ve got to go. You can cut these little buggers completely flush to the larger piece of plastic and then sand them smooth.

Do you have to take them all the way off you may ask? The answer is yes you do, and I should know, I spent about two hours carefully sanding these down little by little, fitting and refitting to see if they could still be used. They can’t. Don’t worry about the roof no longer being secure either. It is still plenty sturdy with just the center screw in there, and if it bothers you that much it can be glued on too.
Now put all pieces back together and voila! No more looking down for Mr. Hide. Now a few additional notes. The head won’t be quite perfectly flush, but it’s damn close. Also if you look at the rotating pelvis area it won’t go quite the whole way back, as it’s hitting the automorph bumper. Honestly this isn’t at all noticeable unless you’re looking at him from underneath. I didn’t even notice it for a couple of hours after I finished the mod.
Lastly I would highly recommend clear coating the backpack pieces. Mine were scarily tacky right out of the box, and I haven’t had that problem on any of my other figures. I recommend Testors Dullcote for this. I used it and it worked great, and the sheen on the figure isn’t that different either. Remember to mask of the windows though or you’ll end up with foggy ugly windows. I also painted his face silver with Games Workshop boltgun metal, followed by chainmail, but you can use whatever you want.
I would consider this mod to be of intermediate difficulty only because of how much plastic you’re actually getting rid of. It’s more time consuming than anything. I also may be a little biased having about 25 years of model building experience, but I’m sure that if you’re careful anyone can do it.
