Page 1 of 1

My first repaint (now with more kitty)

PostPosted: Tue Jul 07, 2009 1:55 am
by Gutter Bunny
New pics aug 3 (that means scroll down)

Oh yeah...it's one of those threads.

ultimately I'm pleased with it. It turned out better than expected. Criticism is welcome, but please keep it constructive.

Image
Image

my photo skills are as poor as my painting lmao :P

Image
Image
Image

Re: My first repaint

PostPosted: Tue Jul 07, 2009 5:41 am
by Mykltron
That looks nice. It certainly doesn't look like plastic so you've done a good job! The drybrushing looks quite even, rather than some scruffy things I've seen before.

It's a shame the pics are so poor. You should borrow a decent camera so you can take photos that are focused, then maybe we can see it well enough to fully appreciate it and maybe give advice. Also, good lighting is important, especially for a figure that is mainly black! My best results so far come from taking pics in my kitchen (it's south facing) on a bright day with the florescent light on as well. That way it's got light coming from many angles so all the details are visible. Then I use photo shop to enhance the colour (ctrl+shift+L selects default levels) cos I'm only using a camera phone.

Re: My first repaint

PostPosted: Tue Jul 07, 2009 10:32 am
by Nightscreech
Your techniques good. An extra step i would recommend to you though is once you've done your initial dry brush find a lighter metal paint and then lightly dry brush again on the most raised areas. This will help create depth and give the illusion of shading.

Black is a tricky one at the moment it looks like it has a matt finish matching your metal dry brushed segments. Grab some nail varnish or paint varnish and go over the black sections with it, excluding the metal finish areas. This will give the black a high gloss look to go with the matt dry brushed metal, giving it a really nice contrasting finish.

Re: My first repaint

PostPosted: Tue Jul 07, 2009 3:53 pm
by Gutter Bunny
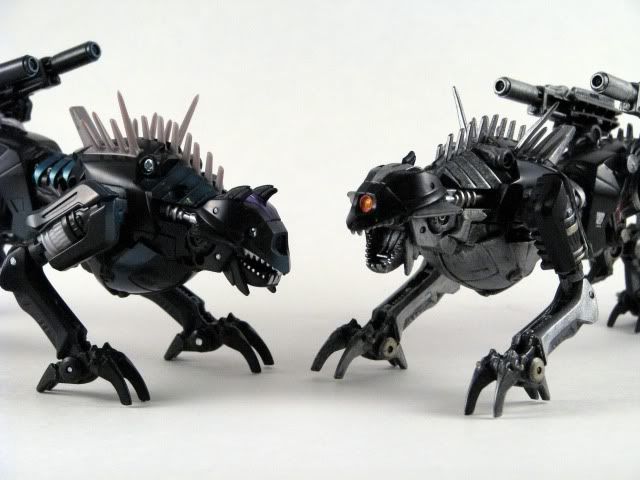
mykltron wrote:That looks nice. It certainly doesn't look like plastic so you've done a good job! The drybrushing looks quite even, rather than some scruffy things I've seen before.


Thank you. I wouldn't be surprised if its just the bad photos making it look better lol

mykltron wrote:It's a shame the pics are so poor. You should borrow a decent camera so you can take photos that are focused, then maybe we can see it well enough to fully appreciate it and maybe give advice. Also, good lighting is important, especially for a figure that is mainly black! My best results so far come from taking pics in my kitchen (it's south facing) on a bright day with the florescent light on as well. That way it's got light coming from many angles so all the details are visible. Then I use photo shop to enhance the colour (ctrl+shift+L selects default levels) cos I'm only using a camera phone.


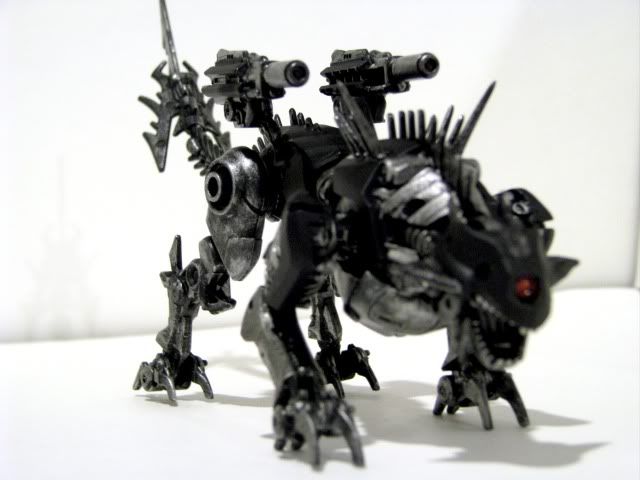
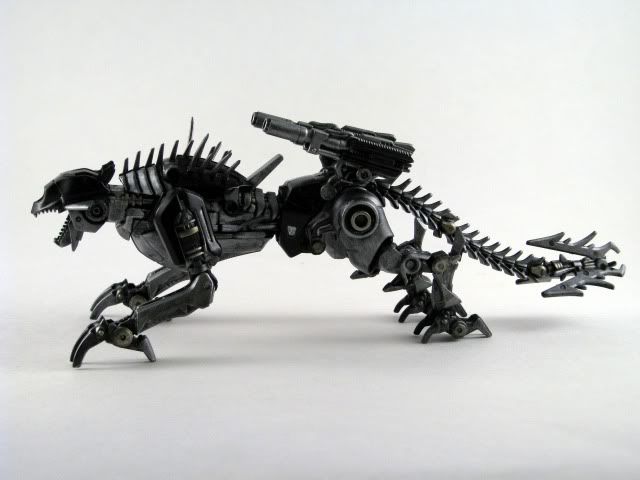
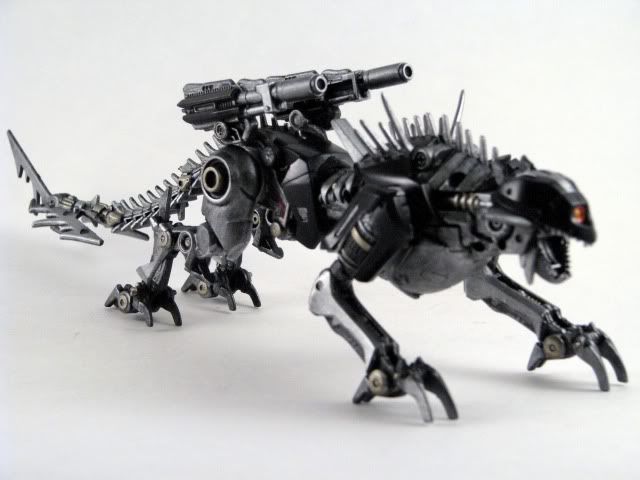
The camera is actually a decent camera, I just have NO photo skills. The lighting was terrible as it was taken in my living room with low watt energy efficient bulbs :-x . I relocated to my garage to try and snap a few photos in better lighting, hopefully it doesn't change your opinion of the figure to much.

Nightscreech wrote:Your techniques good. An extra step i would recommend to you though is once you've done your initial dry brush find a lighter metal paint and then lightly dry brush again on the most raised areas. This will help create depth and give the illusion of shading.


Thank you for the advice. Would mixing a drop or two of white in with the silver create the desired shade? I'm no artist, in fact its been over 15years since i have held a paintbrush.

Nightscreech wrote:Black is a tricky one at the moment it looks like it has a matt finish matching your metal dry brushed segments. Grab some nail varnish or paint varnish and go over the black sections with it, excluding the metal finish areas. This will give the black a high gloss look to go with the matt dry brushed metal, giving it a really nice contrasting finish.


I'll have to consider this. I see what you are saying, but for some reason I LOVE the matte black. I was half(or more)tempted to just spray the figure in black and call it a day :lol:

Re: My first repaint (more photos added)

PostPosted: Tue Jul 07, 2009 5:53 pm
by Mykltron
Instead of glossing the black you could keep the matt-ness of it but make it look more metallic by doing a VERY VERY light silver drybrush over it. All it does is add a touch of metallic sheen as if it's slightly worn. In my oppinion it really adds some life and realism to flat black sections. If you don't like it it won't be hard to black over it. You may be able to see what I'm talking about on Blackout's blades here although you could go even lighter than this. I have a better example of this in something I'm working on now but there aren't any photos yet.

Make sure you're in a well light place, wipe the brush till it's almost clean (I like to drush brush a piece of paper till there's hardly any paint coming off on the paper) then do some delicate brush strokes on the toy.

Oh yeah, now that I can actually see it, my oppinion HAS changed - it's gone UP! It looks better than I thought.

Re: My first repaint

PostPosted: Tue Jul 07, 2009 10:33 pm
by Nightscreech
Gutter Bunny wrote:Thank you for the advice. Would mixing a drop or two of white in with the silver create the desired shade? I'm no artist, in fact its been over 15years since i have held a paintbrush.

I'll have to consider this. I see what you are saying, but for some reason I LOVE the matte black. I was half(or more)tempted to just spray the figure in black and call it a day :lol:


I wouldn't mix white in with your metallics, simply because white is a solid and if you look at your metallic colours they have a base with silver flakes, id recommend mixing in either a lighter metallic paint (make sure you mix the dark into light other wise it wont work)... there is another option if you go over your dry brushed areas with a say a watered down black wash (citadel make a really good one) and let that dry you could then lightly dry brush again using the same metallic, it another nice way of getting depth with limited paints.

Lol, i can understand your love for matt black i was just offering it as a suggestion. If you want to keep the matt black dry lightly dry brushing the edges of the black panels with a medium to dark grey. This will separate the black from the metallics more and make the black pop that much better without going into a gloss.

Re: My first repaint (more photos added)

PostPosted: Wed Jul 08, 2009 3:13 pm
by Jacob P. Galvatron
Very cool.

Re: My first repaint (more photos added)

PostPosted: Thu Jul 09, 2009 4:41 pm
by Gutter Bunny
I haven't made it to the shop to pick up a lighter silver yet, but in the mean time I plan to do some touch ups in some of the sloppier spots(i.e the silver on the head and small patch near the flank).

I'd love to hear more feedback even if it's negative. How else will I improve? If you have negative (or positive...) comments and just don't want to post them for the world to see, feel free to pm them to me.

Re: My first repaint (more photos added)

PostPosted: Thu Jul 09, 2009 5:48 pm
by Skyfire77
Nice job on the Deceptikitty!

You may want to pick up a photo tent (or photo box). A portable one will run about $30-40, and include two additional lights. It really helps with pictures of figures like this.

Re: My first repaint (fail?)

PostPosted: Fri Jul 17, 2009 9:20 am
by Gutter Bunny
well I tried adding a little gold to break up the silver. I also went over the flat black with a gloss back. Unfortunately, I didn't thin either of them enough so I now have a clumpy(gold) brushstroked(black) mess. Soon as the hobby shops open(or my wife goes to sleep...whichever happens last), I'm gonna head out and pick up some sand paper to see if I can repair the damage.

Even If I can't, I had a blast and it was definitely a learning experience.

Hopefully I can repair it enough to show off the final product. And I look forward to doing some more repaints and some kitbashes in the near future.

Re: My first repaint (fail?)

PostPosted: Fri Jul 31, 2009 10:57 am
by Gutter Bunny
well i successfully stripped the botched paint off the figure and now have ravage to about the same point that it was when the most recent pictures were taken.

I've decided it is next to impossible to make this eye look good...the sucker practically repels paint.

anyway, I'm hoping to have time to complete it this weekend and will post pics soon after.

Re: My first repaint (fail?)

PostPosted: Fri Jul 31, 2009 1:53 pm
by trans-fanatic
Huh...wha...YOUR FIRST REPAINT!? :shock: Thats awesome. I need help with my repainting. I tried one time, brushstroke city. I really nead help.

Re: My first repaint (fail?)

PostPosted: Sat Aug 01, 2009 9:22 pm
by Gutter Bunny
trans-fanatic wrote:Huh...wha...YOUR FIRST REPAINT!? :shock: Thats awesome. I need help with my repainting. I tried one time, brushstroke city. I really nead help.


Thanks!

It's actually looking better now. Although black has become the bane of my existence...no matter how thin I make it, it still looks sloppy.

just a few details to finish up and then i'll post pics, regardless of the end result...promise lol

Re: My first repaint (fail?)

PostPosted: Sat Aug 01, 2009 11:59 pm
by Gutter Bunny
wow i must have jinxed myself...

trying to detail and my 15/0 turns out to be a frayed piece of crap...

and then i get a fingerprint on the black that i've worked so hard on.

:-x :sad:

Re: My first repaint (fail?)

PostPosted: Sun Aug 02, 2009 5:52 am
by Mykltron
I don't understand how you can mess up black! What kind of paint are you using?

Two tips:
1) don't use the same brush for different types of paint. You can never clean every particle of paint off and for some reasons the chemicals react and cause the brush to fray.
2) drybrushing is bad for brushes. It causes them to fray. I find a really knackered brush is great for battle damage scuff marks so don't throw them out!

Re: My first repaint (fail?)

PostPosted: Sun Aug 02, 2009 1:30 pm
by Gutter Bunny
Mykltron wrote:I don't understand how you can mess up black! What kind of paint are you using?

Two tips:
1) don't use the same brush for different types of paint. You can never clean every particle of paint off and for some reasons the chemicals react and cause the brush to fray.
2) drybrushing is bad for brushes. It causes them to fray. I find a really knackered brush is great for battle damage scuff marks so don't throw them out!


only I could find a way to screw up black :P

I'm using tamiya acrylics.

The brush was actually battered from the get go. I just didn't look at it close enough before buying. lesson learned.

Re: My first repaint (fail?)

PostPosted: Mon Aug 03, 2009 2:00 am
by Gutter Bunny
Still no masterpiece, but getting better. I think...

Deceptikitty take: Two

Image
Image
Image

and a headshot with "stock" ravage
Image

Re: My first repaint (now with more kitty)

PostPosted: Tue Aug 04, 2009 7:26 am
by Mykltron
It looks great! Although I still think you should do a very light drybrush of bright silver over the black bits to make it looks slightly worn. I did this on silverbolt and you can just about see it best on his legs, although my camera didn't really pick it up.

When you're finished with the kitty, make sure you varnish it with an acryllic varnish. Make sure it's a spray as well - brushing it on will probably 'melt' the drybrushing and smooth it over. As soon as you've sprayed it you can smooth the varnish with a brush but do it within seconds of spraying and do it very delicately. I find sprays don't give an even coat.