Page 28 of 28
Re: Transformers Workshop (Maintenance & Repair)

Posted:
Wed Feb 14, 2018 10:52 pmby Zeedust
Retracted, please ignore
Re: Transformers Workshop (Maintenance & Repair)
Posted:
Tue Feb 20, 2018 8:36 pmby Acesmcgee
how stripped? Sometimes, if the screw is large enough too, you can stick something like a rubber band against the head and then then the screw driver to it and unscrew it that way. Kind of like the potato to a broken bulb thing.
Re: Transformers Workshop (Maintenance & Repair)
Posted:
Thu Feb 22, 2018 8:47 pmby Zeedust
Retracted, please ignore
Re: Transformers Workshop (Maintenance & Repair)
Posted:
Sat Jun 02, 2018 11:28 pmby TF-fan kev777
Does anyone, especially maybe one of the customizers out there, possibly have an extra wheel from the Rook/Swindle/Hound molds? One of the middle wheels of my Impactor popped off and got crushed. Definitely beyond repair. Any of the wheels from the legs of the Rook or Hound/Swindle molds should work and I can silver sharpie the hubcap. I'd have no problem buying a broken figure if that would be easier.
(Please re-direct me if there is a better thread for this)
Re: Transformers Workshop (Maintenance & Repair)
Posted:
Thu Nov 15, 2018 9:01 pmby nycPrime
Sorry not exactly Transformers, but have a toy repair question. My SOC Megazord had a slight fall and the 2 front pieces of the battle mask part came off. Looks like each piece tabs in to another plastic piece and came off as a result of the fall. One side (left in the photo) snaps back in ok while the right side very barely stay on. The slightest pressure and it comes off. I'm thinking of using some glue to secure it in place as I don't see any point in ever having to take those pieces off. Is that a good idea or is there a better product to do the job? Any advice is greatly appreciated.
Re: Transformers Workshop (Maintenance & Repair)
Posted:
Sun Nov 18, 2018 2:54 pmby ZeldaTheSwordsman
Anyone willing to take apart the head and cockpit section of HFTD Leader-class Starscream to show me how they're supposed to go back together?
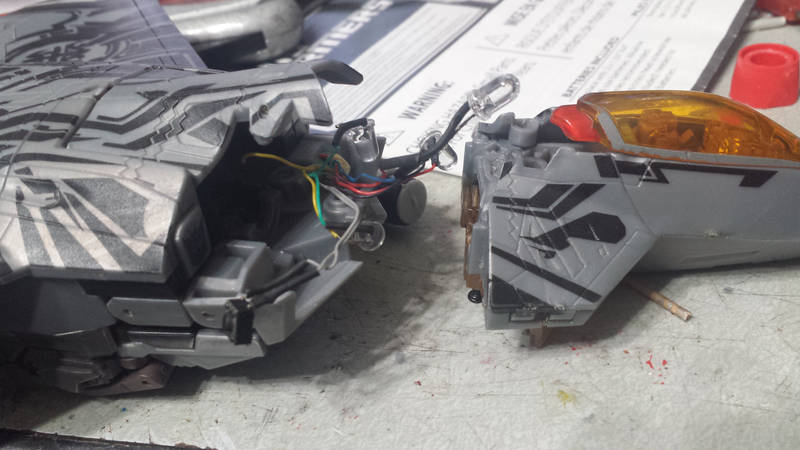
There are 3 LEDs and a button to go back in. But I can only clearly determine spots for 2 LEDs, and it's not certain
which two. Do the button and one LED go in the head?
I bought him headless and partially dismantled on eBay, I wasn't the one to take him apart. That's why I don't know.
Re: Transformers Workshop (Maintenance & Repair)
Posted:
Sat Jan 19, 2019 1:04 pmby kugutsumin

What's the way you guys usually clean off caked on battery acid? The pic is of a 2003 energon Optimus. Any advice appreciated.
Re: Transformers Workshop (Maintenance & Repair)
Posted:
Sat Jan 19, 2019 3:43 pmby Cobotron
I have had success with other toys using a small metal brush and some steel wool to nock the corrosion loose.
Definitely don't use anything wet. Even a tooth pick, or a hobby knife just to scrape the crud off.
Most important is to clean the leads (parts that make contact with the battery) as best you can so the electrolysis doesn't create more corrosion.
Re: Transformers Workshop (Maintenance & Repair)
Posted:
Sat Jan 19, 2019 6:37 pmby kugutsumin
The thing is, it's tough to get down in there behind the springs, and I think the metal brush would scratch up the plastic.
Re: Transformers Workshop (Maintenance & Repair)
Posted:
Mon Jan 21, 2019 10:52 amby Jelze Bunnycat
Well, the first post advised against anything wet, or at the very least anything that could cause further corrosion or short-outs like water, but...
As a somewhat last resort, try table vinegar. That will dissolve and loosen some of the caked on gunk for easier removal. Don't pour it straight on there, use a brush (like an old soft toothbrush) to apply it. Wait for the hissing to stop, remove what you can, lather rinse repeat. I used that technique on an old alarm clock and got it back to work.
Be sure to air out the toy when you're done

Re: Transformers Workshop (Maintenance & Repair)
Posted:
Mon Jan 21, 2019 7:48 pmby kugutsumin
Yeah the vinegar seems to be the best bet. Apparently if it's alkaline batteries you're supposed to use a water and baking soda solution, that just makes a big mess and leaves powder streaks all over the place.
Re: Transformers Workshop (Maintenance & Repair)
Posted:
Mon Jan 21, 2019 10:17 pmby ZeldaTheSwordsman
It may be wet, but a baking soda solution is good for cleaning off battery acid. Do make sure to wipe the parts dry after!
Re: Transformers Workshop (Maintenance & Repair)
Posted:
Tue Jan 22, 2019 7:51 amby Agamemnon
Alkaline is actually a base (or forms one when mixed with water, technically speaking). So, using baking soda with alkaline residue will likely have minimal chemical effect. I suspect it more has to do with baking soda being a fine grained scrubbing solution, sort of like a pumice stone or steel wool. But, baking soda is much less abrasive and will likely damage the plastic much, much less than using something like a steel brush.
Now, acid based batteries (like that which is in your car) will chemically react to baking soda solutions. I'm pretty sure that is why I have seen that recommendation when cleaning car battery leads.
But, for this, the vinegar solution makes a lot of sense. The acid in vinegar should react with the alkaline to help remove the residue. And vinegar is a weak enough acid that there should be little to no risk to the plastic or metal leads.
Let us know how it goes.
(Just call me Mr. Wizard.

)
Re: Transformers Workshop (Maintenance & Repair)
Posted:
Thu Jan 24, 2019 1:31 pmby Jelze Bunnycat
Nice that you're all supporting my suggestion guys... kinda making me blush

Not gonna take all the credit, I got the original idea from another member who owns a Cybertron Metroplex whose batteries exploded inside the weapon. Not a pretty sight. I don't remember who it was, but it should still be on the boards.
:EDIT: It's Overcracker, with this picture:

Re: Transformers Workshop (Maintenance & Repair)
Posted:
Fri Aug 30, 2019 11:48 amby ZeldaTheSwordsman
Word of advice for those of you with Battle Blade Bumblebee: Shave down the inside of his inner chest panel (the one with the Autobot symbol). HasTak failed to make the central channel deep enough to clear Bee's headcrest properly, so it has a tendency to snag on his panel during transformation. This can pull the head off the ball, or even snap his neck. So shave or file down the back of that panel, or at least deepen the central channel so that it works properly.
If your Bee has already fallen victim to this, use a pushpin to drill a hole in the balljoint's stem, and a matching hole in the base of the neck. Then insert a wire reinforcing rod and Krazy Glue them back together
Re: Transformers Workshop (Maintenance & Repair)
Posted:
Fri Aug 30, 2019 2:13 pmby Jelze Bunnycat
ZeldaTheSwordsman wrote:Word of advice for those of you with Battle Blade Bumblebee: Shave down the inside of his inner chest panel (the one with the Autobot symbol). HasTak failed to make the central channel deep enough to clear Bee's headcrest properly, so it has a tendency to snag on his panel during transformation. This can pull the head off the ball, or even snap his neck. So shave or file down the back of that panel, or at least deepen the central channel so that it works properly.
If your Bee has already fallen victim to this, use a pushpin to drill a hole in the balljoint's stem, and a matching hole in the base of the neck. Then insert a wire reinforcing rod and Krazy Glue them back together
O I hear you, I'm very aware of that problem as owner of that mold (I think I took him with me? Gotta check, though all Bumblebee toys look alike in vehicle mode! Gah!

). Haven't that problems with snagging and snapping, probably because I move the head up ever so slightly so it clears the narrow point. Whatever you do, do NOT force the hood down if caught!
Re: Transformers Workshop (Maintenance & Repair)
Posted:
Fri Aug 30, 2019 6:33 pmby ZeldaTheSwordsman
JelZe GoldRabbit wrote:ZeldaTheSwordsman wrote:Word of advice for those of you with Battle Blade Bumblebee: Shave down the inside of his inner chest panel (the one with the Autobot symbol). HasTak failed to make the central channel deep enough to clear Bee's headcrest properly, so it has a tendency to snag on his panel during transformation. This can pull the head off the ball, or even snap his neck. So shave or file down the back of that panel, or at least deepen the central channel so that it works properly.
If your Bee has already fallen victim to this, use a pushpin to drill a hole in the balljoint's stem, and a matching hole in the base of the neck. Then insert a wire reinforcing rod and Krazy Glue them back together
O I hear you, I'm very aware of that problem as owner of that mold (I think I took him with me? Gotta check, though all Bumblebee toys look alike in vehicle mode! Gah!
). Haven't that problems with snagging and snapping, probably because I move the head up ever so slightly so it clears the narrow point. Whatever you do, do NOT force the hood down if caught!
I had my Battle Blade Bumblebee's neck snap this morning.. I wiggled things wrong..
Re: Transformers Workshop (Maintenance & Repair)
Posted:
Thu Sep 05, 2019 12:54 pmby Decepticon Stryker
Just got CW Offroad second hand as part of a lot, and his combiner peg is broken. The smaller square isn't connected. Any ideas on if this can be fixed?
(Figure hasn't arrived yet, I just want to know if theres any thing I can do beforehand)
EDIT: here's the picture the seller posted:
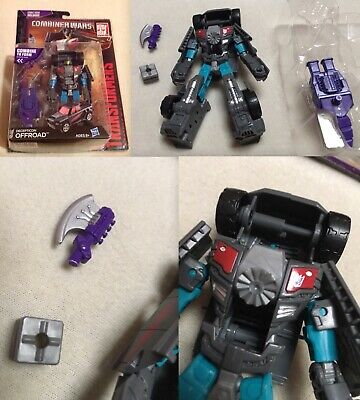
- s-l400.jpg (33.86 KiB) Viewed 212696 times
Re: Transformers Workshop (Maintenance & Repair)
Posted:
Sun Sep 08, 2019 2:38 pmby ZeldaTheSwordsman
It should be fixable, but I can't prescribe an exact fix just from that pic.
Re: Transformers Workshop (Maintenance & Repair)
Posted:
Thu Sep 12, 2019 1:15 pmby Decepticon Stryker
Hoo boy, Offroad arrived yesterday and it definitely isn't a simple fix. The middle part that connects the two main pieces of the combiner peg is sheared off. Offroad might be doomed to never be part of a combiner. Any ideas for a replacement?
Re: Transformers Workshop (Maintenance & Repair)
Posted:
Fri Sep 13, 2019 1:13 amby ZeldaTheSwordsman
Decepticon Stryker wrote:Hoo boy, Offroad arrived yesterday and it definitely isn't a simple fix. The middle part that connects the two main pieces of the combiner peg is sheared off. Offroad might be doomed to never be part of a combiner. Any ideas for a replacement?
Maybe, if you would be so kinda as to provide photos.
Re: Transformers Workshop (Maintenance & Repair)
Posted:
Sun Sep 15, 2019 1:11 pmby Rogue-Primal
I think there is a small problem with my Power Of the Primes Skullgrin. His weapon is claw is showing signs of wear and friction already or could it be close to breaking? His hands are fine but the weapon is a narrow fit
Re: Transformers Workshop (Maintenance & Repair)
Posted:
Sun Sep 15, 2019 1:31 pmby Jelze Bunnycat
Rogue-Primal wrote:I think there is a small problem with my Power Of the Primes Skullgrin. His weapon is claw is showing signs of wear and friction already or could it be close to breaking? His hands are fine but the weapon is a narrow fit
I've looked at my Skullgrin and Bomb-Burst weapons, and I think it's nothing more than a slight stress mark, especially if the peg is still completely straight. Do keep in mind that the peg has two thicknesses, and the mark is on the thicker area where the fit may be tighter. Next time you push it into the hand, stop as soon as you feel the fit tighten.
Re: Transformers Workshop (Maintenance & Repair)
Posted:
Sun Feb 23, 2020 10:18 amby ZeldaTheSwordsman
Years ago I started and abandoned an effort to modify my Cybertron Snarl's (or Fang Wolf, to Galaxy Force hardliners) key gimmick. Now, I want to reconstruct the original mechanism. Would anyone be willing to open up their Snarl's wolf head and take pictures of the works? It's a screwdriver-only job.
Re: Transformers Workshop (Maintenance & Repair)
Posted:
Sat Apr 10, 2021 3:11 amby eepos96
Hello. My cyclonus kingdom is otherwise excelent but its left leg is very stiff and easily falls off. Is there any way I could repair it in my home?
I do not know what part of the cylinder on the thigh I should try to shrink.
 Viewed 99309 times")
- Picture of the problem