This page contains affiliate links. We may earn commissions when readers interact with or purchase items through these links. For more information, see our affiliate disclosures here.

Classics Jazz WIP

Post all your customized Transformers here. Whether it's a small mod or a true kitbash, we'd love to see it!

Classics Jazz WIP

Postby TENIME_art » Mon May 07, 2007 3:18 pm

I've been itching to expand my Classics line, but being a Kitbashing near-virgin, it's made me a little aprehensive. Now, there're still going to be those Classics customs that I won't do, that I'll commission, due to complexity that I don't have talent for, but there will be those that will be so easy, there'd be no reason for me to not attempt it.

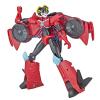
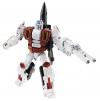
My first idea is an Autobot I've been growing more and more fond of, lately, thanks to his Alternator counterpart. Making him into a Classics figure stumped me for awhile until this morning. I noticed that Bumblebee/Cliffjumper aren't really Volkswagen Beetles, and figured I could use their mold (since so few were made in the Classics line) for other cars, that wouldn't work with Rodimus' (seeing as how there're really only 3 car molds...).

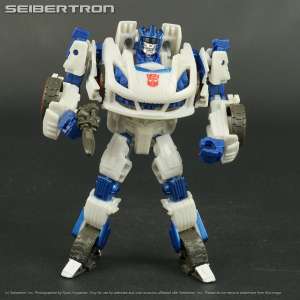
So, to see if my idea would even look decent, I did a digibash.

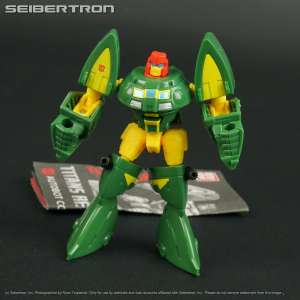
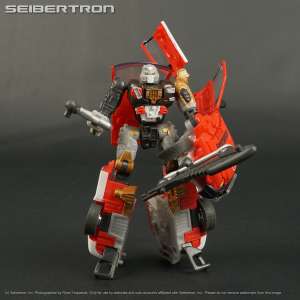
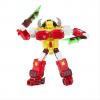
Swap heads with Grimlock, add a strip-styrene nose, paint & Reprolabels (the G1 ones are perfect scale), and you've got Classics Jazz:

Image

Image

I'm keeping a running WIP photo journal for those that also think this is a cool idea, and want to know how I'm doing it.

And, I've already heard it all about how he's not a Porsche, and that I should call him "Meister" (hate that name), and use different stickers. This is how it's going to be. I've already made my choice, and I'm happy with it.

------------------------------------------------------------------------------------
Since I don't have a dremel, know how to use one, or have steady hands, my friend ground down the ridge on 'Bee's roof:
Image

...and the raised portion of the hood:
Image

I'll be using sculpting compound to fill in the holes, though, it only needs to be straight, since the G1 Reprolabels will cover these areas...

I added a small piece of strip styrene to the face:
Image
...now Jazz has a nose!!

Krylon Fusion Satin Black was the paint. Here are the parts:

Image

I need to go out and get a new Bumblebee to replace the forearms I screwed up. They're supposed to be white, not black. Oh, well. I wanted to do a Runabout anyways... (Note: The head did not receive any KF. I still need to spray the red light-piping in the back with it...)

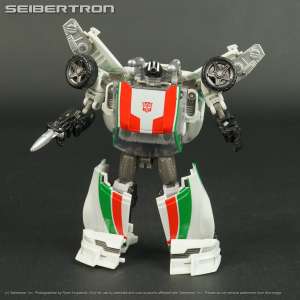
Went over the headlights with Tamiya Clear Blue:

Image

The same that I went over Testor's Model Masters Chrome Silver for the visor. TMM Acrylic Silver (no "chrome") went on the face, and inside the head ridge. The flash really screws up what the head looks like. When the whole figure is finished, I'll take pictures with proper lighting (and no flash!), but for WIP pics, I don't really care! :D

Image
TENIME_art
Fuzor
Posts: 276
Joined: Thu Feb 15, 2007 2:50 pm

Postby DTM » Mon May 07, 2007 3:20 pm

looking good. digibashes tend to get me confused. I think it is the final prduct, lol
DTM
Vehicon
Posts: 357
Joined: Thu Jun 21, 2007 2:42 pm

Postby TENIME_art » Mon May 07, 2007 3:29 pm

Lol...

The lines on the finished product will be straighter, since I'm using stickers...
TENIME_art
Fuzor
Posts: 276
Joined: Thu Feb 15, 2007 2:50 pm

Postby evilratbat » Mon May 07, 2007 4:02 pm

temine if you cut up a bit on the Nose that would be better i think as it seems a little long on second look ignore my comment on tfans the nose need to be cut a little and the rest will work.

For a first bash i am Impressed with the Thoughts gone into this as most people go for the basic repaint of this plane or that plane lol!

great work keep it up
evilratbat
Headmaster
Posts: 1009
News Credits: 1
Joined: Thu Nov 09, 2006 12:31 pm

Postby rhinox555 » Mon May 07, 2007 4:15 pm

So much better than my first bash,can you send me an e-mail on how you took bumblebee apart?
I'm thinking of doing the classics bugbite myself,although i wouldn't mind trying a Jazz as well if it's okay with you.


marius_555@hotmail.com
-Decepticon Rhinox of Transtopia
rhinox555
Transmetal Warrior
Posts: 835
Joined: Sun Jun 17, 2007 10:06 am
Location: Holland

Postby jimsloth » Mon May 07, 2007 4:38 pm

reminds me of the Minibot Cybertron Jazz someone made a while back. I think it was Crazy Steve. He used the original cliffjumper mold to make a Jazz, and so this one with the windshield at the bottom of the chest and hood for feet makes me think of it. And how he looks slightly SD. Really nice Digibash.
till all are one.
Image
jimsloth
Gestalt Team Leader
Posts: 926
Joined: Sat Apr 17, 2004 12:22 am
Location: Pittsburgh -ish

Postby TENIME_art » Mon May 07, 2007 5:03 pm

Thanks, guys.

ERB, I responded on TFans. I'm happy with the head. I'm not taking any steps backwards. I'm moving on. Thank you for your input. Duly noted. *tips hat respectfully*

rhinox555 wrote:So much better than my first bash,can you send me an e-mail on how you took bumblebee apart?
I'm thinking of doing the classics bugbite myself,although i wouldn't mind trying a Jazz as well if it's okay with you.


As long as you cite me as an inspiration, I don't mind at all. I took him apart carefully. Unscrewed all the screws, tapped out all the pins. For most of the pins, I needed an extra hand (so, my girlfriend helped). You hold the figure and the tapping utensil, and your helper holds the hammer. Here's some pics I took: (I figured it'd be easier than writing down what's what)

Image
Image
Image
Image
Image
Image
Image
Image
Image
Image
Image

The inside one is the hardest. After you've tapped it down a bit, you can pry the roof canopy out. Then, tap some more. The way I did it was to tap, then pry. By the time you've pried all out that you can, you've got enough room to just grab the pin with pliers, and yank it the rest of the way out. I haven't removed the door pins yet. I need to find my soldering iron first...
TENIME_art
Fuzor
Posts: 276
Joined: Thu Feb 15, 2007 2:50 pm

Postby Ramrider » Mon May 07, 2007 5:35 pm

That works a hell of a lot better than it should. I can't help thinking the 'horns' should be a little shorter, but it's really looking good so far.
Ramrider
Gestalt
Posts: 2691
Joined: Sun Jul 13, 2003 11:04 am

Postby TENIME_art » Mon May 07, 2007 5:54 pm

Ramrider wrote:That works a hell of a lot better than it should. I can't help thinking the 'horns' should be a little shorter, but it's really looking good so far.


Lol...Thanks.

I had a thought of cutting the ends at an angle, then dremeling into the sides at the base of them, for the ears:

Image

But I'm too happy with the head as it is to risk ruining it, and having to start over. If anyone else wants to try it, please, be my guest!!
TENIME_art
Fuzor
Posts: 276
Joined: Thu Feb 15, 2007 2:50 pm

Postby Ramrider » Mon May 07, 2007 6:05 pm

That's pretty much exactly what I was thinking. It shouldn't be too hard to do, although I'd recommend just using a normal file and taking your time with it. Often I find detail work like that is best done manually.
Ramrider
Gestalt
Posts: 2691
Joined: Sun Jul 13, 2003 11:04 am

Postby Rodimus VTS » Wed May 09, 2007 10:26 pm

Looks good. I have been thinking about making a CL Jazz too but out of C. Smokescreen eventually. I think his transformation is a little closer to G1 Jazz and the vehicle's body style isn't too far off either.
Rodimus VTS
Micromaster
Posts: 87
News Credits: 1
Joined: Sat Feb 24, 2007 6:57 am

Postby TENIME_art » Thu May 10, 2007 3:14 am

I just hate that car & robot. He's fine for Smokescreen (since all I had to do to him was add Reprolabels' stickers), but I don't ever want to buy another one of him. I don't care how far off a KB goes from the G1, I won't ever use that mold.

If you want to, please, by all means, go for it.

I just don't like it.
TENIME_art
Fuzor
Posts: 276
Joined: Thu Feb 15, 2007 2:50 pm

Postby TM Devastator » Thu May 10, 2007 9:29 am

I like how you keep the screws organzied. I'm very sloppy when I take a figure apart. I just put the screws in a pile and put them back wherever they seem to fit. It doesn't always work that way for me though, heh.
Image
TM Devastator
Site Owner
Posts: 755
Joined: Thu Apr 15, 2004 7:31 pm
Location: Western NY

Postby TM Mega-Prime » Thu May 10, 2007 10:52 am

I really like what you are doing here!! I might just be inspired to follow you! :D
"Megatron, is that you?!!"

"Here's a HINT!"....KABOOM!!!
User avatar
TM Mega-Prime
Micromaster
Posts: 94
Joined: Wed Apr 04, 2007 5:50 pm
Location: New Brunswick, Canada

Postby TENIME_art » Thu May 10, 2007 1:23 pm

Thanks! Go for it!

Devastator - What Devastator is that in your avatar? I just got a G1 KO in the mail today ($16 off eBay!! :D), and it's making me really hate the Classics one. I was hoping to KB it to look better, but comparing it to the actual Dev., there's just too much work to be done...I need a good Dev. in scale with my Classics!! *sobs*
TENIME_art
Fuzor
Posts: 276
Joined: Thu Feb 15, 2007 2:50 pm

Postby TM Devastator » Thu May 10, 2007 8:57 pm

TENIME: It's the Devastator I built back in 2004. I won second place (should have been first darnit!) at OTFCC that year.

http://www.tfmaster.com/gallery_kb0033.php

There's the gallery!
Image
TM Devastator
Site Owner
Posts: 755
Joined: Thu Apr 15, 2004 7:31 pm
Location: Western NY

Postby Soundwarp » Thu May 10, 2007 9:57 pm

Looks great mate!
Soundwarp
Micromaster
Posts: 82
News Credits: 3
Joined: Mon Feb 21, 2005 3:23 pm

Postby TENIME_art » Fri May 11, 2007 2:42 am

Shoot, that's amazing!! Too bad he's not bigger, otherwise I'd ask you to make me one!! That's exactly what I want, only in scale with the Classics...Just a hair larger...

(Thank you, Soundwarp!)
TENIME_art
Fuzor
Posts: 276
Joined: Thu Feb 15, 2007 2:50 pm

Postby TM doomtron » Fri May 11, 2007 4:19 pm

wow. jazz was one of my favorites
TM doomtron
Posts: 223
Joined: Sun Jul 10, 2005 5:22 am
Location: j-ville fla

Postby TENIME_art » Wed May 23, 2007 1:09 am

Well, it's been almost 2 weeks. Krylon says Fusion is scratch free in 7 days. So, I hammered the pins back into the seats/kneecaps:

Image

I used Creative Paperclay to even out the hood:

Image

And, I fixed the formerly black forearms and am done with the feet/front end, except for adding the red stripe and redoing the silver grill:

Image
(Krylon Fusion Satin White)
TENIME_art
Fuzor
Posts: 276
Joined: Thu Feb 15, 2007 2:50 pm

Postby TENIME_art » Wed May 23, 2007 1:46 pm

The doors and the backend and spoiler are finished! I painted the back and the spoiler separately, but put them together anyways after it dried, since there won't be any moving parts involved with it. I didn't need the soldering iron after all with the doors...they just popped right off!!

Image

First coat just went on the new, flat hood...I pray the Paperclay holds Krylon well...
TENIME_art
Fuzor
Posts: 276
Joined: Thu Feb 15, 2007 2:50 pm

Postby TM TM2 Dinobot » Wed May 23, 2007 4:54 pm

That is very nice my friend. I am highly impressed!
Image
TM TM2 Dinobot
Fuzor
Posts: 239
Joined: Thu Jun 17, 2004 6:27 pm
Location: Way Down South

Postby Pun-3X » Wed May 23, 2007 7:17 pm

Very nice so far. My first thoughts were neutral--good idea, but nothing that jumped out at me. Seeing it get put together, especially with the head you're using, is changing my mind. Grinding down the scoop and raised part on the hood was a good move, and I'm real curious to see how it all looks assembled.
Pun-3X
Fuzor
Posts: 281
Joined: Sun Jun 29, 2003 5:41 pm

Postby TENIME_art » Thu May 24, 2007 11:57 pm

Thanks, guys!

Image

Red stripes, roof, hood, back of head, grill, and license plate holder (cut the trailer hitch off) are drying. I'll be assembling him in about two weeks (even though Fusion says "7 days").
(Krylon Fusion Red)
TENIME_art
Fuzor
Posts: 276
Joined: Thu Feb 15, 2007 2:50 pm

Postby Ramrider » Fri May 25, 2007 7:09 am

Looking really good so far. The only niggle I have that I can point out is the hood; specifically the scoop. It's looking pretty roughly filled; I'd've thought with the effort going into this, it would've been worth the extra few minutes getting that properly smooth. I usually find it's best to put a little too much in, then file it down to the right size. Although to be honest, you'd have been better off with an epoxy like Milliput; if the clay you used is what I think it is, it's the air-drying stuff, and I'm not sure how well that'd file or sand.
Ramrider
Gestalt
Posts: 2691
Joined: Sun Jul 13, 2003 11:04 am

Next

Return to Customizations

Transformers and More @ The Seibertron Store

Visit our store on eBay
These are affiliate links. We may earn commissions when you purchase items or services through these links.
Visit shop.seibertron.com to buy "Autobot WHEELJACK Transformers Generations Combiner Wars IDW pack-in comic book"
Autobot WHEELJACK ...
Visit shop.seibertron.com to buy "TRANSFORMERS UNIVERSE #3 Marvel Comics 1987 (CA) Trimpe (W) Budiansky 230926U"
TRANSFORMERS UNIVE ...
Visit shop.seibertron.com to buy "TWINFERNO +  DABURU Transformers Titans Return Deluxe complete 2016 231208I"
TWINFERNO + DABUR ...
Visit shop.seibertron.com to buy "JAZZ Transformers Generations Deluxe Fall of Cybertron complete 2012 230920A"
JAZZ Transformers ...
Visit shop.seibertron.com to buy "COSMOS Transformers Titans Return Generations Legends complete+more 2017 230429A"
COSMOS Transformer ...
Visit shop.seibertron.com to buy "CYCLONUS + NIGHTSTICK Transformers Legacy Generations Selects Voyager 2022 New"
CYCLONUS + NIGHTST ...
Visit shop.seibertron.com to buy "Trypticon RAMP (LEFT HIP) Transformers Titans Return part accs 2017 230817D"
Trypticon RAMP (LE ...
Visit shop.seibertron.com to buy "VECTOR PRIME METALHAWK Transformers Power Primes Prime Master POTP 2017 New"
VECTOR PRIME METAL ...
Visit shop.seibertron.com to buy "MAGNIFICUS Transformers Legacy Deluxe Generations Selects Hasbro 2023 New"
MAGNIFICUS Transfo ...
Visit shop.seibertron.com to buy "ANTAGONY Transformers Legacy Generations Selects Voyager 2023 New"
ANTAGONY Transform ...
Visit shop.seibertron.com to buy "WHEELJACK Transformers Generations Deluxe complete Hasbro 2011 230809A"
WHEELJACK Transfor ...
Visit shop.seibertron.com to buy "HUN-GURRR Transformers Generations Power of the Primes Voyager 2018 230903A"
HUN-GURRR Transfor ...
Visit shop.seibertron.com to buy "PROWL Transformers Universe Spy Changer complete Hasbro 2005 230821A"
PROWL Transformers ...
Visit shop.seibertron.com to buy "RATCHET Transformers Universe Deluxe complete Machine Robot Rescue 2003 230830A"
RATCHET Transforme ...
* Price and quantities subject to change. Shipping costs, taxes and other fees not included in cost shown. Refer to listing for current price and availability.
Find the items above and thousands more at the Seibertron Store on eBay
Transformers Podcast: Twincast / Podcast #348 - Uno
Twincast / Podcast #348:
"Uno"
MP3 · iTunes · RSS · View · Discuss · Ask
Posted: Saturday, April 20th, 2024

Featured Products on Amazon.com

These are affiliate links. We may earn commissions when you purchase items or services through these links.
Buy "Transformers Toys Optimus Prime Cyberverse Ultimate Class Action Figure - Repeatable Matrix Mega Shot Action Attack Move - Toys for Kids 6 & Up, 11.5"" on AMAZON
Buy "Transformers: Generations Power of The Primes Legends Class Autobot Tailgate" on AMAZON
Buy "Transformers Studio Series 10 Deluxe Class Movie 1 Autobot Jazz" on AMAZON
Buy "Transformers: Generations Power of the Primes Voyager Class Starscream" on AMAZON
Buy "Transformers Titans Return Repugnus, Dastard, and Solus Prime Prime Master" on AMAZON
Buy "Transformers: Generations Power of The Primes Voyager Class Grimlock" on AMAZON
Buy "Transformers: Generations Power of The Primes Deluxe Class Dinobot Sludge" on AMAZON
Buy "Cyberverse Warrior Class Windblade" on AMAZON
Buy "Transformers Generations Combiner Wars Deluxe Class Air Raid Figure" on AMAZON
Buy "Transformers Generations Combiner Wars Deluxe Class Smokescreen" on AMAZON
Buy "Transformers Generations Titans Return Decepticon Krok and Gatorface" on AMAZON
Buy "Transformers Generations Titans Return Sky Shadow and  Ominus" on AMAZON