
The official Classics Minor Mods Thread.
Posted by REDLINE Mon Jan 08, 2007 7:49 pm

- REDLINE
- Fuzor
- Posts: 229
- Joined: Thu Jul 28, 2005 2:06 am
- Location: Missouri
Posted by James28210 Mon Jan 08, 2007 8:28 pm
I like how you bolded usuallyTramp wrote:From my experience, the rough end is usually flush or slightly raised from the surface of the hole while the smooth end in recessed slightly.
That was my theory also and I dove in with both feet. Unfortunately, one of the flush ones in the elbow was the smooth side...CRACK. Also, there is no consistency. The tail wing pins were in opposite directions...CRACK on one of them...as were the wrists. No damage to the wrists.
No matter. I have determined that the head and cockpit pins are the only ones I HAVE to remove to get the effect I want. I'll write the first one off to experience. I can use him to test paint now.
Thanks Tramp!
- James28210
- Mini-Con
- Posts: 8
- Joined: Sat Jan 06, 2007 1:22 pm
Posted by TFmaster Mon Jan 08, 2007 10:51 pm
James28210 wrote:I like how you bolded usuallyTramp wrote:From my experience, the rough end is usually flush or slightly raised from the surface of the hole while the smooth end in recessed slightly.
That was my theory also and I dove in with both feet. Unfortunately, one of the flush ones in the elbow was the smooth side...CRACK. Also, there is no consistency. The tail wing pins were in opposite directions...CRACK on one of them...as were the wrists. No damage to the wrists.
No matter. I have determined that the head and cockpit pins are the only ones I HAVE to remove to get the effect I want. I'll write the first one off to experience. I can use him to test paint now.
Thanks Tramp!
Well to salvage what you have broke or cracked just go to any Hobby Shop and buy a bottle of Plastic Weld.
Once you let it sit for awhile after putting it back together it's almost better then new and very tightly held. I use it for my Scratchbuilding projects.
As for pin removal in the end it's almost always a guessing game. Sure, sometimes you can tell from the flush side and whatnot but sometimes you can't and just have to take that risk.
Ah, the life of a Kitbasher.
After awhile you'll find ther are always solutions to problems and always a way to fix things. Just ask...almost anyone around here as you can see are willing to help with what they can.
Just play safe. It's messing up your own hands that can be a bit more of a problem and in the end alot more risky. I've drilled my finger to the nuckle, Cut to the bone, resin in the eye...agh...i'm really lucky sometimes that I haven't hurt myself alot worse.
In the end we do it because it's fun and we love it. (Not to mention you'll have something almost noone else has.)
Good luck on your next project. I cross my fingers so that you won't break another one. (I broke my SS Elbow too so your not alone in pin guessing)
TFM
- TFmaster
- Site Moderator
- Posts: 511
- News Credits: 1
- Joined: Thu Jul 22, 2004 12:27 pm
Posted by Palamon Tue Jan 09, 2007 9:41 am
I removed the screws, but the caps on both ends and top are giving me a problem.
As for plastic weld, I agree, it works wonders when joining plastic. Just use it with caution when gluing transparent/translucent plastic; when it dries, it leaves the plastic a bit foggy, plus make sure you don't get some on your fingertip and then touch the plastic, otherwise you will mold your finger print in there. (I know it doesn't apply much to glueing cracked parts, but it just happened to me and I had to vent
- Palamon
- Mini-Con
- Posts: 34
- Joined: Mon Nov 20, 2006 10:33 am
Posted by TFmaster Tue Jan 09, 2007 3:45 pm
Palamon wrote:Does anyone have any tips on how to open up Classic Megatron's Scope without damaging it?
I removed the screws, but the caps on both ends and top are giving me a problem.
As for plastic weld, I agree, it works wonders when joining plastic. Just use it with caution when gluing transparent/translucent plastic; when it dries, it leaves the plastic a bit foggy, plus make sure you don't get some on your fingertip and then touch the plastic, otherwise you will mold your finger print in there. (I know it doesn't apply much to glueing cracked parts, but it just happened to me and I had to vent)
First you need to take the orange cap off. Just use a flat head to pry it up.
Then you need to take the top cap and back cap off. These are a bit harder because they are glued so take the top cap off then the back. I popped mine off with a Butter knife. Then the back cap. This part is really hard to take off. Just seperate the two haves of the scope as much as possible with your hands and wiggle with just a little bit of force up and down untill it breaks aways from the glue. One side will prob pop off before the other but that's ok...then you can just wiggle the other half off.
It takes some time and patience but if you do it right it should be ok.
Oh, and next time questions belong in the Help and How to Sections.
TFM
- TFmaster
- Site Moderator
- Posts: 511
- News Credits: 1
- Joined: Thu Jul 22, 2004 12:27 pm
Posted by Chocobo Assassin Thu Jan 11, 2007 9:36 pm

Just a little something I'd worked on..I didn't like my Sunstorm after a while (the clear coat was getting dirty from handling, and I was sick of the thick paint), so I repainted it as Thundercracker.
I'll take pics with my digicam someday..for now I just used my phone.
- Chocobo Assassin
- Mini-Con
- Posts: 44
- Joined: Fri Jan 14, 2005 3:04 am
- Location: Comfortably resting in Yoko's cleavage (Las Cruces, NM)
Posted by TM doomtron Sat Jan 27, 2007 11:14 am
 the new guns for the airwarrioir clone here came from the energon bruticus combiner feet from the tank. i will add some vehicle pics when they are a little further along.
- TM doomtron
- Posts: 223
- Joined: Sun Jul 10, 2005 6:22 am
- Location: j-ville fla
Posted by TM doomtron Sat Jan 27, 2007 11:14 am
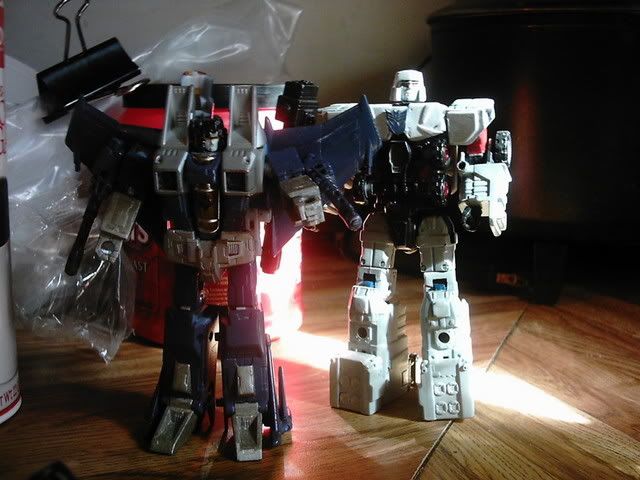
 the seeker is a airwarrior clone i havent wearhered him yet. optimus is the two pack a little knee and helmet changes. and another barricade megatron i am working to make my original one battle damaged and i wanted a clean newer looking one. hello everyone ive been gone for a bit just wanted say hello
- TM doomtron
- Posts: 223
- Joined: Sun Jul 10, 2005 6:22 am
- Location: j-ville fla
Posted by MacrossFA19 Sat Jan 27, 2007 11:28 pm
Nice paints there. I like the dark seeker. What are you calling him?
And what are those guns from exactly?
- MacrossFA19
- Vehicon
- Posts: 300
- News Credits: 4
- Joined: Fri Apr 23, 2004 10:06 am
Posted by jimsloth Sun Jan 28, 2007 12:17 pm
MacrossFA19 wrote:HEY DOOMTRON whats up?!
Nice paints there. I like the dark seeker. What are you calling him?
And what are those guns from exactly?
read.
- jimsloth
- Gestalt Team Leader
- Posts: 926
- Joined: Sat Apr 17, 2004 1:22 am
- Location: Pittsburgh -ish
Posted by MacrossFA19 Sun Jan 28, 2007 4:20 pm
jimsloth wrote:MacrossFA19 wrote:HEY DOOMTRON whats up?!
Nice paints there. I like the dark seeker. What are you calling him?
And what are those guns from exactly?
read.
Brain Fart, thanks.
- MacrossFA19
- Vehicon
- Posts: 300
- News Credits: 4
- Joined: Fri Apr 23, 2004 10:06 am
Posted by REDLINE Tue Jan 30, 2007 3:55 am


- REDLINE
- Fuzor
- Posts: 229
- Joined: Thu Jul 28, 2005 2:06 am
- Location: Missouri

Posted by Tramp Tue Jan 30, 2007 8:49 pm
superquad7 wrote:Mod it for armor!!!!
Either that or build a suit from scratch like I am planning on doing. Post a pic of the trailer so I can see if modding it is feasable. Depending on how your trailer looks, it might be easier to build a new one from scratch.
I like the paint apps on the head. It is unfortunate that in order to give him his proper red eyes, you have to lose the light piping.
- Tramp
Posted by MacrossFA19 Wed Jan 31, 2007 7:54 am
Tramp wrote:superquad7 wrote:Mod it for armor!!!!
Either that or build a suit from scratch like I am planning on doing. Post a pic of the trailer so I can see if modding it is feasable. Depending on how your trailer looks, it might be easier to build a new one from scratch.
I like the paint apps on the head. It is unfortunate that in order to give him his proper red eyes, you have to lose the light piping.
Not true. clear red tamaya or testors paint over the eyes will keep the light piping.
what scale would the trailer for magnus be? I too would like to scratch one up for him. I am one of those who think he isn't magnus without the armor.
- MacrossFA19
- Vehicon
- Posts: 300
- News Credits: 4
- Joined: Fri Apr 23, 2004 10:06 am
Posted by Ramrider Wed Jan 31, 2007 9:22 am
MacrossFA19 wrote:Tramp wrote:I like the paint apps on the head. It is unfortunate that in order to give him his proper red eyes, you have to lose the light piping.
Not true. clear red tamaya or testors paint over the eyes will keep the light piping.
It would keep the light piping, but it wouldn't be red. The clear stuff as is is too deep a blue, so you'd wind up with purple eyes, not red.
- Ramrider
- Gestalt
- Posts: 2691
- Joined: Sun Jul 13, 2003 12:04 pm
Posted by Tramp Wed Jan 31, 2007 1:51 pm
MacrossFA19 wrote:Tramp wrote:superquad7 wrote:Mod it for armor!!!!
Either that or build a suit from scratch like I am planning on doing. Post a pic of the trailer so I can see if modding it is feasable. Depending on how your trailer looks, it might be easier to build a new one from scratch.
I like the paint apps on the head. It is unfortunate that in order to give him his proper red eyes, you have to lose the light piping.
Not true. clear red tamaya or testors paint over the eyes will keep the light piping.
what scale would the trailer for magnus be? I too would like to scratch one up for him. I am one of those who think he isn't magnus without the armor.
Mine will be about 9-10" long in trailer mode and he'll stand about 8" tall in armored robot mode. You can see my design sketches in my Classics Ultra Mangus thread in the Homage Fan Art forum.
- Tramp
Posted by REDLINE Wed Jan 31, 2007 6:14 pm
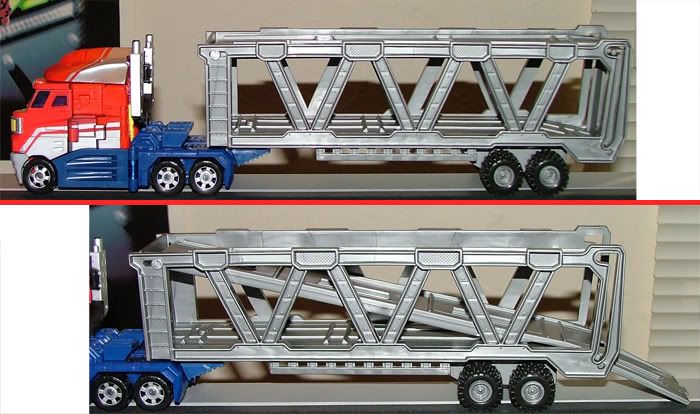
Here's the trailer still in its box, got it at TRU for $6 (came with a diecast tractor and several little cars, notice that one actually looks like wheeljack!)

- REDLINE
- Fuzor
- Posts: 229
- Joined: Thu Jul 28, 2005 2:06 am
- Location: Missouri
Posted by Tramp Wed Jan 31, 2007 6:24 pm
- Tramp
Posted by Tramp Wed Jan 31, 2007 11:13 pm
REDLINE wrote:yeah. If I do it, I'd like to do something similar to Mark's MP Armor I think, if I'm good enough anyway.
Check out the design I have planned over in my thread in the Homage fan art forum. It is similar in execution to Mark's but closer to the G1 armor/trailer as well as updated in the spirit if the Classics line.
Here is the link: http://www.tfmaster.com/forum/viewtopic.php?t=5025&postdays=0&postorder=asc&start=0
The color pic is at the bottom of page one and there are some concept pencil sketches on page two.
- Tramp
Posted by Greyryder Fri Feb 02, 2007 2:01 am

Every bot should have a proper insignia.
- Greyryder
- Vehicon
- Posts: 389
- Joined: Sun Apr 01, 2007 12:01 am
Posted by Tramp Fri Feb 02, 2007 2:21 am
As far as the rims go, leave them silver. It needs that contrast,
- Tramp
Who is online
Registered users: Apple [Bot], Bing [Bot], ChatGPT [Bot], Google [Bot], Google Adsense [Bot], Google Feedfetcher, MSN [Bot], OpenAI [Bot], Yahoo [Bot], Yandex [Bot]