>
>
>

pairadocs design lab - New Custom Bonecrusher!

Post all your customized Transformers here. Whether it's a small mod or a true kitbash, we'd love to see it!

pairadocs design lab - New Custom Bonecrusher!

Postby pairadocs » Mon Aug 27, 2007 2:17 pm

Another new one from the lab this week - this time, one I've had on the bench off and on, deciding the best direction I wanted to take it. Alas, we have Bonecrusher!

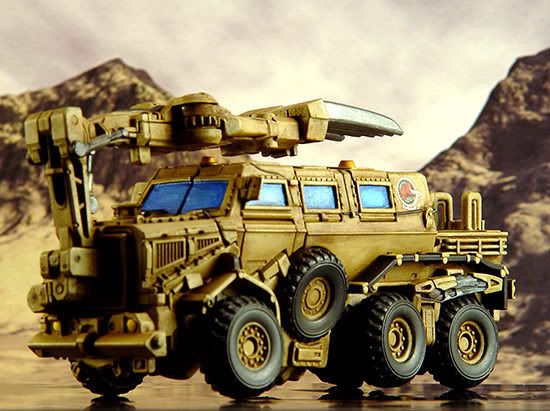
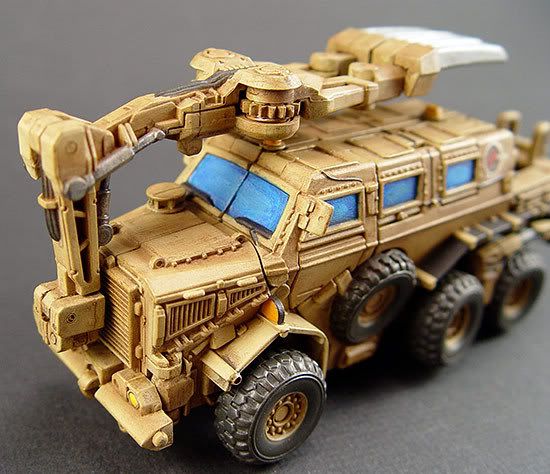
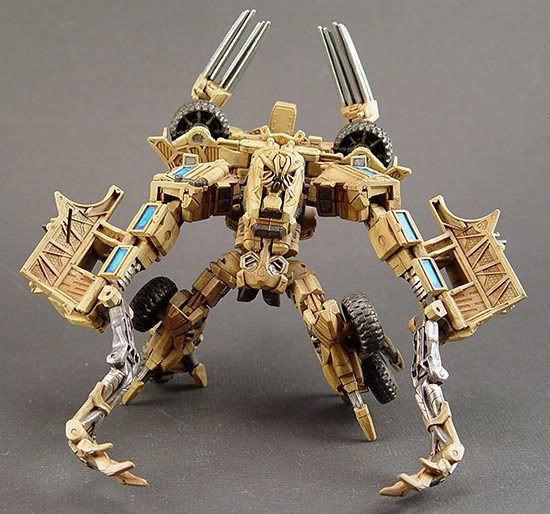
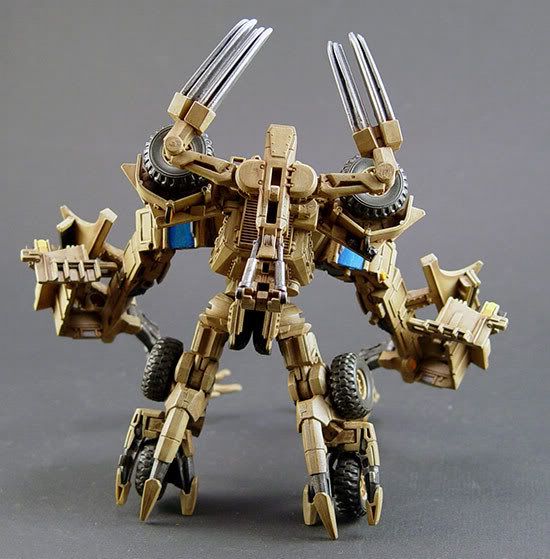
I started off intending to make him just like the movie version, with a nice clean paint app... as if the Minesweeper vehicle drove fresh off the "lot," so to speak. I did that, and then thought he looked too boring. I started with some subtle brown washes to pop out some detail... and it still wasn't doing it for me. So, using the technique I did for my Blackout, I whipped out the artist pastels, and scraped up a dust blend of medium brown, with some nice ochre and yellow for "pop" color, then liberally applied it to Bonecrusher. The result? I think he looks a heck of a lot more "weathered," and it brought some more dpeth into the details. I think this achieves a more "organic" effect (something I think the factory paint apps are lacking when it comes to bringing these "alive.") I went it afterwards and added in some fine-line detailing (fine tuned brown washes, and some lining with a .005 Micron pen in the face, etc.) His eyes were painted black, then white blended pupils, then a transparent gloss red overcoat (which was hard to capture on the camera.)

The robot portions are actually several muted metallics, but you can't really see many of the color differentiations in the pictures... the light sort of outputs a general metallic sheen to them all.

I love to hear your feedback, positive and negative!

Thanks for looking everyone!

Image

Image

Image

Image

Image

Image

Image

Image


You can find him on ebay here: http://cgi.ebay.com/ws/eBayISAPI.dll?ViewItem&item=320152204663
pairadocs
Mini-Con
Posts: 32
Joined: Wed Aug 08, 2007 1:59 pm

Postby Tramp » Mon Aug 27, 2007 3:39 pm

Very, very nice, The metal Ogre is back and standing tall (or hunched over :grin: ) Great work.
Tramp

Postby Moonbase2 » Mon Aug 27, 2007 4:04 pm

He's so ugly he's cute. His face looks like one of those cats with the squished-in noses. Great job on the paint.
Image
Moonbase2
Godmaster
Posts: 1989
News Credits: 2
Joined: Sat Jul 14, 2007 8:05 pm

Postby Skowl » Mon Aug 27, 2007 4:09 pm

Beautiful detailing! Really nice job on the head, that must have been a bitch to paint!

Hooray for movie-accuracy!
User avatar
Skowl
City Commander
Posts: 3081
News Credits: 665
Joined: Wed Oct 27, 2004 6:20 am

Postby Great Atlas » Mon Aug 27, 2007 4:29 pm

Motto: "Don't worry, I got it all under control"
Weapon: Twin Swords
Very Nice!!
User avatar
Great Atlas
Headmaster Jr
Posts: 549
Joined: Mon Sep 05, 2005 1:01 pm
Strength: 9
Intelligence: 10+
Speed: 7
Endurance: 7
Rank: ???
Courage: 8
Firepower: 8
Skill: 9

Postby Sonray » Mon Aug 27, 2007 4:32 pm

Awesome job! How did you personally get around the problem of the paint chipping on the automorph sections and regular joints?
Sonray
City Commander
Posts: 3521
Joined: Tue May 08, 2007 5:42 pm

Postby pairadocs » Mon Aug 27, 2007 5:36 pm

Thanks guys!

Yeah, Bone is definitely one of those faces that's so ugly, but you can't help but like it... like a Bulldog (which I think he's modeled loosely after.) A bitch to paint? Not too bad actually... I have small brushes. :)

Sonray - to get around the chipping thing, there's many tricks... usually I go with the "superglue trick" where you apply superglue with a toothpick over painted sections, being careful not get it in joints... but that wasn't necessary with Bonecrusher. He's got multiple coats of dull coat finish that seals him good. I used THIN layers of Testors Acryl paint (which bonds nicely to this plastic) and after dried, I gave it a flash coat (a QUICK overspray.) Then I did some weathering, another flash coat. Some more weathering, another flash coat. The flash coats seal the pastel dust (that I weather with) in place, and further help protect the painted areas as well.

They key is ALWAYS several thin coats... NEVER thick coats. Thick coats of paint will scrape off if you even so much as look at them funny.

Another great trick on joints that move a whole heck of a lot... you don't paint them. :) Simple enough, eh? You just make sure the SURROUNDING areas are the same, or darn near the same color so you never even notice. There's a few tan joints in there that I never touched with paint... but you can't see them in either truck or robot form.

Think of it as the "More Than Meets the Eye" method... ;)
pairadocs
Mini-Con
Posts: 32
Joined: Wed Aug 08, 2007 1:59 pm

Postby Sonray » Mon Aug 27, 2007 6:07 pm

pairadocs wrote:Thanks guys!

Yeah, Bone is definitely one of those faces that's so ugly, but you can't help but like it... like a Bulldog (which I think he's modeled loosely after.) A bitch to paint? Not too bad actually... I have small brushes. :)

Sonray - to get around the chipping thing, there's many tricks... usually I go with the "superglue trick" where you apply superglue with a toothpick over painted sections, being careful not get it in joints... but that wasn't necessary with Bonecrusher. He's got multiple coats of dull coat finish that seals him good. I used THIN layers of Testors Acryl paint (which bonds nicely to this plastic) and after dried, I gave it a flash coat (a QUICK overspray.) Then I did some weathering, another flash coat. Some more weathering, another flash coat. The flash coats seal the pastel dust (that I weather with) in place, and further help protect the painted areas as well.

They key is ALWAYS several thin coats... NEVER thick coats. Thick coats of paint will scrape off if you even so much as look at them funny.

Another great trick on joints that move a whole heck of a lot... you don't paint them. :) Simple enough, eh? You just make sure the SURROUNDING areas are the same, or darn near the same color so you never even notice. There's a few tan joints in there that I never touched with paint... but you can't see them in either truck or robot form.

Think of it as the "More Than Meets the Eye" method... ;)


I try to use thin coats but with tamiya paints, especially red, they dont seem to cover well unless you put on 3 coats, if you put on really thin coats your looking at 4 or 5!

Superglue method huh? Cool...glad im doing something right. lol
Sonray
City Commander
Posts: 3521
Joined: Tue May 08, 2007 5:42 pm

Postby Sherade » Mon Aug 27, 2007 6:46 pm

Sweet.
I only wish you made a head that can detach and clip wires to, so you can decapitate him and cook up his walnut head.
Seriously, great paint you got going. Especially the tires and windows. Real lookin. Nice. :grin:
Image
previousPrime wrote:The clock guy has impressive testicles.
Sherade
City Commander
Posts: 3426
News Credits: 1
Joined: Fri Oct 06, 2006 7:09 pm
Location: Baltimore, MD, USA

Postby pairadocs » Sat Sep 01, 2007 9:52 pm

Sherade wrote:Sweet.
I only wish you made a head that can detach and clip wires to, so you can decapitate him and cook up his walnut head.
Seriously, great paint you got going. Especially the tires and windows. Real lookin. Nice. :grin:


Thought of that, but I like him "pre-skewered" ;)

Thanks again everyone!
pairadocs
Mini-Con
Posts: 32
Joined: Wed Aug 08, 2007 1:59 pm

Postby Tom_Servo » Sat Sep 01, 2007 10:36 pm

Really nice paint job you've done there. It feels a little besides the point to crit him though, seeing as I've already spotted him on ebay. ;)
But the bright blue windows strike me as a little happy-looking for a blood-thirsty mechanical monster.
Image
Tom_Servo
Headmaster Jr
Posts: 502
Joined: Sun Sep 03, 2006 8:21 am

Postby pairadocs » Sat Sep 01, 2007 10:58 pm

That's a great point Tom... and I contemplated nixing them as well (I know it came with that color window too.)

So I went out looking for reference art, to see the original vehicle from the movie... and in my head, I was convinced they were tinted black. Turns out, the real vehicle has clear blue tinted windows!

I wanted movie-accuracy on this one, so I went with the blue. It grew on me though.

I think if I did it again, and didn't go for the accuracy aspect, I totally would do black windows. Heck, I'd even do it an army green...

hmmm...
pairadocs
Mini-Con
Posts: 32
Joined: Wed Aug 08, 2007 1:59 pm


Return to Customizations

Patreon
Charge Our Energon Reserves. Join the Seibertron Elite.
Support SEIBERTRON™