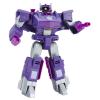
MP-05 Masterpiece Megatron/Upgrade Kit Review (warning, pictures and lots of words.)
This is, by far, one of the best TransFormer figures ever made. *EVAR* He's definitely better than Masterpiece Starscream (and I loooove 'Screamer.) and he's definitely better than Convoy/20th/DVD Prime. He's intricate, he's massive, he's heavily detailed, and he looks very much like his cartoon counterpart. (Not perfect, of course.)
He's just...wow.
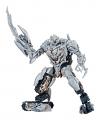
Megatron Robot Mode
Pros:
Details, details, details. It's like they grabbed the cartoon model, and pulled him right out of the screen. (with leg modifications of course.) The torso design, colors, all of it screams "cartoon come to life"
The fusion cannon lights up and makes it seem like he could blast a hole through Prime, that's about the size of Texas. (BIG cannon. BEEEG.)
His hands are fully articulated with poseable fingers and thumbs, a pivoting wrist, and *gasp!* the surprising part is...whatever accessory you shove in his hand (pistol, sword) ....he'll actually HOLD it! Unlike Prime and Starscream (The Butterfinger Brothers), Megatron actually succeeds at being able to utilize his weapons.
His mace looks great when attached to his arm, and comes with a reeeally long chain. If it were real, he could take down a brick wall with it. It's a big ol' spikey ball of doom.
His face doesn't quite have the classic Megatron grimace, but it comes darn close.
Without the cannon, he can make some really great poses and looks dynamic and triumphant. (With the cannon, he'll fold over like a drunk on St. Patty's Day. Although, there's a work around for that, mentioned waaaay below.)
Cons:
The leg design makes for an interesting situation. If you bump him, the panels come loose sometimes, and then others, the legs are rock solid. I guess it depends on how you do it, and whether or not it's done just right.
He is overly light. A lot lighter than you'd expect. However, light doesn't absolutely mean "Fragile, breakable, cheap". (I recommend the upgrade kit. The metal legs do add some weight to him and makes him nice and solid.
Overall: Fantastic robot mode, one of the most impressive.
A solid

---------------------------------------------------------------------------
Transformation
Uh...I'm not even going to try and describe this one. It's definitely a hands on type of thing. Trust me, you have to experience it for yourself to even grasp it.
Pros: One of the most innovative twist and flip transformations we've ever had.
Cons: A lot of kibble and panels to fiddle with and move out of the way of other pieces, which can be difficult, depending on how you're holding him. (This is where broken tabs can come into play.)
Overall: Intricate, difficult, and 110% satisfying. Impressive.
A solid
---------------------------------------------------------------------------
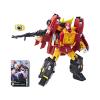
Gun/alt mode
Pros:
Looks fantastic! Looks fantastic with or without the upgrade kit. Looks so real (minus the Decepticon symbol) even has a moving lock lever! (I think it's a lock, isn't it? I don't know much about guns, so feel free to correct me if I'm wrong on this.)
Even has a loop for attaching to one's belt, on the butt of the gun. (NOTE: It's not glued in place and can pop off. So don't actually try and strap it to your body, people. Not to mention, a cop will hurt you for carrying it in public. lol

)
The details are just fantastic. I can't even think of enough words to explain him.
Cons:
He's way too big. (Granted, it's due to the fact that it must contain his robotic innards, and believe me...there's a quite a bit of robot inside of that gun.)
Overall: A terrific alt mode, with or without the upgrade kit.
A solid
---------------------------------------------------------------------------
Accessories
Pistol*
Energon Saber**
Energy Mace***
Kremzeek****
*= You might say, "Why would a guy with an alt mode of a gun, carry a gun?" Well, you must have forgotten about the original movie or never saw it. He used it to deliver the final deadly blows to Prime before he died. A perfect plasticized copy of the animation model.
**= Also a perfect plasticized copy of the animation model. And going with Takara's track run of show/movie accuracy...the blade comes out so all you see is the handle. (I think Megatron held it like that for what...all of twenty seconds? Yeah...that's. Wow.)
***= Not quite like the animation model, but an excellent facsimile, and the chain is nice and long.
****= I didn't receive him with mine (bought mine used) but there's not much to say....he's a glob of translucent yellow plastic with painted details. Eh...pass.
Overall: His essential accessories, finely reproduced and lovingly crafted.
A solid
---------------------------------------------------------------------------
Overall: Megatron is an intricate design, and some care will be needed during transformation, but he's definitely one of the best figures ever. I highly recommend him to an insane degree and I swear you'll be glad you bought this guy. He's friggin' incredible!
A SUPER solid
---------------------------------------------------------------------------
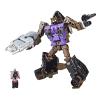
MP-05 Upgrade Kit by Justitoys
Pros:
An excellent reproduction of the original accesories set, all of the original details have been retained for the upsize, with new ones added in.
Die-Cast Metal in the base of the stock (hefty!)
Die-Cast Metal replacement leg panel pieces (doubly hefty)
And like his Microman/G1 counterpart, the kit can do all of the weapon combinations as well.
A.) Particle Beam Cannon (the one Megatron stands behind, used in MTMTE part 3)
B.) Telescopic Laser Cannon (shoulder mounted mega blaster)
C.) And the cannon that that the Micromen figures could sit on and use. (I have no idea what it's called, someone help?)
A, B and C all fire pellets (like the reissue Megatrons do) and these are BIG pellets. Pretty strong spring too! Problem is, it's hard to get it loaded just right due to the design of the upsize, but once loaded correctly...that sucker will fly across the room. With a thud.
Cons:
The aforementioned pellet loading problem.
The leg panels have the connector for the stock to attach, problem is...the plates aren't permanently affixed. They'll slide right off of the figure when you pull the stock off. A small dab of Super Glue should hold those plates on, though. (Thing is, when it first happens, you freak out, you think something just broke...and it hasn't. Whew!)
The silencer puts some weight on Megatron's barrel, which I fear could lead to problems later on down the road. Breakage? I doubt it. Loosen up? Yeah.
The size. He's gotta be close to (if not a little over) three feet when completed! THREE FEET! (Trying displaying that in alt mode...geez.)
Overall:
Justitoys did their homework and faithfully reproduced the silencer and stock of the original as perfect as they could get it.
It's solid, it's sturdy and it's HEAVY. Megatron looks fantastic with it and it definitely completes the whole package. A worthy purchase.
A solid
---------------------------------------------------------------------------
Now, some important points to cover:
I can't speak for others, but I can tell you that Megatron's not as difficult or worrisome as some would have you believe.
I'll go over a list of fragile points and tell you how to carefully avoid them. (NOTE: Pictures from Remy's collection will be used, they are the property of him, folks. I also used some pictures from Invincible Robot Factory. I modified them to point out the potential trouble spots.)
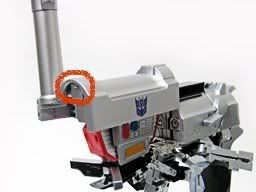
First picture, Megatron from the front:
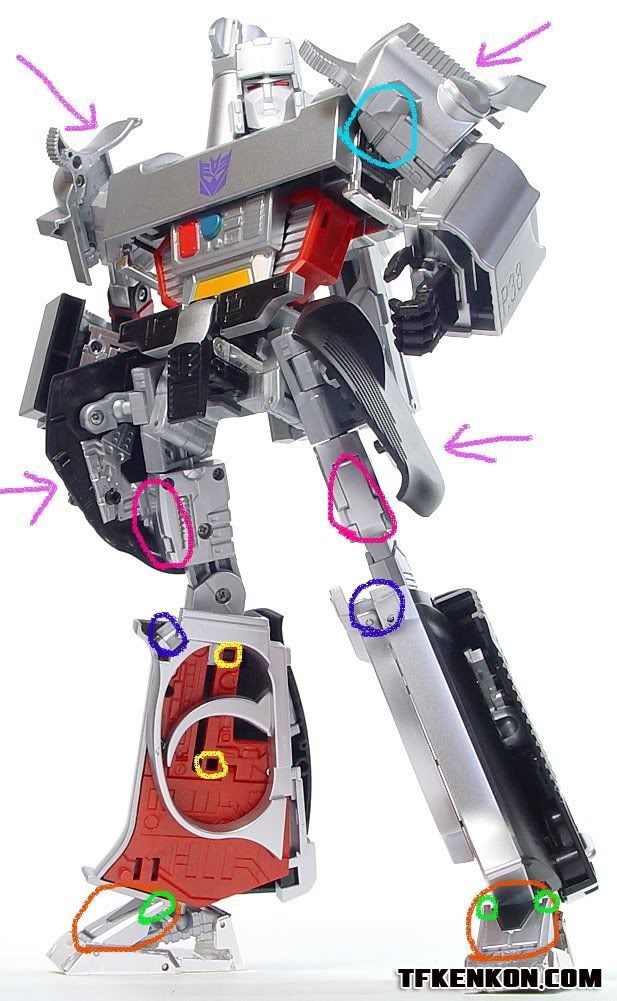
1.) Pink arrows point to panels that are connected via ball joint. These come off easily and should be removed during the first transformation. (Once transformed, they'll pop right back on. These are mentioned because they're a hindrance and you have to learn the core robot first and foremost. Once you've got the hang of it, those panels will be no problem.)
2.) The blue circled part is the arm connector/shoulder/ratchet. There is a tab that holds the arms in that's just a tad too big and makes it quite difficult to remove his arms, perhaps to the point of breakage if you're not careful. Carefully shave off some of the tab (shown in the third pic) but not all of it. Use a set of nail clippers and literally just trim a little (I must emphasize little) plastic off of the tab, but not the entire tab (because the arm won't stay in place if you do.) If you trim the tab just enough, the arms will lock in place and disconnect with ease and no stress on the arms. It's literally just enough to hold him rock solid without breaking him.
3.) The thigh panels circled in red/magenta could break easily because they'll swing up like a car hood, and when you collapse the leg in on itself to create the butt of the gun, they could get caught on the surrounding black and red plastic of the legs and snap off. Just make sure they're lined up just right (guide it by finger if need be) and they'll slide in just fine without any problem.
4.) The releases circled in yellow are held in place by a strong spring, plus the assembly of the legs has a lot of tight space for everything to work in. I recommend sticking a toothpick, or Jeweler's Screwdriver into them to depress the spring with one hand, and start pushing the top half of the leg down with the other hand. Once you've made it past the notch, you'll be able to remove the tool and the leg will slide easily the rest of the way. (I recommend this tactic for robot to gun, and vice versa.)
5.) The hinges circled in blue could break easily, so follow this method: 1.) Pull the trigger from the leg and straighten it out towards the the other leg. 2.) With the trigger straight out, swing the rest of the hinge up in place. Don't swing it from the back hinge and then move the trigger, because that could lead to breakage. You'll see what I mean once you try it.
6.) The panels on his feet (circled in orange) can be swung up under the leg to give more support and stability so he'll stand up straight. (This is especially useful for when his cannon is attached to his arm. It's so heavy, he will topple over. Those panels will help avoid that.) The tabs circled in green should be sitting on either side of the leg when you pull the panel up. If those tabs aren't on the sides of the legs, he won't have stability, and might even break. (NOTE: His ankle is balljointed and you can do some dynamic poses (so long as you don't have the cannon attached) and if you wish to pose, close those panels down so they're not in the way.
Second picture, Megatron from the back:
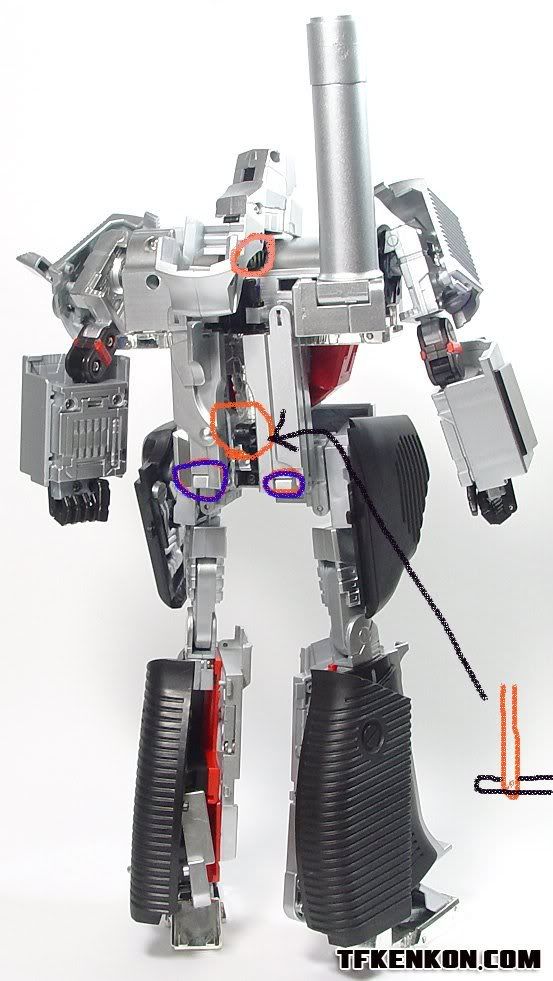
1.) The pink/orangish circle shows a piece of his spine (I know, it's hard to see, but you'll see it in hand) that attaches his head to the rest of the body. The black bar snaps into the back of the chest to hold the head/neck in place. On the sides of that bar, you'll see small nubs of plastic (these are the pieces that hold it in place) and you'll instantly notice that they're too big. They don't look it, but believe me...when you're pulling that head away and you have to *yank* it because it's so tight...you'll see. Take a nail file (or any file) or sandpaper and carefully and gently sand those nubs down. Just enough that his head will hold in place, but easily removable with no stress.
2.) The orange circled piece with the black arrow pointing to it, shows a part of the spine assembly. This part you *must* be careful with. In the crude picture I added, you can see the orange part (the spine) running vertically, and it slides backward and forward along the black part. The spine is die-cast metal. The black piece is plastic. Thick plastic, but still breakable if given enough stress. Hold Megatron by the crotch with one hand, and with the other hand, put your fingers on the sides of the die-cast piece (where the pin runs through) and carefully pull it back straight 'til it stops. (you'll feel it stop, don't make it go any further) Don't push or pull at it in an angle, no wiggling back and forth, just pull it straight back. (Use this handling method for transformation, both ways.)
3.) The parts circled in blue are very tight hinges on the same order as Masterpiece Starscream's wings. (which have been breaking) just sand down the catch spots, just enough to allow free movement, and you won't have to worry about the hinges causing breakage.
Third picture, Megatron in mid-transformation:
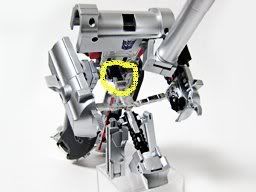
1.) The yellow circled part will show you the spine piece I mentioned.
Fourth and fifth picture, Megatron's shoulder and tab:
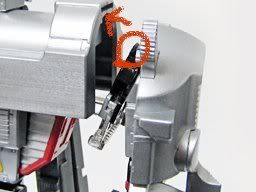
1.) The red circle and arrow shows how it works. As you can see, the tab is excessively large, and it has to slide in and out, under the silver area that the arrow is pointing to.
2.) The square piece (circled in red where the barrel is swung back from the chest, you can see it, barely) holds the arm in place, along with the tab. So you can't slide down on the arm to get it to release. You have to wiggle it so the tab will clear and you can pop off of that square piece. This is why I say trim the tab. That way it'll still sit on the square and the tab will hold it in.
Not pictured:
On the legs, you'll notice everything is extremely tight, which is fine and all...but you're going to be transforming this guy and you want him moving fluidly. Simply loosen the screws on the knees and hips (under the side waist panels) a little bit. Not enough to remove the leg of course, but with that extra little bit of play, the joints will still hold a pose, and he'll move easily without fear of breakage.
I realize my modifications may sound excessive or too risky, but they're easier done than said. (Yes, I worded that correctly.) You might say "Well that's a lot of crap to go through just to enjoy a collectible" well, yeah, I guess...but it only takes a couple of hours to do everything needed, and once it's done...you can fully enjoy him for hours on end. Isn't it worth a tiny bit of your time just to make him better? I'd say so.
Just be careful, and he'll be one of the best pieces of your collection. (He's definitely leaps and bounds better than 'Screamer.)
Hope this helps!

NOTE: Realize that I am not a perfect Christian, nor do I profess to be. I apologize if anyone's ever offended by me, I'm not perfect. Don't hold my posts and opinions against other Christians.


 [ Click to attempt signal recovery... ]