This page contains affiliate links. We may earn commissions when readers interact with or purchase items through these links. For more information, see our affiliate disclosures here.

Alternator Bumblebee

Post all your customized Transformers here. Whether it's a small mod or a true kitbash, we'd love to see it!

Alternator Bumblebee

Postby Captain Crooks » Thu Oct 12, 2006 6:31 am

Okeeeey, well, now that i'm in the right place, i will start giving you some work in progress reports on my first Transformers custom project - an Alternators Bumblebee, made using a die-cast 1:24 New VW Beetle model and a couple of 1:144 Gundam kits - and styrene, copper tubing, and pretty much whatever else is lying around!

The tools i have used so far are a jeweller's saw, a scalpel, and some different sized files. I needed a screwdriver to pull apart the car model as well, as it was one of those Burago display models, not a hobby kit.

I didn't make much of a plan, but i can provide one if folks are interested enough. I basically stared at the car model for about 3 days, formed an idea of sorts in my mind, and then, last Friday night, started cutting with the jewellry saw. Once i had all the basic pieces all laid out, I started in on the gundam parts, and after a lot of cutting, glueing, trimming and cursing, made some trial arms and legs, and for reference purposes, i've been using a gundam torso as a stand-in for the head, which will probably be made last.

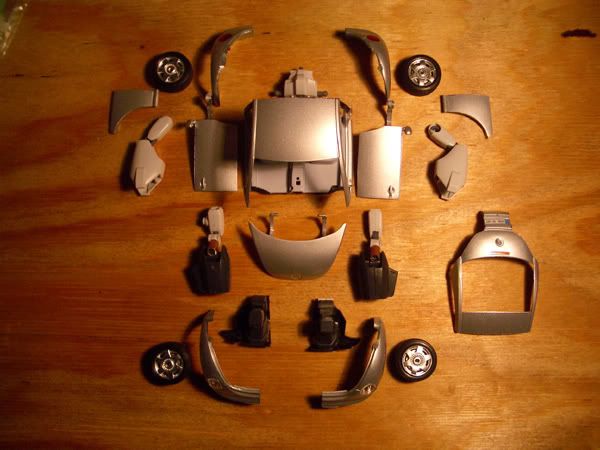
All the pieces arranged here give a rough idea of how i am putting him together...
Image


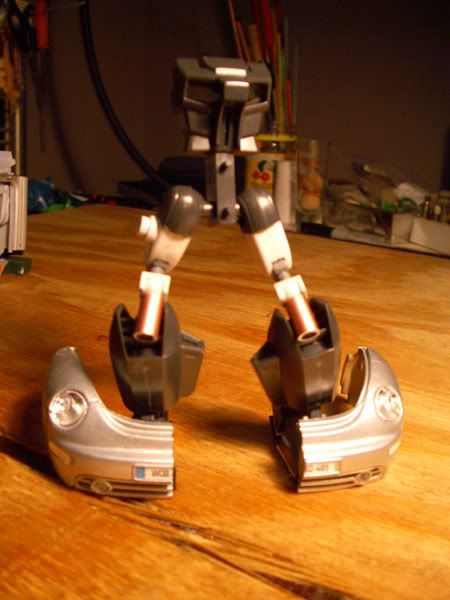
This post, i will be concentrating on the leg assembly.

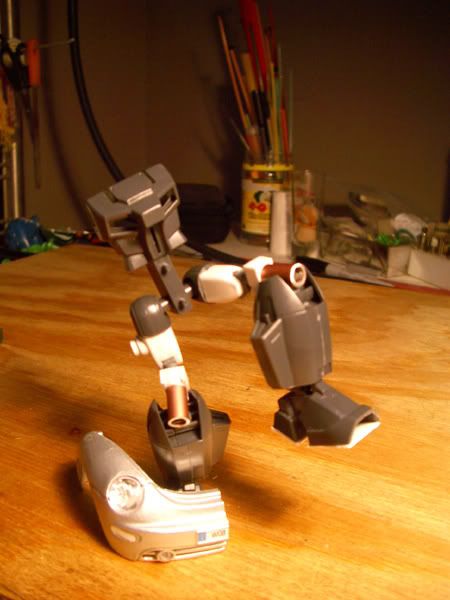
The legs are made of gundam parts from 2 kits, heavily trimmed and modified. The feet are cut down gundam ones attached to the floor of the car model, which in turn will be glued into BB's 'shoes', which are the front of the car. I was going to saw through the bonnet too, but i thought it would look better without the bonnet attached there, so it will actually pivot on the waist and hang off the back like an armoured 'skirt', a little like samurai armour or something. I originally intended to have the car doors swing down at the sides to have the skirt continued all the way round, but the torso looked a bit hollow without them attached, and it spoiled the G1 look im trying to preserve...

The knee joint needed to be quite strong, so i made it using plastic parts which have been locked in place with two short lengths of copper tubing. The tubing has been more or less filled with 2-part epoxy glue, and will act as a mount for some 'knee-pads' later on - they will probably have to be incorporated into the dashboard also!

the waist is not finished yet - as you can see, it started life as a gundam torso and lower waist, and the upper part will be trimmed extensively and made to slide out of the main passenger compartment of the car, where it will then be able to swivel. Pushing it in locks the hips to make the car mode more solid (and helps with space, because there isnt much room under that little bonnet!).
Image

The legs have several joints made using 'polycaps' from the gundam figures - at this stage, im not sure whether they will be strong enough to hold the weight of the car - maybe someone has tried this already, and can suggest something better?

Anyway, the joints make the legs quite poseable, although i dont know how many sweet moves Bumbles will be able to pull off when fully assembled...
Image

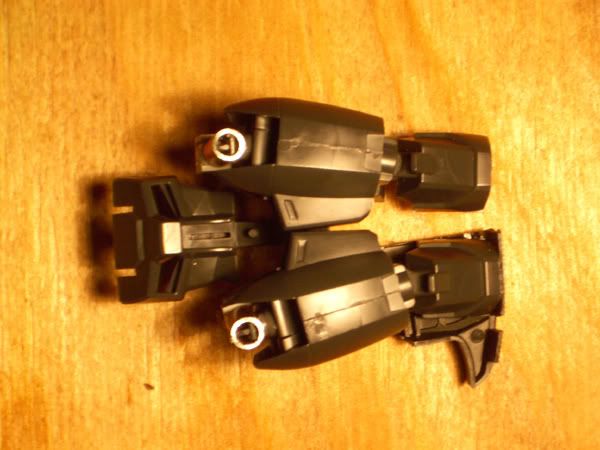
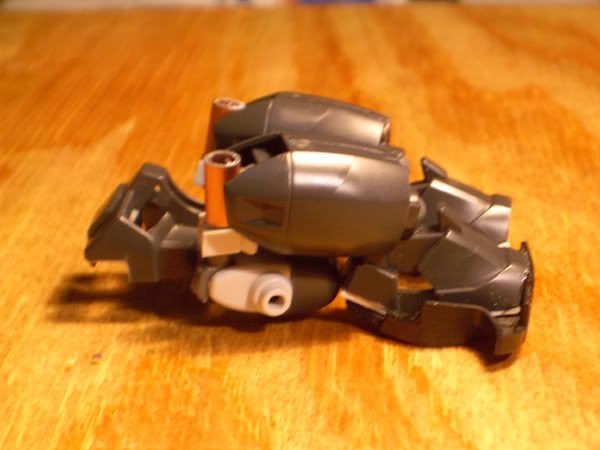
The legs fold down into the 'shoes' and the upper thighs actually wind up under the lower shins - with the hip joint in the middle. The large calves/shins are placed far enough back in ALT mode that there is still room to fit the engine top - which means i can convert it into a gun like the other ALTS. Cool!
Image

Image

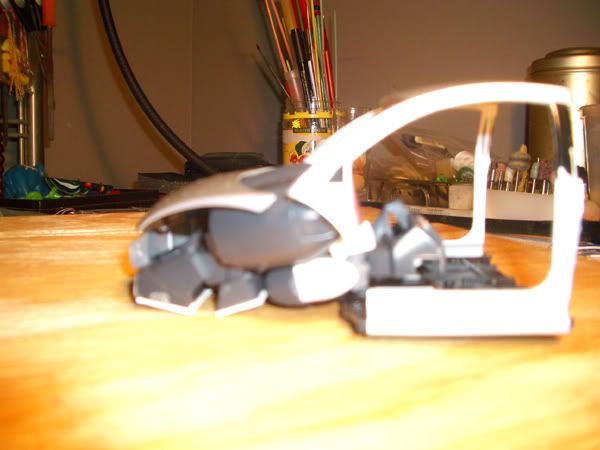
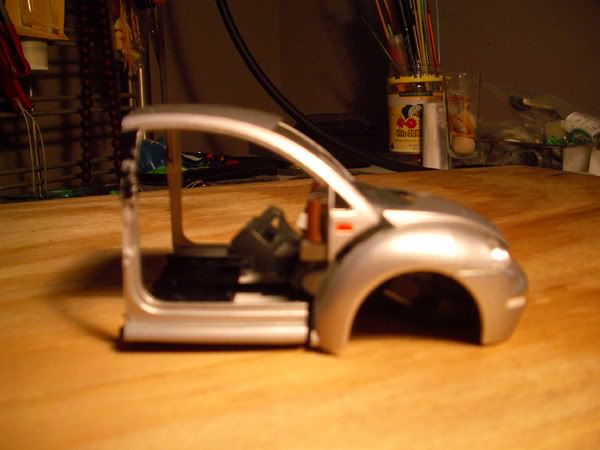
These next two shots are quite bad - i'm not very adept at using my mate's digital camera (gimme film ANY day, heh), but for the sake of illustrating how the legs fit in to the front shell, i think they are sufficient. This is a look at the side without the front wheel cowling, and with the bonnet in place. They are not attached, yet.
Image

This is the other side, with cowling. The large lump in the driver's seat area is the gundam torso which needs cutting down. It will eventually be incorporated into the hump which runs along the length of the car, where the drive train usually goes, and which the gear stick and hand break are mounted in.
Image

The front wheels are going to be attached to the upper thighs - so if you were thinking the upper legs are a little on the skinny side, dont worry, they will be bulked up a bit. The wheels weren't mounted there on the G1 Bumblebee figure, but i didnt want to give him 'rollerskates' by leaving them in place, nor did i really want to have them fold inwards, as there is enough going on under the hood as it is...Plus, i was worried his upper legs were too thin, and thought it was a good way to add bulk without impeding the transformation. Let me know what you think about this choice anyway.

That's about it for today - i will hopefully get more done this weekend, i hope to have the hip assembly mounted into the body at least....We'll see.


Any feedback about the design, or any other relevant aspects are welcomed and encouraged!
"I am not a meat popsicle"

Image
Captain Crooks
Minibot
Posts: 168
Joined: Mon Oct 09, 2006 4:37 am
Location: Sydney

Postby plowking » Thu Oct 12, 2006 2:14 pm

Wow! This is coming along pretty slick. You have some great skills there!
.....must keep us updated!
Image
plowking
Micromaster
Posts: 92
Joined: Sat Jun 04, 2005 12:18 pm

Postby Paul Prime » Thu Oct 12, 2006 4:08 pm

That looks amazing. Keep up the good work.
Praise Paul Prime
Paul Prime
Minibot
Posts: 102
Joined: Tue Sep 05, 2006 5:47 pm

Postby Retread » Thu Oct 12, 2006 6:14 pm

Looks really good so far.
I'm thinking about trying a die cast reshell at some point, but the 2 things that have me worried are cutting the model and attaching metal to plastic. Would be cool if you did a walkthrough once you've got things done.
Image
Retread
Fuzor
Posts: 203
Joined: Wed Jul 25, 2007 9:07 pm

Postby Hobbyist Prime » Thu Oct 12, 2006 6:31 pm

Looking really really good! (first time my a$$ :lol: ) I would love to know how you managed to separate the metal chassis so evenly!
Image
Hobbyist Prime
Targetmaster
Posts: 618
Joined: Sun Jun 11, 2006 4:53 pm

Postby onesock » Thu Oct 12, 2006 6:32 pm

Wow! That looks sweet!
onesock
Mini-Con
Posts: 7
Joined: Tue Oct 10, 2006 1:52 pm
Location: Florida

Postby Captain Crooks » Thu Oct 12, 2006 8:28 pm

Hobbyist Prime wrote:
Looking really really good! (first time my a$$ Laughing ) I would love to know how you managed to separate the metal chassis so evenly!


Haha, it's not my first modelling attempt, but it IS my first Transformer (unless you count the lego ones i used to make as a youngster). I used a plain old jewellers saw to take the li'l fella apart - it took a while, but patience is the key.....

Retread wrote:
2 things that have me worried are cutting the model and attaching metal to plastic.
Attaching the metal to the plastic has me a little worried too - but im pretty confident that if you roughen up the surface of the metal with a file or similar, it should help the adhesive bond to it - i'm using a two part araldite adhesive, but i've also been recommended 'liquid nails', although i'd test it before use - dont know what it might do to the plastic...

To everyone else who commented, thankyou for the support and encouragement! I'll hopefully add to this posting very soon (this weekend is going to be a bit of a monster by the looks of it....)
"I am not a meat popsicle"

Image
Captain Crooks
Minibot
Posts: 168
Joined: Mon Oct 09, 2006 4:37 am
Location: Sydney

Postby alpha_alternator » Thu Oct 12, 2006 8:29 pm

when i saw your kitbash, remind me of my alternators bumblebee
he was a pain in the @ss ahahha

great job with bumblebee!!!
alpha_alternator
Minibot
Posts: 104
Joined: Thu Feb 02, 2006 7:04 pm

Postby Captain Crooks » Thu Oct 12, 2006 9:18 pm

Thanks for the comment Alpha, I just had a look at the pictures of your Bumblebee, he looks cool! Did you end up finishing him off? Selling him? I'd really like to see if you got the transformation working, etc.
"I am not a meat popsicle"

Image
Captain Crooks
Minibot
Posts: 168
Joined: Mon Oct 09, 2006 4:37 am
Location: Sydney

Postby Menbailee » Thu Oct 12, 2006 11:10 pm

Wow! That's one of the first custom *Binaltech* Transformers I've seen. I grabbed hold of a cheap Maisto mini-cooper a while back, but cutting through metal as opposed to plastic turned out a little ambitious for me, so the thing became Roller for Prime's trailer. That's some very impressive articulation on that figure. It looks as if you're using the same transformation sequence I'm now hoping for with my plastic Tamiya model. That's a good solution you have for the "Roller Skate" problem, too. Good stuff.
Menbailee
Vehicon
Posts: 335
News Credits: 1
Joined: Mon Aug 14, 2006 11:35 pm

Postby Nemesis Sturmvogel » Thu Oct 12, 2006 11:54 pm

It must be a Binaltech, because the car is a Die Cast and not of Plastic.
Nemesis Sturmvogel
Headmaster Jr
Posts: 519
Joined: Sat Sep 20, 2003 1:21 pm

Postby Captain Crooks » Fri Oct 13, 2006 12:27 am

Menbailee wrote
cutting through metal as opposed to plastic turned out a little ambitious for me


I must admit, I found the cutting a bit trickier than what i expected, and also, i must confess, I got my jeweller friend to help me make the two major straight cuts - the one down the front to separate the 'shoes', and the one across the top of the roof - the other cuts could be cleaned up with a file if i went a bit wonky, but those two cuts had to be dead straight so as not to look bad, and he has a LOT more experience than I do in cutting. He still just used the saw though....clever fella....


Sturmvogel Prime wrote
It must be a Binaltech, because the car is a Die Cast and not of Plastic.


Are the plastic one not called 'Binaltech' too? Both kinds are pretty rare and expensive here in Australia, but I only get the metal ones because they look better and you can buy them off ebay for about the same price as the plastic ones in store (not including postage, but they still work out cheaper than buying them in the shops...).
"I am not a meat popsicle"

Image
Captain Crooks
Minibot
Posts: 168
Joined: Mon Oct 09, 2006 4:37 am
Location: Sydney

Postby Skullgrin140 » Fri Oct 13, 2006 2:43 am

Lookin mighty good :wink:
Image
Skullgrin140
Brainmaster
Posts: 1375
Joined: Wed Oct 20, 2004 10:18 am
Location: Chelmsford, United Kingdom

Postby AceBaur Prime » Fri Oct 13, 2006 11:28 am

Looks very good so far, are you planning on painting it or are you going to leave it as is? it looks as though its already a metallic goldish color
AceBaur Prime
Minibot
Posts: 161
Joined: Sat Aug 26, 2006 7:41 am

Postby jimsloth » Fri Oct 13, 2006 5:06 pm

Captain Crooks wrote:Menbailee wrote
cutting through metal as opposed to plastic turned out a little ambitious for me


I must admit, I found the cutting a bit trickier than what i expected, and also, i must confess, I got my jeweller friend to help me make the two major straight cuts - the one down the front to separate the 'shoes', and the one across the top of the roof - the other cuts could be cleaned up with a file if i went a bit wonky, but those two cuts had to be dead straight so as not to look bad, and he has a LOT more experience than I do in cutting. He still just used the saw though....clever fella....


Sturmvogel Prime wrote
It must be a Binaltech, because the car is a Die Cast and not of Plastic.


Are the plastic one not called 'Binaltech' too? Both kinds are pretty rare and expensive here in Australia, but I only get the metal ones because they look better and you can buy them off ebay for about the same price as the plastic ones in store (not including postage, but they still work out cheaper than buying them in the shops...).


YAAAAAYYYYYY!!!!!!!!!!!!!! I've been trying to tell everyone over here to use a jewelers saw for about two years now! And if they had trouble to consult their local jeweler (I am one myself). I'm so glad someone else here is finally backing me up.

and just incase anyone else out there does anticipate screwing up a long straight cut, and has noone to help them out, the non-economically sound way of doing things, buy two identical model kits and make sure on one you cut a little too far to one side, the other kit error to the other side, then file and sand them to match perfectly. Also, even though they're easier to break, they make super thin sawblades, and the finer the cut line, the less error you end up making.

As far as binaltech vs. alternators, you are correct. Asia gets binaltech (dicast metal parts, much nicer, higher initial price) and the US gets alternators (all plastic, $20 USD, but I'm sure once they ship over to you...)
till all are one.
Image
jimsloth
Gestalt Team Leader
Posts: 926
Joined: Sat Apr 17, 2004 12:22 am
Location: Pittsburgh -ish

Postby Captain Crooks » Fri Oct 13, 2006 7:27 pm

^^^ Ahhh, the wonder that is the jeweller's saw. They truly are indispensible for the plastic and metal worker alike - heck, you can get special blades for wood etc too! Seriously, everyone, get one! They are cheap, and the sooner you start practising using them, the better!! You should be able to buy packs of blades for them easily and cheaply too - they DO break easily (im not real good with them, and snapped about 6 blades cutting up the Beetle shell) but they are inexpensive to replace, and the more you practise, the better you get!

And the plastic alternators here retail between AU$30 - AU$50- depending on where you shop, and just aren't worth it for the price. I got a Die-Cast Wheeljack off of ebay brand new, in a box, for AU$44- (with another $25- postage, but in the shops here they cost around AU$120- IF you can find them at all!)

AceBaur Prime wrote:
Looks very good so far, are you planning on painting it or are you going to leave it as is? it looks as though its already a metallic goldish color


I most certainly WILL be painting it - the original colour is silver, the lamp gives it that goldish tinge. I chose it because 1) Grey is an easy colour to prime and paint over, and 2) It was the only colour available in the shop......!

I'm not sure exactly which shade of yellow to go with yet, i'm thinking 'Chrome Yellow', but i also considered the stock yellow colour for production Beetles - it's very pale, but would look more realistic. What do you guys reckon? My mate wants me to paint it pineapple yellow, but i dunno......heh.

In the meantime, i am not attaching any of the metal pieces permanently, so they will be easier to spray later on.

Thanks for the comments guys!
"I am not a meat popsicle"

Image
Captain Crooks
Minibot
Posts: 168
Joined: Mon Oct 09, 2006 4:37 am
Location: Sydney

Postby Tramp » Fri Oct 13, 2006 7:41 pm

It's definately looking good. I am glad someone is finally using the classic transformation for an Alternators/Binaltech Bumblebee. As far as the car hood, I would split it in half and attach hinges to the front (a reverse hinged hood), and attach the halves to his feet. IMO, it would look better in robot mode and more true to the original.
Tramp

Postby Captain Crooks » Fri Oct 13, 2006 7:59 pm

Tramp wrote:
As far as the car hood, I would split it in half and attach hinges to the front (a reverse hinged hood), and attach the halves to his feet. IMO, it would look better in robot mode and more true to the original.


You are quite right in that it would be true to the original design - and this was one of the first major choices i had to make, design-wise. I want to retain as much of the G1 look as i can, whilst ALSO making sure it has all the little perks of an Alternator - like having an opening bonnet, engine detail etc. If the bonnet were hinged as you suggest (a good idea, mind you, in terms of how the overall transformation works), I wouldnt be able to display the engine etc, and this is an important aspect for me.

I'm going to stick with the current plan for now, because the way the legs mount now, the bonnet would have to stick straight up, and would obscure the legs up to the knee joint. It might be just me, but i dont think that would look too great in terms of colour distribution (unless the bonnet were black, or maybe one of those carbon racing ones, heh - turbo-charged Bumbles anyone...?).

Maybe afterwards, i'll reconsider the design for a second project - I was thinking about maybe doing a 'Cliffjumper' version as a Cabriolet (convertible)....

Thankyou for your advice Tramp!
"I am not a meat popsicle"

Image
Captain Crooks
Minibot
Posts: 168
Joined: Mon Oct 09, 2006 4:37 am
Location: Sydney

Postby Tramp » Sat Oct 14, 2006 12:38 pm

Captain Crooks wrote:Tramp wrote:
As far as the car hood, I would split it in half and attach hinges to the front (a reverse hinged hood), and attach the halves to his feet. IMO, it would look better in robot mode and more true to the original.


You are quite right in that it would be true to the original design - and this was one of the first major choices i had to make, design-wise. I want to retain as much of the G1 look as i can, whilst ALSO making sure it has all the little perks of an Alternator - like having an opening bonnet, engine detail etc. If the bonnet were hinged as you suggest (a good idea, mind you, in terms of how the overall transformation works), I wouldnt be able to display the engine etc, and this is an important aspect for me.

I'm going to stick with the current plan for now, because the way the legs mount now, the bonnet would have to stick straight up, and would obscure the legs up to the knee joint. It might be just me, but i dont think that would look too great in terms of colour distribution (unless the bonnet were black, or maybe one of those carbon racing ones, heh - turbo-charged Bumbles anyone...?).

Maybe afterwards, i'll reconsider the design for a second project - I was thinking about maybe doing a 'Cliffjumper' version as a Cabriolet (convertible)....

Thankyou for your advice Tramp!

Actually, you would stiul be able too, the hod would just open up in reversewith the hnge in front. There are cars in existance with that kind of set-up, and you can still display the engine.In fact, that kind of hinge set-up allows the hood to open up a full 90 degrees, allowing for more clearance. Secondly, it doesn's require figuring out how to rotate the hood behind him without rotating the entire lower torso. The new Classics Bumblebee uses the same type of hood set-up.
Tramp

Postby incecticons forever » Sat Oct 14, 2006 12:57 pm

Actually, you would stiul be able too, the hod would just open up in reversewith the hnge in front. There are cars in existance with that kind of set-up, and you can still display the engine.In fact, that kind of hinge set-up allows the hood to open up a full 90 degrees, allowing for more clearance. Secondly, it doesn's require figuring out how to rotate the hood behind him without rotating the entire lower torso. The new Classics Bumblebee uses the same type of hood set-up.


the forward hinged hood is a fairly simple and common modification with tuners. since the addition of hood pins is needed with carbon fiber hoods.[/quote]
( \ / ) The Bunny
(O.o) Add him to your signature
(> <) Help him rule the world
/_||_\ Prosper at his side
incecticons forever
Mini-Con
Posts: 29
Joined: Sun Dec 04, 2005 7:18 am
Location: is this heaven? NO just iowa

Postby Captain Crooks » Sat Oct 14, 2006 2:15 pm

Tramp wrote:
that kind of hinge set-up allows the hood to open up a full 90 degrees, allowing for more clearance


insecticons forever wrote:
the forward hinged hood is a fairly simple and common modification with tuners


Hmmm, you guys both have very valid points here - although in this particular instance, having the bonnet hinged at the front would also expose pretty much all of the lower legs of the bot, and make the removal of the engine bits, which are situated directly at the front of the engine block area, a lot more difficult....

Also, i'm still not a real big fan of splitting the bonnet - i could live with cutting the rest of the front in half, but the bonnet i liked better in one piece - i'm a bit pedantic when it comes to things like that!

I think i will leave the plan as is still, and see how it turns out - at this stage, the bonnet will rotate around the waist on an individual piece, meaning the whole waist wont have to rotate.....hopefully!

Thanks heaps for the input though - i appreciate the thought you have put into your posts here :D [/quote]
"I am not a meat popsicle"

Image
Captain Crooks
Minibot
Posts: 168
Joined: Mon Oct 09, 2006 4:37 am
Location: Sydney

Postby Tramp » Sun Oct 15, 2006 3:11 pm

Wel, as I said, it wouldn't interfere with removing the engine at all. In fact, it would make it easier to remove. N0ot only that, but it would not expose the lower legs at all. In fact, it would hide the lower legs entirely. Another advantage.
Tramp

Postby jimsloth » Sun Oct 15, 2006 6:31 pm

I completely see your point with not wanting to split the bonnet. It looked better with an old beetle because there was already a raised line down the center of it, and making it also a crack wouldn't look half bad, but with the new beetles its all nice and smooth. Alternators tracks for example has a split down the bonnet in car mode, and I don't like how distracting it is.

I also see what you mean about in bot mode how it would interfear having those parts there. G1 bumblebee had the hood flush to where it would be in car mode, not raised like G1 wheeljacks. With your bash the legs go through that area when in bot mode, so the bonnet parts would have to be opened up, thus making it not look G1 and defeating the purpose of putting them on there to begin with.

Personally I love the track your on.
till all are one.
Image
jimsloth
Gestalt Team Leader
Posts: 926
Joined: Sat Apr 17, 2004 12:22 am
Location: Pittsburgh -ish

Postby Captain Crooks » Sun Oct 15, 2006 10:49 pm

Tramp wrote:
Well, as I said, it wouldn't interfere with removing the engine at all. In fact, it would make it easier to remove. Not only that, but it would not expose the lower legs at all. In fact, it would hide the lower legs entirely. Another advantage.


Sorry, i probably didn't explain this too well - the engine in the VW Beetle is a little 4 cylinder inline which is mounted sideways, left to right, at the very front of the car, not front to back and in the middle like in the V-8s and other engines in the Alternator series. Bumble's engine will not be included in it's entirety, because it is actually quite a large part - in real life it is linked directly to the front wheel, via an attached gear-box, and it is quite bulky for a little engine. I will only be including the top-most part of it, same as the Alternator series, and it attaches right where the hinges would be if i were to put them at the front, and will probably help to keep the front transformation solid in Car mode. It may not be as difficult as i'm imagining it to be to get out, but i do have rather large, clumsy fingers at the best of times, and that engine area is sooo small...it's going to be quite a small, Bumblebee sized gun - i dont want to have to crank the tweezers out every time!

And when i said it will expose the lower legs, i meant everything from the ankles up to the knees, which inhabit the rear cavity of the engine block - although, taking another look, a lot of that area will be under the dash, so again, it might not be that bad...

To be honest, all of my excuses aside, i just dont want to have a split bonnet! As jimsloth said in the post just above this one, it isn't the best look, and while i dont mind it so much on the all black Ravage Alt, it was the main reason i didnt want to get Tracks - i liked the yellow variant best, and the split was way too obvious....and Bumblebee will be a similar colour! Yikes! He's doomed by association to have a solid bonnet (and hence, probably a big butt....oh well)

Also, I want the car to be as stock as possible in ALT mode, and while it has rightly been observed that reversing the bonnet is a common alteration, it just doesnt fit with my envisioning of the project.... I reckon his feet look alright as they currently are, and the bonnet being at the back gives the upper body some needed balance - i'm trying to avoid making Bumbles look like an egg on stilts!

I really should have drawn up a plan of this project - that might be my job this evening - in the meantime, i'm going to put some work in on ol' Bumblebee this afternoon, and will hopefully have some more pics for you soon!

Thanks heaps to Tramp for your continued interest and advice, and to jimsloth for your comment also!
Last edited by Captain Crooks on Tue Oct 17, 2006 1:00 am, edited 1 time in total.
"I am not a meat popsicle"

Image
Captain Crooks
Minibot
Posts: 168
Joined: Mon Oct 09, 2006 4:37 am
Location: Sydney

Postby plowking » Mon Oct 16, 2006 4:27 pm

All the advice and tips are cool, but Captain, do it your way.
Thats what will make you happy.

Who cares if its not a 100% homage to the G1 BB.
Its YOUR interpetation of BB as a new piece.

Do what makes you happy Captain, and it will come out SWEET!

And post some more pics when you get the chance.

This is going to rock!
Image
plowking
Micromaster
Posts: 92
Joined: Sat Jun 04, 2005 12:18 pm

Next

Return to Customizations

Transformers and More @ The Seibertron Store

Visit our store on eBay
These are affiliate links. We may earn commissions when you purchase items or services through these links.
Visit shop.seibertron.com to buy "Transformers Best of HOT ROD #1 IDW Comics 2022 MAR220507 (CA) Biggie"
Transformers Best ...
Visit shop.seibertron.com to buy "TRANSFORMERS UNIVERSE #2 Marvel Comics 1987 (CA) Trimpe (W) Budiansky 230926S"
TRANSFORMERS UNIVE ...
Visit shop.seibertron.com to buy "TRANSFORMERS #10 Cover B IDW Comics 2019 BOLD NEW ERA 10B (CA) Deer"
TRANSFORMERS #10 C ...
Visit shop.seibertron.com to buy "THE TRANSFORMERS #18 Marvel Comics 1986 (CA) Trimpe (W) Budiansky 210422B"
THE TRANSFORMERS # ...
Visit shop.seibertron.com to buy "TRANSFORMERS ESCAPE #2 Cvr B IDW Comics 2021 NOV200370 2B (CA) Malkova"
TRANSFORMERS ESCAP ...
Visit shop.seibertron.com to buy "TRANSFORMERS BEAST WARS #10 RI 1:10 IDW Comics 2021 SEP210480 10RI (CA) Coller"
TRANSFORMERS BEAST ...
Visit shop.seibertron.com to buy "TRANSFORMERS GALAXIES #6 Cover B IDW Comics 2020 DEC190653 6B (CA) McGuire-Smith"
TRANSFORMERS GALAX ...
Visit shop.seibertron.com to buy "TRANSFORMERS #9 Cover B IDW Comic 2019 BOLD NEW ERA SIEGE 9B (CA) Tramontano"
TRANSFORMERS #9 Co ...
Visit shop.seibertron.com to buy "Transformers ALL HAIL MEGATRON #16 RI 1:10 IDW Comics 2009 16RI (CA) Hutchison"
Transformers ALL H ...
Visit shop.seibertron.com to buy "TRANSFORMERS #42 RI 1:10 IDW Comics 2022 FEB220436 42RI (CA) Goux"
TRANSFORMERS #42 R ...
Visit shop.seibertron.com to buy "Transformers ROBOTS IN DISGUISE #33 RE IDW Comics 2014 Giant Robot 210322A"
Transformers ROBOT ...
Visit shop.seibertron.com to buy "TRANSFORMERS BEAST WARS #10 Cvr B IDW Comics 2021 SEP210479 10B (CA) Williams II"
TRANSFORMERS BEAST ...
Visit shop.seibertron.com to buy "Transformers WARS END #2 Cvr A IDW Comics 2022 JAN220494 War's End 2A (CA) Panda"
Transformers WARS ...
Visit shop.seibertron.com to buy "TRANSFORMERS BEAST WARS #3 RI 1:10 IDW Comics 2021 FEB210484 3RI (CA) Perez"
TRANSFORMERS BEAST ...
* Price and quantities subject to change. Shipping costs, taxes and other fees not included in cost shown. Refer to listing for current price and availability.
Find the items above and thousands more at the Seibertron Store on eBay
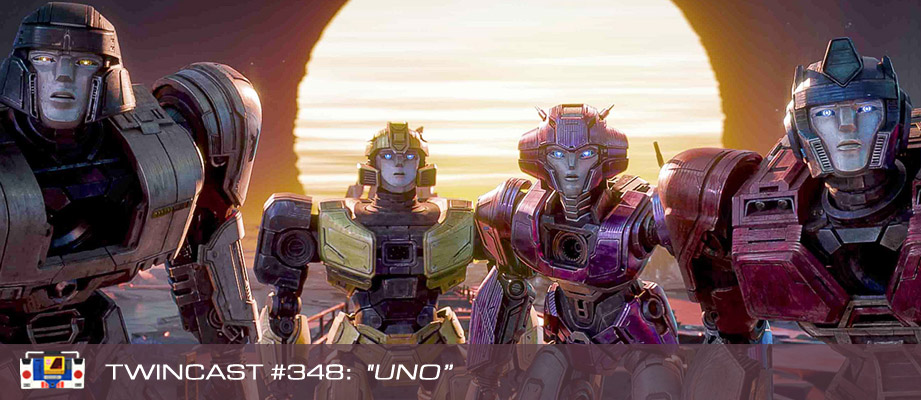
Transformers Podcast: Twincast / Podcast #348 - Uno
Twincast / Podcast #348:
"Uno"
MP3 · iTunes · RSS · View · Discuss · Ask
Posted: Saturday, April 20th, 2024

Featured Products on Amazon.com

These are affiliate links. We may earn commissions when you purchase items or services through these links.
Buy "Transformers MPM04 Optimus Prime" on AMAZON
Buy "Transformers: Generations Power of The Primes Quintus Prime Prime Master" on AMAZON
Buy "Transformers Deluxe 20 Mercenary Action Figure" on AMAZON
Buy "Transformers: Generations Power of the Primes Titan Class Predaking" on AMAZON
Buy "Transformers Generations Power of The Primes Deluxe Class Terrorcon Blot" on AMAZON
Buy "Transformers: Generations Power of The Primes Voyager Class Grimlock" on AMAZON
Buy "Transformers Studio Series 08 Leader Class Movie 1 Decepticon Blackout" on AMAZON
Buy "Transformers Generations Power of The Primes Deluxe Terrorcon Rippersnapper" on AMAZON
Buy "Transformers: Generations Power of The Primes Liege Maximo Prime Master" on AMAZON
Buy "Transformers Tra Rid Warrior Soundwave Action Figure" on AMAZON
Buy "Transformers Studio Series 02 Deluxe Class Movie 3 Decepticon Stinger" on AMAZON
Buy "Transformers Generations Titans Return Titan Master Terri-Bull" on AMAZON