
Arrrrrrr, being in a forum like this full of friendly, knowlegable folks, willing to share their advice, makes me plenty happy!
Thankyou for your support plowking, i will be posting some more pics very soon - the hips are neeeearly finished, as is the bonnet connector swivel thing - maybe tonight i can finish that part, and post pics tomorrow....so stay tuned!
Alternator Bumblebee
76 posts
• Page 2 of 4 • 1, 2, 3, 4
Posted by Captain Crooks Tue Oct 17, 2006 9:22 pm
I put a bit of work in these last couple of nights, and behold - Bumblebee has hips! .....sort of.
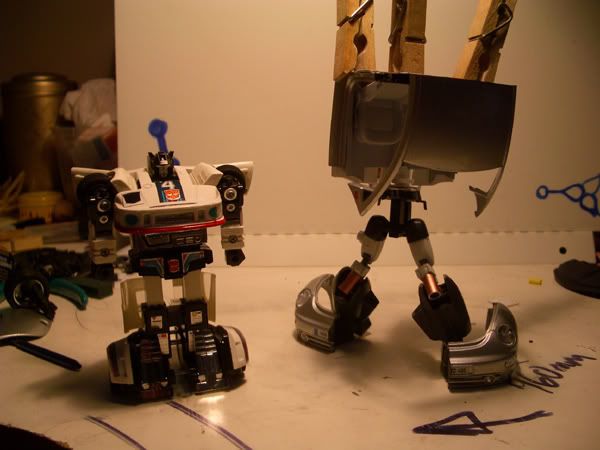
Behold the wonder that is PEGBOT - with torso twist action, and, erm, pegs.
Seen here posing with his little mate G1 Jazz. Go fellas!
I'll start off by showing you some detail, and explain as i go.
(I hope the photos are adequate to explain the details!!)
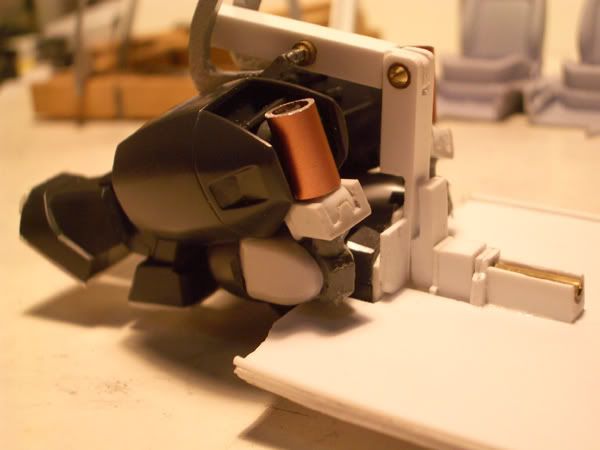
Here is a close up of the hip region in bot mode:

The hips are designed to slide out from under the dashboard for bot-mode - you can see the grooves cut into the plastic to help guide it in. The brass rod in the centre is what allows it to slide smoothly, and is essentially the 'backbone' structurally. When finished, the top of the brass tube will be capped so the torso cant be taken completely off - im leaving it for now, because i will want to disassemble and paint the model later.
You can also see where the hip swivels - in ALT mode, the swivelling is locked when it slides in to the car, and in bot mode, a piece which also supports the bonnet swivels around and locks the torso, stopping it from sliding back down over the waist.
Here is a pic of the whole assembly transformed:
Here, in addition to all the other worky bits, you can see the arm assembly that the bonnet attaches to - at the present, it is too long - it will be trimmed to just past the swing arm attachment at the very top of the photo. That arm swivels to sit at the rear in bot mode, and folds up, making the bonnet a rear armour plate, and balancing out the robot's lower half. The legs need to be trimmed to allow the swing arms to lower into the engine area - at the present, they are stuck in full open position...
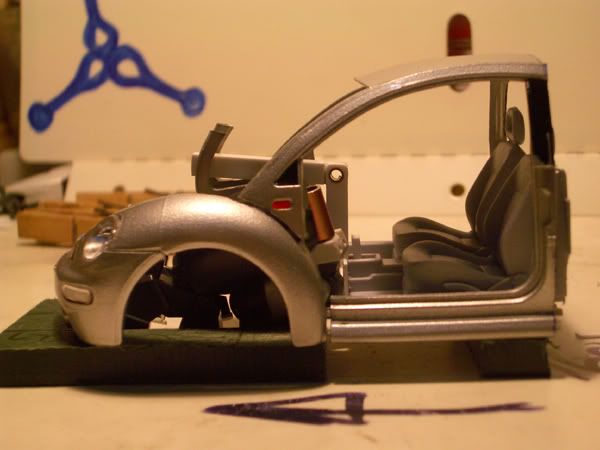
Here is a pic of the whole assembly, with the interior detail added to show how all the workings will be covered over.

The dashboard will conceal the upper legs, knees and waist workings, and in addition to the sheath which now covers the 'backbone' sliding parts, there is another piece which goes over it which has the gear stick, hand brake and, most importantly, cup holders. The only sacrifice so far is I had to remove the Jumbo drink holder.....but i dont see Spike as being a Jumbo man myself...
Here is a pic of Bumbles a little more appropriately dressed:
As soon as the swing arm is trimmed down, and the legs altered, i will be able to fit the dashboard and build up the front detail some more, particularly the hip and interior detail. The hips need bulking out considerably; now that i have a better idea of where everything fits, this should be easier to do.
The wheels won't be attached to the upper thighs for a while yet - i need to leave them until the legs and hips are all done, because the correct positioning of them is critical. At this stage, having working steering is probably not going to happen, but i havent given up on it yet...
Well, that's about it for this update, feel free to ask any questions you might have, or put forward any advice.
Also, at this stage it's not critical, but if anyone has some advice on how to dye the styrene plasctic, i would appreciate it - i have read posts where folks have mentioned doing it, but i have never heard of it before this forum, and dont know which products work best, etc. Thanks guys!
Behold the wonder that is PEGBOT - with torso twist action, and, erm, pegs.
Seen here posing with his little mate G1 Jazz. Go fellas!
I'll start off by showing you some detail, and explain as i go.
(I hope the photos are adequate to explain the details!!)
Here is a close up of the hip region in bot mode:
The hips are designed to slide out from under the dashboard for bot-mode - you can see the grooves cut into the plastic to help guide it in. The brass rod in the centre is what allows it to slide smoothly, and is essentially the 'backbone' structurally. When finished, the top of the brass tube will be capped so the torso cant be taken completely off - im leaving it for now, because i will want to disassemble and paint the model later.
You can also see where the hip swivels - in ALT mode, the swivelling is locked when it slides in to the car, and in bot mode, a piece which also supports the bonnet swivels around and locks the torso, stopping it from sliding back down over the waist.
Here is a pic of the whole assembly transformed:
Here, in addition to all the other worky bits, you can see the arm assembly that the bonnet attaches to - at the present, it is too long - it will be trimmed to just past the swing arm attachment at the very top of the photo. That arm swivels to sit at the rear in bot mode, and folds up, making the bonnet a rear armour plate, and balancing out the robot's lower half. The legs need to be trimmed to allow the swing arms to lower into the engine area - at the present, they are stuck in full open position...
Here is a pic of the whole assembly, with the interior detail added to show how all the workings will be covered over.
The dashboard will conceal the upper legs, knees and waist workings, and in addition to the sheath which now covers the 'backbone' sliding parts, there is another piece which goes over it which has the gear stick, hand brake and, most importantly, cup holders. The only sacrifice so far is I had to remove the Jumbo drink holder.....but i dont see Spike as being a Jumbo man myself...
Here is a pic of Bumbles a little more appropriately dressed:
As soon as the swing arm is trimmed down, and the legs altered, i will be able to fit the dashboard and build up the front detail some more, particularly the hip and interior detail. The hips need bulking out considerably; now that i have a better idea of where everything fits, this should be easier to do.
The wheels won't be attached to the upper thighs for a while yet - i need to leave them until the legs and hips are all done, because the correct positioning of them is critical. At this stage, having working steering is probably not going to happen, but i havent given up on it yet...
Well, that's about it for this update, feel free to ask any questions you might have, or put forward any advice.
Also, at this stage it's not critical, but if anyone has some advice on how to dye the styrene plasctic, i would appreciate it - i have read posts where folks have mentioned doing it, but i have never heard of it before this forum, and dont know which products work best, etc. Thanks guys!
"I am not a meat popsicle"
- Captain Crooks
- Minibot
- Posts: 168
- Joined: Mon Oct 09, 2006 5:37 am
- Location: Sydney
Posted by No One Thu Oct 19, 2006 1:33 pm
This is the only Alternator I would ever buy, and the only one I can never have!!!
- No One
- Vehicon
- Posts: 359
- News Credits: 3
- Joined: Thu Oct 03, 2002 1:21 pm
- Strength: N/A
- Intelligence: N/A
- Speed: N/A
- Endurance: N/A
- Rank: N/A
- Courage: N/A
- Firepower: N/A
- Skill: N/A
Posted by Retread Thu Oct 19, 2006 8:45 pm
That pic with Jazz reminds me of a post over at the official movie forums. It was a comparison of the scale of classic g1 transformations using current vehicles. I think the Bee ended up being a good foot or two taller than jazz by their calculations.
You wouldn't think it, but the new beetle is actually a fairly large car. Looks like your bumblebee is going to have a fairly hefty belly Cap. Does the back half fold out to become arms or does it just flip down, directly behind the front?
Some nice engineering going on there so far.
You wouldn't think it, but the new beetle is actually a fairly large car. Looks like your bumblebee is going to have a fairly hefty belly Cap.
Some nice engineering going on there so far.

- Retread
- Fuzor
- Posts: 203
- Joined: Wed Jul 25, 2007 10:07 pm
Posted by Captain Crooks Fri Oct 20, 2006 12:09 am
Retread wrote:
Heh, he is indeed - li'l tub-tub Bumbles!
At first, i was kinda concerned about this - he reminds me of someone wearing a mega-tight corset, that pushes all the lard upwards, heh. The way the rear half breaks down, the wheel guards turn around to become shoulder pads, the arms come out from under the shoulderpads, attached to the wheels (just like the arms of G1 Jazz there - he was my inspiration for that part of the assembly, hence why he gets to pose with PEGBOT) and the rear roof, windows etc all fold back and swivel around, forming a backplate and meeting the bonnet at the rear, making a solid rear piece. The bonnet helps break up the inevitable roundness, which more than anything, helps justify the name 'Bumblebee', and even 'Beetle', because he looks kinda like that lady-bug character out of 'A Bug's Life', hehe...
I dunno what you guys think generally, but if nothing else, he WILL look kinda cute....and isnt that what Bumblebee is all about? He will look a bit more like the G1 toy than the G1 character at this stage, unless i can find some clever way of giving him less chest and more waist...
He actually resembles the classic Bumblebee that just came out, in that his front windshield conceals the hip area. It's not a BAD look, but i was hoping to give him more of a waist - that would involve making him quite a bit taller though, and i want him to be shorter than the other ALTs by a good margin. I'll keep working at it....
So you guys can see where i'm heading, I'm also going to whip up a quick plan of Bumbles, since today is pouring rain and miserable, i cant be bothered going out shopping or anything i ought to do today.... who needs food anyway? Really?
Looks like your bumblebee is going to have a fairly hefty belly Cap.
Heh, he is indeed - li'l tub-tub Bumbles!
At first, i was kinda concerned about this - he reminds me of someone wearing a mega-tight corset, that pushes all the lard upwards, heh. The way the rear half breaks down, the wheel guards turn around to become shoulder pads, the arms come out from under the shoulderpads, attached to the wheels (just like the arms of G1 Jazz there - he was my inspiration for that part of the assembly, hence why he gets to pose with PEGBOT) and the rear roof, windows etc all fold back and swivel around, forming a backplate and meeting the bonnet at the rear, making a solid rear piece. The bonnet helps break up the inevitable roundness, which more than anything, helps justify the name 'Bumblebee', and even 'Beetle', because he looks kinda like that lady-bug character out of 'A Bug's Life', hehe...
I dunno what you guys think generally, but if nothing else, he WILL look kinda cute....and isnt that what Bumblebee is all about? He will look a bit more like the G1 toy than the G1 character at this stage, unless i can find some clever way of giving him less chest and more waist...
He actually resembles the classic Bumblebee that just came out, in that his front windshield conceals the hip area. It's not a BAD look, but i was hoping to give him more of a waist - that would involve making him quite a bit taller though, and i want him to be shorter than the other ALTs by a good margin. I'll keep working at it....
So you guys can see where i'm heading, I'm also going to whip up a quick plan of Bumbles, since today is pouring rain and miserable, i cant be bothered going out shopping or anything i ought to do today.... who needs food anyway? Really?
"I am not a meat popsicle"
- Captain Crooks
- Minibot
- Posts: 168
- Joined: Mon Oct 09, 2006 5:37 am
- Location: Sydney
Posted by Captain Crooks Fri Oct 20, 2006 3:41 am
Okay, here is what the current plan looks like for Bumblebee head on - i'll do a side view soon, but for now you can see the basic outline at this stage.
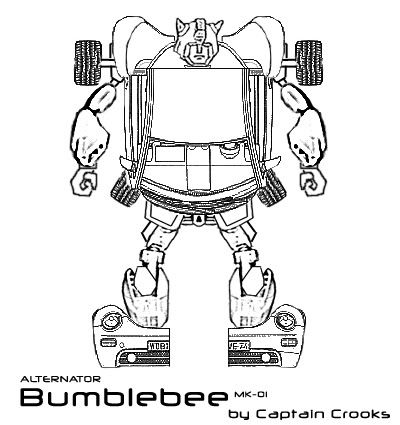
The parts that worry me are:
- His chest - is it too big in proportion to the rest of him? In side profile, it sticks out a fair way too, but we'll discuss that later when i get another pic up
- His shoulderpads - are they mounted too high? Due to the transformation method i've worked out, it will be tricky to have them any lower - i may have to rethink it entirely. For now, what do you guys think?
- I havent done much work on the arm assembly yet - what you see here is more of a theoretical idea of how they will mount - so let me know your opinions and ideas. Also, im still not sure about the overall arm shape either, so if you thing these chunky forearms dont work, or anything else, please say your piece!
I look forward to hearing your thoughts!
"I am not a meat popsicle"
- Captain Crooks
- Minibot
- Posts: 168
- Joined: Mon Oct 09, 2006 5:37 am
- Location: Sydney
Posted by RavageX-9 Fri Oct 20, 2006 2:29 pm
yeah, I would say the proportions are pretty bad. Not just going to copy the unused Alternators concept design for Bumblebee, huh?
master of the arbitrary and figurative
- RavageX-9
- Vehicon
- Posts: 322
- Joined: Wed Jun 02, 2004 1:21 pm
- Location: Ontario, Canada
Posted by Tramp Fri Oct 20, 2006 3:08 pm
RavageX-9 wrote:yeah, I would say the proportions are pretty bad. Not just going to copy the unused Alternators concept design for Bumblebee, huh?
I for one am glad he isn?t using that design. having a more classic transformation is a much better choice IMO. I never liked that unused concept and never will.
- Tramp
Posted by Captain Crooks Fri Oct 20, 2006 3:09 pm
^^^ I'm not sure if I've seen that design or not - i found a plan either on this forum or just on the net, but the transformation style used the front end as the chest in the style i've been avoiding - all the ALT Bumblebees ive seen so far have that configuration, and i wanted to do it more like the original...
However - if there is ANOTHER design out there, i'd like to see it!
Which proportions did you think were bad in particular RavageX-9?
Or, is it pretty much all of them, heh?
However - if there is ANOTHER design out there, i'd like to see it!
Which proportions did you think were bad in particular RavageX-9?
Or, is it pretty much all of them, heh?
"I am not a meat popsicle"
- Captain Crooks
- Minibot
- Posts: 168
- Joined: Mon Oct 09, 2006 5:37 am
- Location: Sydney
Posted by Retread Fri Oct 20, 2006 8:00 pm
I can't remember what the book is called, but I've seen a few scans from it. Has a bunch of alt concept art include unreleased stuff, like the beetle alt and Jazz as a Porche boxter.
Here's an idea for you.

What if you attach the doors to the front fenders (flip them back in bot mode like the subaru mold). Then you can make the roof slide down at the door frame or rotate at the front window so it sits closer to the chest. Guess the seats would have to fold down too. Wish I had some scratchbuilding experience, so I could tell if my ideas are actually practical to implement. Might lose all your stability in alt mose I suppose?
And the shoulderpads might look better if they could slide in closer together?
Here's an idea for you.

What if you attach the doors to the front fenders (flip them back in bot mode like the subaru mold). Then you can make the roof slide down at the door frame or rotate at the front window so it sits closer to the chest. Guess the seats would have to fold down too. Wish I had some scratchbuilding experience, so I could tell if my ideas are actually practical to implement.
And the shoulderpads might look better if they could slide in closer together?
- Retread
- Fuzor
- Posts: 203
- Joined: Wed Jul 25, 2007 10:07 pm
Posted by Retread Fri Oct 20, 2006 8:06 pm
And a couple of links for you Crooks:
[url]http://tfkenkon.com/g/?mode=album&album=BTC+Complete+Guide&start=25
[/url]
http://www.tfarchive.com/creative/showentry.php?s=544
[url]http://tfkenkon.com/g/?mode=album&album=BTC+Complete+Guide&start=25
[/url]
http://www.tfarchive.com/creative/showentry.php?s=544
- Retread
- Fuzor
- Posts: 203
- Joined: Wed Jul 25, 2007 10:07 pm
Posted by Supreme-Autobot Fri Oct 20, 2006 8:55 pm
his limbs look a little scrawny for his big car shell body.
- Supreme-Autobot
- Mini-Con
- Posts: 45
- Joined: Fri Aug 18, 2006 8:56 pm
Posted by Captain Crooks Sat Oct 21, 2006 12:02 am
I've been thinking about this one pretty much all night - since this is the first time i've had a plan for him to work from too, it's given me a couple of ideas for improvement already!
The idea Retread has posted is a good one - i had a similar thought last night. If i can retract the dashboard and fold down the seats, i can 'collapse' the chest inwards and that would pretty much solve the excessive tubbyness - (dont get me wrong, BB SHOULD be tubby, as Tramp has rightly observed, but if you were to see his side profile *coming soon* you would see that he really is a big ball on stilts.....hmmm). I dont think this would affect the stability of the ALT mode either - at least, not in a way which couldnt be fixed.
I actually joked with my mate about making the seats adjustable, just to be hyper-realistic and thoroughly annoying....looks like it may be a reality after all!!
I dont think moving the doors is a necessary option at this stage, at least, not how Retread suggests, simply because the front fenders are the feet, and he would have 'wing feet' then, which im not sure i like the thought of (although he would be quite speedy i guess...). Originally, the doors were going to fold down to create samurai style armour plates at the sides of his waist - this may still be an option, but i'd like to keep them in place if i can for now.
Thanks heaps for those links too Retread, that design is very detailed - i'm going to examine it further, and see what bits i can steal!
A note on proportions - I agree that the arms look kinda funny at this point - they really are just tacked-on additions at this point, and havent been through much of a design process...I will more than likely increase the size of the upper-arms, providing there is room in the trunk that is, but what about the shape of the fore-arms? Is it working for anyone? Or too bulgy? I'm undecided myself, but thinking about trimming them down (they are Gundam legs, pretty much straight from the box, almost no modifications yet).
With the legs, they actually look quite good proportion wise, if you take off the wind-screen and dash which cover most of the thigh.... - i'm not too concerned about their proportions at this stage. I'm trying to maintain the balance of what looks good, with trying not to make him too tall - the Beetle has a very big body compared to its front and rear ends - making this a trickier project by far than i had anticipated!! Still, i DO love a challenge....
"I am not a meat popsicle"
- Captain Crooks
- Minibot
- Posts: 168
- Joined: Mon Oct 09, 2006 5:37 am
- Location: Sydney
Posted by Supreme-Autobot Sat Oct 21, 2006 6:31 am
you could still put the doors on his feet but fald them back like on the subaru mold.
- Supreme-Autobot
- Mini-Con
- Posts: 45
- Joined: Fri Aug 18, 2006 8:56 pm
Posted by Captain Crooks Sat Oct 21, 2006 6:32 am
Oops, i thought the Subaru mould had them coming off the shoulders! My mistake.....sorry!.
"I am not a meat popsicle"
- Captain Crooks
- Minibot
- Posts: 168
- Joined: Mon Oct 09, 2006 5:37 am
- Location: Sydney
Posted by Supreme-Autobot Sat Oct 21, 2006 6:59 am
it also has the back doors folded on the backof the legs 
- Supreme-Autobot
- Mini-Con
- Posts: 45
- Joined: Fri Aug 18, 2006 8:56 pm
Posted by Captain Crooks Sat Oct 21, 2006 7:24 am
Heh, until now, i didnt even see he had 4 doors..... 
"I am not a meat popsicle"
- Captain Crooks
- Minibot
- Posts: 168
- Joined: Mon Oct 09, 2006 5:37 am
- Location: Sydney
Posted by Retread Sat Oct 21, 2006 11:57 am
I could see it working with the doors rotated at the hips and hanging down. But would they get in the way of the front wheels? But if you go with them on the feet, it could give a bit more of a finished look when you view him from the back.
And what about reversing the forearms, so they flare out instead of in? Create a bit of space for the wheels to sit closer to the upper arms and lets the arms lie flusher to the body
And what about reversing the forearms, so they flare out instead of in? Create a bit of space for the wheels to sit closer to the upper arms and lets the arms lie flusher to the body
- Retread
- Fuzor
- Posts: 203
- Joined: Wed Jul 25, 2007 10:07 pm
Posted by Captain Crooks Sat Oct 21, 2006 11:40 pm
^^^ I think the doors WILL interfere with the wheels now that i'm attaching them to the thighs - the original original idea was th have the wheels stay in the feet, but i scrapped that idea early on...
I may not need to move the doors at all though, i've yet to investigate that...
Another idea i've had for the arms is to scrap the shoulder-pad idea, and make the wheel guards at the rear a part of the upper arm somehow - but i dont want to give bumbles super-beefy biceps if i can help it. I'm going to experiment this afternoon/evening, and see what i can come up with.
Thanks Retread for the suggestions! Maybe, if i reverse the forarms, i can install a couple of little fore-arm cannons, give Bumbles a bit of oomph?
"I am not a meat popsicle"
- Captain Crooks
- Minibot
- Posts: 168
- Joined: Mon Oct 09, 2006 5:37 am
- Location: Sydney
Posted by jimsloth Sun Oct 22, 2006 8:10 am
I like the idea of the rear wheel wells above the sholders personally. Saw it in GIJoe vs. Transformers Vol 1, and always wanted to see it in toy form. Maybe there would be a way to colapse it down if you could fold the doors furthur inward in bot mode. You may need to attach the rear wheels to the sholders the way g1 BB (toy) was, Like Alt Sideswipe. Having them on posts going straight in and out of the body looks like it would completely limit the range of motion of his arms.
till all are one.
- jimsloth
- Gestalt Team Leader
- Posts: 926
- Joined: Sat Apr 17, 2004 1:22 am
- Location: Pittsburgh -ish
Posted by Captain Crooks Sun Oct 22, 2006 12:18 pm
^^^ I've tried several different modes tonight jimsloth, until i got a headache and started on my Motorcycle femme-bot instead!! I'm thinking of maybe making the rear wheel guards a part of the upper arm itself - ie. it moves as the arm, instead of just covering the joint. However, he does look a bit beefy like that...
The other option is to just find a way to lower them right down, which i'm going to experiment with....there's just so little room in that trunk with arms included!! Ah well, we shall see....
The doors are starting to annoy me.....heh. They cant swing down over the legs Samurai armor style, because the front wheels ARE in the way - Im thinking i might have them swing around behind him, hidden behind the rear shell, so the roof can collapse down. The other problem is the super chunky dash board - it needs to go somewhere for the roof to compact down, but i dunno where just yet.....!!
Complicated is the word folks, but it just wouldn't be fun if it wasnt a challenge!!
"I am not a meat popsicle"
- Captain Crooks
- Minibot
- Posts: 168
- Joined: Mon Oct 09, 2006 5:37 am
- Location: Sydney
Posted by TwV Sun Oct 22, 2006 5:53 pm
Hmm.. nice execution sofar!
Looks somewhat like an old sketch of mine, with it twist of course.
If you want to decrease the belly, you should try to make the roof collapsable.
Make the doors fold out to the sides of his thighs, much like Alternator Tracks.
Disconnect the B-posts (the vertical posts alongside the rear of the doors).
Fold the seats flat, tilt the windscreen and possibly fold the roof partially over the flattened windscreen (think of Alt Smokerscreen's back assembly).
Keep up the good work!
- TwV
- Minibot
- Posts: 105
- Joined: Fri Nov 19, 2004 3:18 pm
76 posts
• Page 2 of 4 • 1, 2, 3, 4
Who is online
Registered users: Apple [Bot], Bing [Bot], ChatGPT [Bot], Google [Bot], Google Adsense [Bot], MSN [Bot], OpenAI [Bot], ThunderThruster, Yahoo [Bot], Yandex [Bot]