>
shop.seibertron.com amazon.seibertron.com Facebook Twitter X YouTube Pinterest Instagram Myspace LinkedIn Patreon Podcast RSS
This page runs on affiliate links — your clicks may earn us a few Shanix. Want the full transmission? Roll out to our Affiliate Disclosure.

Cybertron Chainclaw

Post all your customized Transformers here. Whether it's a small mod or a true kitbash, we'd love to see it!

Cybertron Chainclaw

Postby TM IronWolf » Tue Apr 18, 2006 2:14 pm

Hey all! Here's my second custom bot, and first proper kitbash: Cybertron Chainclaw! I really like Overhaul's general appearance, but like most people, think that his arms suck like Unicron's tractor beam. Considering Hastak created Bendy Prime a good while back, there's hardly an excuse for this in my world... so I did something about it!

This is actually more like version 1.5 of Chainclaw, as I was originally gonna have his arms mounted on assemblies that slid out sideways from his central torso (I didn't like them being mounted on the side/door plates, it seemed too flimsy in appearance to me). But the idea didn't work out, so I constructed the armatures that the arms are mounted on now instead :) This made his shoulders stick out of the cavity a bit in vehicle mode, so I had to add the extra armour to widen him slightly. The missile pods were made out of a knock-off Cutthroat's torso, sliced in half and decorated with a few bits of odd plastic. I chopped up his elbows and rebuilt them properly, also allowing the forearm to rotate just in front of the elbow for more interesting poseability. The upper legs were cut through just below the hip and a rotator added, this really is a simple and incredibly effective way to make a bot look much more dynamic I reckon! He can mount his weapons on the sides of the missile pods, and on the underside of his torso in robot mode thanks to the small holes that his forearms peg into :D His tank-tread chainsaws are mounted on ball-joints, allowing them to be placed pretty much anywhere he needs them :) The shoulder shields are also mounted on rotators so they can be shifted to accomodate his arms in various poses :)

In future I plan to do a better version of him, with more detail on the upper arms and leaving his internal structure intact (this one can't fire his chest missile as I gutted his insides to make way for the abortive first version of his arm mounts), but for now, what does everyone think? :)

Image

Image

Image

Image
TM IronWolf
Mini-Con
Posts: 13
Joined: Fri Apr 14, 2006 2:03 pm
Location: Staffordshire, UK

Postby Skullgrin140 » Tue Apr 18, 2006 2:30 pm

Badass!
Image
Skullgrin140
Brainmaster
Posts: 1375
Joined: Wed Oct 20, 2004 11:18 am
Location: Chelmsford, United Kingdom

Postby TM IronWolf » Tue Apr 18, 2006 2:35 pm

LOL cheers! :D Just sending the pics of him and Shrapnel to Devastator now for gallery-fying :)
TM IronWolf
Mini-Con
Posts: 13
Joined: Fri Apr 14, 2006 2:03 pm
Location: Staffordshire, UK

Postby TFLobo » Tue Apr 18, 2006 7:38 pm

Very Cool!!!

I'm interested in the arm modifications. Do you have any WIP pics of them?
TFLobo
Fuzor
Posts: 239
Joined: Wed Oct 25, 2006 12:14 am

Postby jimsloth » Tue Apr 18, 2006 9:46 pm

or close-ups?
till all are one.
Image
jimsloth
Gestalt Team Leader
Posts: 926
Joined: Sat Apr 17, 2004 1:22 am
Location: Pittsburgh -ish

Postby Pun-3X » Tue Apr 18, 2006 10:13 pm

That's different. In a very good way. ;) Love the half-track mod there, and the missile launchers are a great addition too.
Pun-3X
Fuzor
Posts: 281
Joined: Sun Jun 29, 2003 6:41 pm

Cybertron Chainclaw

Postby Dark_Fool » Wed Apr 19, 2006 12:41 am

nice work
would I be correct in my suspicions that you're into warhammer 40,000?
"...and then I rode off.... on the grass!"
Image
Dark_Fool
Combiner
Posts: 499
Joined: Wed Oct 19, 2005 3:45 am
Location: Melbourne, Australia

Postby TM IronWolf » Wed Apr 19, 2006 2:13 am

Yeah Dark Fool, what gave it away?! Do those missile pods look like Cyclone Missile Launchers...? Cuz that was kinda the idea that was knocking around in my head when I made them, even considered picking up the front of a Cyclone unit to use on him, but eventually decided it would be more satisfying, and cheaper, to make my own :) Not really into it much these days, I prefer kitbashing, but I still pick up the novels as I like a good read :)

Thanks for the good vibes everyone, glad he's going down well :D I haven't got any WIP shots I'm afraid, and close-ups might not be very enlightening as the area is all black (and my digicam has some focusing issues... :P), but I can easily draw the mechanism when I get back from work tonight and stick the pics up on here, no problems :)
TM IronWolf
Mini-Con
Posts: 13
Joined: Fri Apr 14, 2006 2:03 pm
Location: Staffordshire, UK

Postby Lord_Loqi » Wed Apr 19, 2006 9:00 am

drawings would be great. this is so sweet. I'll want to copy this arm mod for my overhaul cause frankly his arm transformation sucks.
Image
Lord_Loqi
Vehicon
Posts: 376
Joined: Thu Jun 03, 2004 9:29 am
Location: Austin Texas

Postby TM IronWolf » Wed Apr 19, 2006 4:21 pm

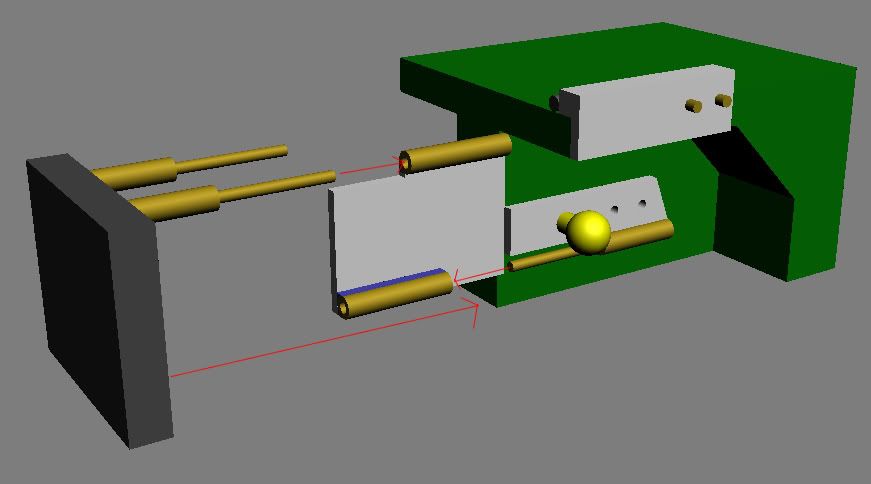
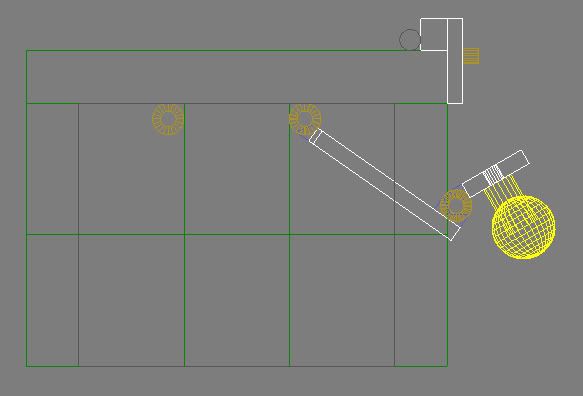
Righto, here we go! I knocked these diagrams up in 3DS Max, they're very simple but show the important bits of the mechanism I think :)

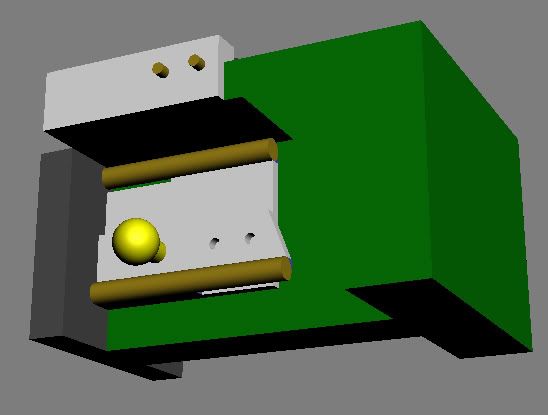
The green bit is obviously Overhaul's main torso, and the grey plate at the front is his chest plate, which is fixed into place normally once the axles are glued onto it. The gold coloured parts are brass rod and tubing, and the white areas are plasticard. The blue areas are where you'll need some damn good adhesive to fix the tubing to the plasticard! I used superglue and it sufficed, but I had to re-stick them more times than I care to remember because it's such a minimal area of contact. If anyone can think of better materials to use, let me know, as I just used what I had to hand :P Oh yeah, and the ball for the shoulder joint is off the toy, mercilessly ripped out of it's mounting in the door plate!

Hopefully the pics are pretty self-explanatory, tho I should state that it's not properly to scale! :P 
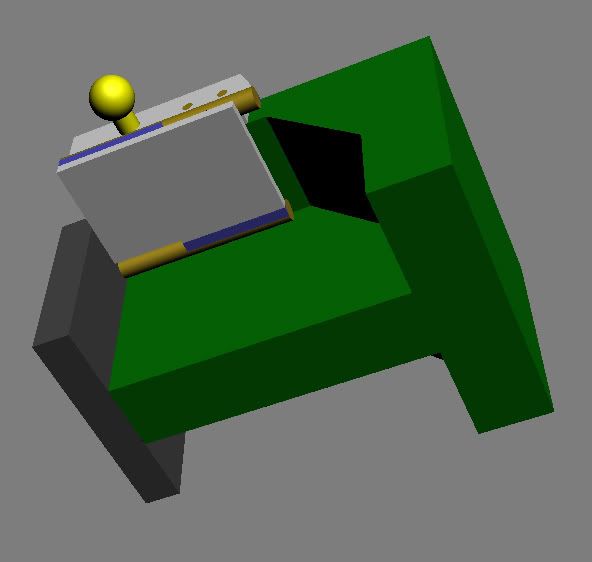
The most important measurement is the larger of the two plasticard plates in the hinge, as it needs to be wide enough to reach right across the underside of Overhaul's roof, and bring the second hinge out at the side so the plate with the ball on can be placed vertically at the side of the roof. I added some plasticard to the roof to make it a bit thicker at the edge (needed because his shoulder sticks out a bit, so the door plate needed some extra stuff to sit on), and then added two small pegs, which fit into the holes in the second plate to lock it in place. The door sections also have matching holes in an extra piece of plasticard at the top, which locks them in place in vehicle mode :)

Unless you can find something thinner and still strong to replace the plasticard, this WILL make Overhaul's shoulders stick out of the cavity in vehicle mode, so you'll need to mod the door plates as well. Having said that, there's most likely several other ways this basic approach could be modified, so if anyone comes up with a better idea, let me know! :D

Finally, I found that even when I got him to hold together, he still requires a gentle touch. The tubing doesn't fix all that well to the plasticard, even with filler adding more surface area to the contact. I drilled a hole in the smaller plate where the ball fits, and added a short peg that runs into the shaft on the ball, for strength. It may be possible to find small modellers hinges that could work in this scenario, thus eliminating the need to construct your own, but again, I was working with what I had at the time :)

Hope this helps folks, any questions, just ask :)

Assembly, front angle
Image

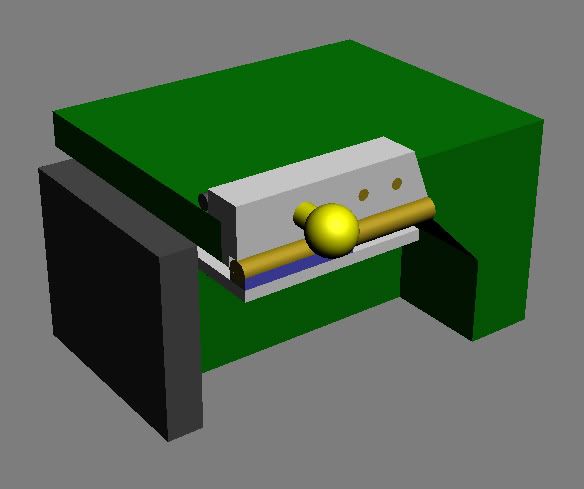
Assembly, rear angle
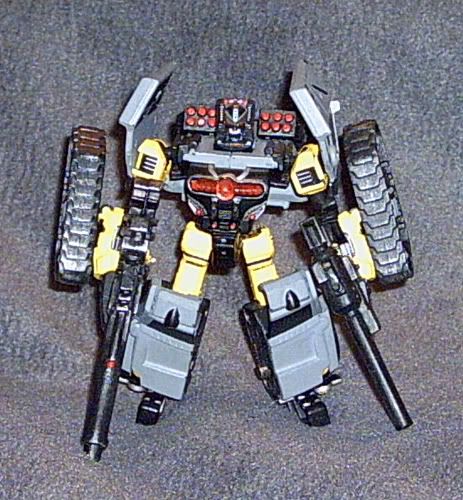
Image

Completed assembly
Image

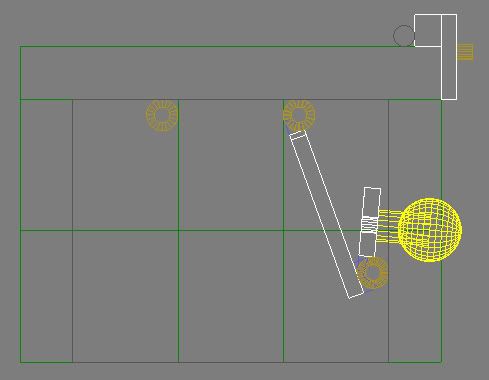
Assembly halfway between modes
Image

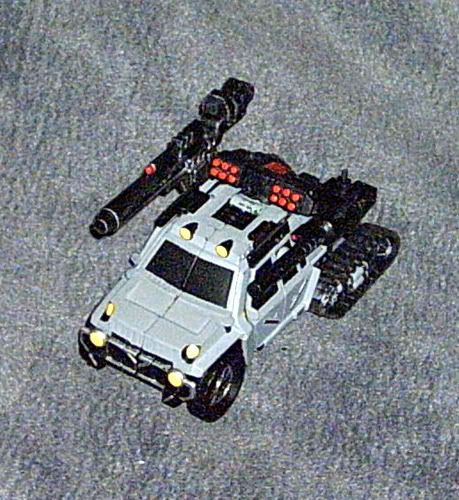
Assembly extended and locked to shoulder mount
Image

Assembly extended, lower view
Image

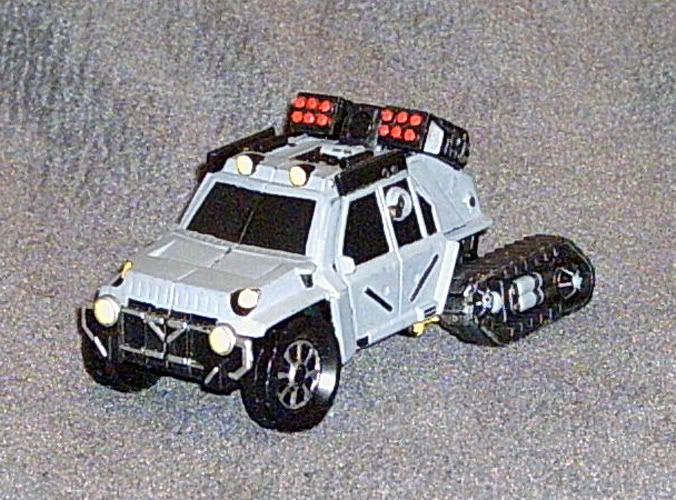
Assembly retracted, front view
Image

Assembly extending...
Image

Assembly extending more...
Image

Assembly extended and locked
Image
TM IronWolf
Mini-Con
Posts: 13
Joined: Fri Apr 14, 2006 2:03 pm
Location: Staffordshire, UK

Postby Lord_Loqi » Wed Apr 19, 2006 4:27 pm

Nice. a little more complex than I was hoping for but it'll give me a chance to work on my scratch building i guess.

Did you scratchbuild your pieces or did you salvage pieces from another bot possibly?
Image
Lord_Loqi
Vehicon
Posts: 376
Joined: Thu Jun 03, 2004 9:29 am
Location: Austin Texas

Postby TM IronWolf » Wed Apr 19, 2006 4:35 pm

It's probably not as complex as it looks, it's all pretty logical once you start putting it together :) two hinges, two plates, that's about it, the main thing is getting the sizes right :)

That entire assembly is scratch-built from plasticard, brass rod and brass tubing. The only premade bit is the ball for the shoulder joint, which is Overhaul's anyway, just removed from the door plates :)
TM IronWolf
Mini-Con
Posts: 13
Joined: Fri Apr 14, 2006 2:03 pm
Location: Staffordshire, UK

Postby Lord_Loqi » Wed Apr 19, 2006 4:38 pm

again, NICE!
Image
Lord_Loqi
Vehicon
Posts: 376
Joined: Thu Jun 03, 2004 9:29 am
Location: Austin Texas

Postby TM IronWolf » Thu Apr 20, 2006 2:13 am

Thanks! The hardest part, as I say, was getting the brass rod to stick to the plasticard. I know there are better adhesives than superglue available, and probably plastic tubing too, which might stick to the plasticard better. Or I could actually build a square tube out of plasticard for the axle to run through, altho that would need the top filing into a curve so stuff could rotate... hmmm, the possibilities for Chainclaw MKII... :D
TM IronWolf
Mini-Con
Posts: 13
Joined: Fri Apr 14, 2006 2:03 pm
Location: Staffordshire, UK

Postby Hobbyist Prime » Thu Apr 20, 2006 8:14 pm

Sounds good I love mark I so I can only imagine how cool Mark II will be!
Hobbyist Prime
Targetmaster
Posts: 618
Joined: Sun Jun 11, 2006 5:53 pm

Postby Greyryder » Thu Apr 20, 2006 8:54 pm

When glueing brass rod or tubing to sheet styrene, I like to put a second piece of styrene on the first, so the brass is resting in the inside corner that creates. Being supported on more than one side gives a much stronger glue joint for the brass.

If you really want it over built. Use Brass sheet, instead of styrene, and solder it together.
Greyryder
Vehicon
Posts: 389
Joined: Sun Apr 01, 2007 12:01 am

Postby Soundwarp » Fri Apr 21, 2006 1:58 am

Thats kick ass man!
Soundwarp
Micromaster
Posts: 82
News Credits: 3
Joined: Mon Feb 21, 2005 4:23 pm

Postby TM IronWolf » Fri Apr 21, 2006 2:18 am

Cheers Greyryder, that's a very good idea! :D

I was discussing this with my Dad yesterday, and he suggested cutting the plates out of very thin steel, such as the stuff they use to make the tins we get our coffee in :) it would need flattening out, and the edges would be, well, lethal, but in theory it should be possible, with long-nosed pliers and a bit of patience, to roll the edges round to form the hinges. I've got a spare tin so I'm gonna try it tonight or tomorrow :) If it works, it might just be thin and strong enough to allow the shoulder mod without having to adjust the door plates too :)
TM IronWolf
Mini-Con
Posts: 13
Joined: Fri Apr 14, 2006 2:03 pm
Location: Staffordshire, UK

Postby TM Devastator » Fri Apr 21, 2006 2:48 am

Image
TM Devastator
Site Owner
Posts: 755
Joined: Thu Apr 15, 2004 8:31 pm
Location: Western NY

Postby TM IronWolf » Fri Apr 21, 2006 7:49 am

Thanks Devastator! Hehe this is quite a moment, spent so long looking at them, to finally have one of my own is quite a feeling :D
TM IronWolf
Mini-Con
Posts: 13
Joined: Fri Apr 14, 2006 2:03 pm
Location: Staffordshire, UK

Postby TM Devastator » Sat Apr 22, 2006 3:49 am

IronWolf wrote:Thanks Devastator! Hehe this is quite a moment, spent so long looking at them, to finally have one of my own is quite a feeling :D
Image
TM Devastator
Site Owner
Posts: 755
Joined: Thu Apr 15, 2004 8:31 pm
Location: Western NY


Return to Customizations


[ Incoming message. Source unknown. ] No Signal - Please Stand By [ Click to attempt signal recovery... ]


Transformers and More @ The Seibertron Store

Visit shop.seibertron.com to buy "OPTIMUS PRIME Transformers Studio Series 112 Deluxe Transformers One Hasbro New"
OPTIMUS PRIME Tran ...
Visit shop.seibertron.com to buy "SKYWARP Transformers Studio Series Gamer Edition +11 Voyager WFC Hasbro 2024 New"
SKYWARP Transforme ...
Visit shop.seibertron.com to buy "GALVATRON Transformers Studio Series 86-31 Movie Leader Class Hasbro 2025 New"
GALVATRON Transfor ...
Visit shop.seibertron.com to buy "SHOCKWAVE Transformers Studio Series Core Class Bumblebee Hasbro 2022 New"
SHOCKWAVE Transfor ...
Visit shop.seibertron.com to buy "Robot Heroes SKIDS Transformers Movie Series Revenge Fallen ROTF 2009 240427E"
Robot Heroes SKIDS ...
Visit shop.seibertron.com to buy "BUMBLEBEE Transformers Studio Series 116 Deluxe One VW Beetle Hasbro 2025 New"
BUMBLEBEE Transfor ...
Visit shop.seibertron.com to buy "APELINQ Transformers Studio Series 118 Leader Rise of the Beasts Hasbro 2025 New"
APELINQ Transforme ...
Visit shop.seibertron.com to buy "Sharkticon GNAW Transformers Studio Series 86-08 Animated Movie Deluxe 2021 New"
Sharkticon GNAW Tr ...
Visit shop.seibertron.com to buy "RATCHET Transformers Studio Series Gamer Edition +09 Voyager WFC 2024 Hasbro New"
RATCHET Transforme ...
Visit shop.seibertron.com to buy "OPTIMUS PRIMAL Transformers Rise of the Beasts Ultimate MV7 ROTB Hasbro 2023 New"
OPTIMUS PRIMAL Tra ...
Visit shop.seibertron.com to buy "HATCHET Transformers Studio Series 117 Deluxe DOTM Hasbro 2024 New"
HATCHET Transforme ...
Visit shop.seibertron.com to buy "SENTINEL PRIME Transformers Studio Series Deluxe Transformers One Hasbro New"
SENTINEL PRIME Tra ...
Visit shop.seibertron.com to buy "B-127 / BUMBLEBEE Transformers Studio Series Deluxe Transformers One Hasbro New"
B-127 / BUMBLEBEE ...
Visit shop.seibertron.com to buy "STARSCREAM Transformers Studio Series Gamer Edition +06 Voyager WFC Hasbro New"
STARSCREAM Transfo ...
These are affiliate links. We may earn a commission.
Details subject to change. See listing for latest price and availability.

Featured Products on Amazon.com

Buy "Transformers: Generations Power of The Primes Legends Class Autobot Tailgate" on AMAZON
Buy "Transformers Authentics Starscream" on AMAZON
Buy "Transformers MPM04 Optimus Prime" on AMAZON
Buy "Transformers: Generations Power of The Primes Legends Class Battleslash" on AMAZON
Buy "Transformers MPM-03 Movie 10th Anniversary Figure Bumblebee" on AMAZON
Buy "Transformers Generations Power of The Primes Evolution Nemesis Prime (Amazon Exclusive)" on AMAZON
Buy "Transformers: Generations Power of The Primes Megatronus Prime Master" on AMAZON
Buy "Transformers: Generations Power of The Primes Evolution Optimal Optimus" on AMAZON
Buy "Transformers: Generations Power of The Primes Liege Maximo Prime Master" on AMAZON
Buy "Transformers Generations Deluxe Class Arcee Figure" on AMAZON
Buy "Transformers Generations Combiner Wars Deluxe Class Dead End Figure" on AMAZON
Buy "Transformers: Generations Chaos on Velocitron 5-Figure Pack" on AMAZON
These are affiliate links. We may earn a commission.
Details subject to change. See listing for latest price and availability.