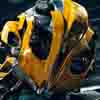
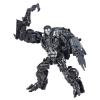
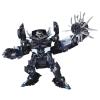
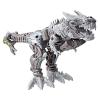
27: SS-34 Megatron (Dark of the Moon)
UPDATE: I spruced up my paint work on Megatron by redoing the weathering to be more consistent in robot and vehicle modes, added copper detailing, and repainted some of the wires found in robot mode. I also added a new net piece over the front (as the original did not age well), and even did some improvement with Igor including both updated paint and his cane!
DOTM Megatron is a project that, in the past, I didn't really know what to do with. I made some minor adjustments, but I never had a plan for a full custom. After Megatron won the 100K poll I had to scramble and think of how I could really do this well. Thankfully, between official HD CGI renders and Prime 1 studios' statue, I had some great reference pictures! I'm really proud of this project, and I hope you enjoy!
- Robot Mode -
While this was more of an issue in vehicle mode, the first thing I wanted to do was get rid of the original "rust" paint on the figure. For some sections I did the same light aircraft gray/mud mixture as vehicle mode, but for other parts I used silvers and various gunmetals to break up the tan sections.
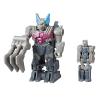
While weathering was a big part of this figure, I also made sure to look for what details I could add. I found some very colorful wires in the legs from the official CG renders, some more wires on the left arm from the Prime 1 studios, and the small red bits on the torso I remembered noticing on the meet & greet Megatron costume at Universal.
Moving onto weathering, I started with some panel liner - not very much though as it started to wat away at the light aircraft gray paint I was using. I then used mud from my Tamiya weathering kit, and sponge-brushed on flat rust to make Megatron look more accurate.
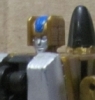
I did do a small amount of modding to robot mode: to get the head sculpt more screen accurate I used an X-acto knife to add to the damage on the existing head sculpt. For example, Megatron is missing his right cheekbone piece in DOTM but the original figure included that piece, so I cut parts of it off and painted over it in gunmetal and some small bits of silver.
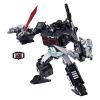
- Vehicle Mode -
The big challenge in vehicle mode (more so than robot mode) was getting rid of the rust fade on the sides of the truck. My first plan was to remove that fade using some kind of paint thinner, but looking at pictures of the truck and the paint I had, I found that light aircraft gray was a pretty close match! You can see how it looked with just that paint earlier on this page. I then took the mud from my weathering kit and used it on all of the surfaces I painted to darken the shade and also make it look dirtier.
I then went to work with detailing: Windows, vents, all the greebling on the side of the truck, and the red for the hazard signs, among others. I used acrylics for the forward rubber section of the truck, learning my lesson from Barricade and Soundwave.
Finally, I took flat rust and dry brushed it in some areas, then used the sponge brush technique over much of the truck, primarily on the cab and lower parts of the trailer/tanker.
There's also a small mod in this mode: I added the netting on the front of the truck that was missing on the original figure. It's actually a section from an Avocado bag that I spray painted black! (Note: this has been replaced with a more robust net piece as of January 2024)
Paint Used:
Testor's enamels:
- Flat gunmetal
- Flat white
- Flat rust
- Metallic silver
- Graphite metallic
- Gloss red
- Flat yellow
- Light aircraft gray (spray)
- Flat coat (spray)
Decoart acrylics:
- Gunmetal
- Extreme sheen sapphire
- Extreme sheen silver
- Emperor gold
- Copper