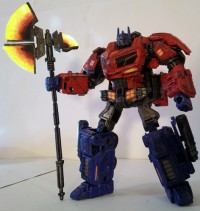
Transtopia Masterclass - War For Cybertron Optimus Prime
Saturday, June 18th, 2011 3:45PM CDT
Categories: Toy News, Game News, TranstopiaPosted by: Blurrz Views: 93,650
Topic Options: View Discussion · Sign in or Join to reply
You'll find Mykltron's methods in making this figure here.
Seibertron.com - The Ultimate Transformers Resource!
News Search
Got Transformers News? Let us know here!
Most Popular Transformers News
ROTB Optimus Prime Lead Designer Discusses Why the Face Looks Similar to the 2007 Movie
58,186 viewsMost Recent Transformers News
Posted by starwarrior1227 on June 18th, 2011 @ 3:52pm CDT
Posted by Mykltron on June 18th, 2011 @ 5:14pm CDT
Blurrz wrote:Front page, well deserved ^_^
 Thanks! That was a nice surprise! I didn't think I'd ever get spotlighted, especially after the last one said about how Transtopia looks for original and unusual ideas, which I don't have. I just take figures and make them look more real rather than repurposing figures.
starwarrior1227 wrote:how did you chip the paint without harming the plastic!?
I probably didn't. I scratched the paint off most corners with a blade and then attacked him with a nailfile. That's why there are scratches there. Finally I retouched the chips with metallic drybrushing.
Here I am, giving all my secrets away. I should start charging.
Posted by vegetacron on June 18th, 2011 @ 6:02pm CDT
1.) The Eyes - They could have been done alot differently. Either by using a brighter blue, or by adding some depth to them by using 3 different hues of blue
2.) Drilled Holes - if you could have drilled out the holes for the 2 exhausts and the gun barrel and then painted the insides. Also, you could have made the figure truly unique by adding gun barrel holes to the exhaust. For example:

Don't take this as flamming, as this is far, far from it. The piece you have here is extremely nice and by no means is it bad, i just wanted to give you that extra mile of advice to keep in mind for your next project.
EDIT: 3.) Also adding a brown or flesh colored ink wash to the tips of the exhaust would have been pretty wicked too.
Also, if you're not a fan of it, you may want to check out Games Workshops' Warhammer 40k Miniature line and all the media and articles out there on how they paint their miniatures, as the same rules kind of apply to modding your Transformer toys. They put out a magazine called "White Dwarf" that has some really nice painting articles in it.
Posted by f-primus-unicron on June 18th, 2011 @ 6:23pm CDT
¬¬ sorry but is the truth
Posted by craggy on June 18th, 2011 @ 6:54pm CDT
The axe is pretty neat too, but the paintjob makes it. Expecially cool considering there's been minimal modding here. I love seeing how someone's built an in-scale to G1-Galvatron, fully toon-accurate, 10,000 points of articulation version of Unicron as much as the next guy, but it's sometimes very cool to point out how that which appears to be a "simple" repaint can greatly enhance a figure.
Great work, Mykltron!
Posted by CrimsonPrime on June 18th, 2011 @ 7:12pm CDT
HORRIBLE !!! MY GOD I ALMOST PUKE !!!
The only cool thing about it is that frickin axe,the rest...Let's just say a rusty and broken-down knock-off would look far more better than that...
Posted by Mykltron on June 18th, 2011 @ 7:35pm CDT
vegetacron wrote:Only 2 things set this apart from a truly "master class' rating:
1.) The Eyes
2.) Drilled Holes
3.) Also adding a brown or flesh colored ink wash to the tips of the exhaust would have been pretty wicked too.
Thanks for the suggestions.
1) I'm not happy with the eyes either, they didn't turn out as well as I hoped.
2) why would I drill holes in him? I was going for accuracy to the trailer and I didn't notice any holes in his pipes. Nor in the gun:

3) Why brown or flesh? I wanted a sooty, burnt look.
f-primus-unicron wrote:the wfc optimus figure is amazing but this paintjob is garbaje
¬¬ sorry but is the truth
Can you say why it is 'garbaje'? For someone claiming to have an intelligence rating of 10+ your spelling and grammar are remarkably poor.
CrimsonPrime wrote:Wow....Just wow...I only have one word to describe it...
HORRIBLE !!! MY GOD I ALMOST PUKE !!!
The only cool thing about it is that frickin axe,the rest...Let's just say a rusty and broken-down knock-off would look far more better than that...
Can you explain why my custom is so displeasing to your digestive system? Can you do better?
Why have f-primus-unicron and CrimsonPrime decided to flame me? I didn't boast that I'm really great - a moderator chose to put my work on the front page.
Posted by Xithys on June 18th, 2011 @ 7:44pm CDT
f-primus-unicron wrote:the wfc optimus figure is amazing but this paintjob is garbaje
¬¬ sorry but is the truth
CrimsonPrime wrote:Wow....Just wow...I only have one word to describe it...
HORRIBLE !!! MY GOD I ALMOST PUKE !!!
The only cool thing about it is that frickin axe,the rest...Let's just say a rusty and broken-down knock-off would look far more better than that...
First of all, both of you are 100% incorrect. First of all the point of this project, as far as I understand was to make a battered and beat up looking prime and in that respect, it was an obvious success. I'm not sure I've ever seen prime look that damaged. Second, he looks damn good looking that bad. I, frankly, amd surprised that anyone could be so rude as to come out and insult another seibertronian's hard work. Seriously. Shame on both of you.
Great job on this piece Mykltron. Don't listen to our grammar-challenged haters.
Posted by f-primus-unicron on June 18th, 2011 @ 7:55pm CDT
ok why is garbage? because its the same as every "battle" damage repaint customizers do, it doesnt looks like a robot after a battle, i like the paint details, really, but the wheathered effect just doesnt work, it doesnt looks "real", for me it looks like a scratched all paint, maybe, some white glue over the paint would work, you can believe me or not
for the axe, that is surelly amazing
i wasnt trying to insult you, sorry, i just say what i think
maybe i just dont like "battle Damage"
i really wasnt trying to insult your work
and SORRY because im not a native english speaker ¬¬ (this part is sarcasm, because english could be the most important language, but not the only one in the world)
Posted by SKYWARPED_128 on June 18th, 2011 @ 8:00pm CDT
Now before I go any further, I realize I probably don't deserve to criticize any part of this work, considering my best successful repaint of a TF [so far] consists of touching up DOTM BB with some dark gray, drybrushing it, and adding a coat of clear gloss to the alt mode.
That said, I think you could have gone easier on painting the head. The paint was a little too heavy for my liking. And that's my only criticism here.
The way you painted up the "glowing" parts was awesome. I can't believe how realistic it actually looks!
All in all, WFC Prime here looks every bit the part of a battle-hardened Cybertronian warrior. And those paint chips, I don't think I've ever seen anyone attempt something like that.
Posted by AutobotMR2 on June 18th, 2011 @ 8:09pm CDT
Hopefully you do some more work with the other WFC figures!
Posted by BeastProwl on June 18th, 2011 @ 9:21pm CDT
see, that's what people would pay for!
Anywho, your also part of this "Transtopia Masterclass" thing?
Can you tell GetRightRobot thanks for all those paint and primer tips?
Id'e really appreciate it, he gave me a long list of do's and don'ts on his Fort Max custom a few days ago, and I never got to thank him for just how helpful they were, because I can mod, but I can't paint worth a damn. his tips helped me improve A LOT! my paint work looks so much better! though it can use a lot more work...
Anyway, always looking forward to new customs from you guys!
Each one is it's own piece of seibertronian historical treasure, that again, belongs in it's own museum!

Posted by Lord Onixprime on June 18th, 2011 @ 10:15pm CDT
It is amazing how real you made it's damage look though. Congrats.
Posted by Mindmaster on June 18th, 2011 @ 10:41pm CDT
Edit; Just remembered to add this, but a quick question: how was the axe done? It doesn't look like the one FansProject did just recently...
Posted by Warbreaker on June 18th, 2011 @ 11:17pm CDT
I'm so willing to delude myself that this custom paintjob actually has die-cast bits on him - superb job on the wear-and-tear Mykltron!
I also admire how you've scratchbuilt the axe, though I must say the shaft looks rather... basic.
Posted by NatsumeRyu on June 18th, 2011 @ 11:28pm CDT
Posted by Supreme Convoy on June 19th, 2011 @ 12:01am CDT
Posted by vegetacron on June 19th, 2011 @ 12:02am CDT
1) I'm not happy with the eyes either, they didn't turn out as well as I hoped.
2) why would I drill holes in him? I was going for accuracy to the trailer and I didn't notice any holes in his pipes. Nor in the gun:
3) Why brown or flesh? I wanted a sooty, burnt look.
Because you are going for a more "realistic" look with realistic wear and tear. IRL, exhausts and guns have holes in them, due them serving a purpose other than to just look cool. If you look at that picture, you'll see his gun has a hole in the barrel. Exhausts have holes in them. You see, the more real you get to modding and painting your Transformers you get, the more visually appealing they are. The more furbished and well made they are.
The ink wash is in reference to Citadel Colors, made by Games Workshop in conjunction with Boltgun Metal.
Here, please reference the following links...they'll give you a couple ideas (also, an idea of what i'm talkin about), if yer open to them and pay attention to the details and processes listed:
http://www.games-workshop.com/gws/conte ... id=1216213
http://www.paintingclinic.com/operation ... marine.htm
http://www.youtube.com/watch?v=yITRhnATlCw
http://www.youtube.com/watch?v=-RBA6SE1 ... re=related
I spent close to two years (40-60hrs a week) painting out 2 different armies and although the hobbies are different and etc, the painting and methods of creating utterly badass figures is parallel enough so that you can learn from the other hobby just enough to make what you are trying to do here, that much better.
If i had the time, money, and resources i did when i was kid...hooo booy! I'd personally paint and mod some serious shit up for ya to use for inspiration. lol
Posted by Talous on June 19th, 2011 @ 2:36am CDT
I would be proud to have this guy in my collection. Thumbs up for all the hard work.
Posted by First-Aid on June 19th, 2011 @ 2:44am CDT
f-primus-unicron wrote:im not a natural english speaker ok? not everybody speaks english ok?
ok why is garbage? because its the same as every "battle" damage repaint customizers do, it doesnt looks like a robot after a battle, i like the paint details, really, but the wheathered effect just doesnt work, it doesnt looks "real", for me it looks like a scratched all paint, maybe, some white glue over the paint would work, you can believe me or not
for the axe, that is surelly amazing
i wasnt trying to insult you, sorry, i just say what i think
maybe i just dont like "battle Damage"
i really wasnt trying to insult your work
and SORRY because im not a native english speaker ¬¬ (this part is sarcasm, because english could be the most important language, but not the only one in the world)
I don't think any insult was intended, especially without the knowledge that English isn't your primary language. Honestly, the spelling and grammar on the internet among those with English as a PRIMARY LANGUAGE are so horrid anymore that I think a lot of us just jump to the comclusion that you are just an English-speaking person who doesn't care about grammar/spelling on the internet. Now we know (and knowing is half the battle!) that you don't speak or write English as a primary and we can adjust our expectations as such. Like I said though, you still are doing better than a lot of the English-speakers out here...
Back on topic, I personally think this is a fantastic job. The metal fatigue effects are great. Props where props are due!
Posted by T-Macksimus on June 19th, 2011 @ 11:16am CDT
My own opinion happens to be that I'm VERY highly impressed. As a Cabinet Finisher who has had to do custom work like antiquing, burn-through and even had to "paint" wood grain where none exists, I am very impressed with the fact that you were able to pull off this weathered look without having a noticeable material build-up (aside from the head which was unavoidable due to size/shape) or burn points that went too far. The fact that it was done so well on such a small scale piece speaks volumes for your patience and attention to detail. Unless someone has actually done a project like this I think most folks have no real understanding of how difficult doing a piece like this can really be. This is some damn fine work!!
Posted by Mindmaster on June 19th, 2011 @ 12:47pm CDT
First-Aid wrote:(and knowing is half the battle!)
Slap me with a fish, why don't you?!

Posted by Mykltron on June 19th, 2011 @ 3:31pm CDT
vegetacron wrote:Because you are going for a more "realistic" look with realistic wear and tear. IRL, exhausts and guns have holes in them, due them serving a purpose other than to just look cool. If you look at that picture, you'll see his gun has a hole in the barrel. Exhausts have holes in them.
I spent close to two years (40-60hrs a week) painting
I think I need to rephrase then. I wasn’t going for ‘realism’ but screen accuracy. It seems that on Cybertron exhausts don’t have ventilation holes! In the trailer the exhausts don’t have vent holes so I didn’t drill any. For the gun I now realise you refer to the hole at the end, not along the barrel. I considered drilling that out but decided to paint the end instead. Now you’ve brought this up I think I’ll drill a shallow hole and repaint it, as well as redo the eyes. New pics coming soon!
Thanks for the links, I'll look at those later as I’m always looking for ways to improve. Unlike you I haven’t spent thousands of hours painting. I’ve done around 30 customs and figured everything out myself as I sent along.
f-primus-unicron wrote: ok why is garbage? because its the same as every "battle" damage repaint customizers do, it doesnt looks like a robot after a battle, i like the paint details, really, but the wheathered effect just doesnt work, it doesnt looks "real", for me it looks like a scratched all paint, maybe, some white glue over the paint would
First, I apologise for insulting your skills at a foreign language.
Second, have you looked at the trailer for War For Cybertron? Drybrushing silver (white wouldn’t work) would make him look scratched but it wouldn’t achieve the desired effect. If you examine Prime in the trailer (pause it on close ups) and examine damaged paint on cars you will see that paint doesn’t always scratch – it chips. It struck me that the only way to replicate chipped paint is to actually chip the paint. This is authentic battle damage because I damaged the paint by scraping it off. When he first appears in robot mode in the trailer he is clearly having paint scraped off as he skids across the floor.
SKYWARPED_128 wrote:
Now before I go any further, I realize I probably don't deserve to criticize any part of this work…
That said, I think you could have gone easier on painting the head. The paint was a little too heavy for my liking. And that's my only criticism here.
Don’t worry, hints from anyone are helpful. Oiling it all up with copious compliments helps!
What do you mean by ‘going easier on the head’ and ‘too heavy’? Do you mean too much damage?
AutobotMR2 wrote: Hopefully you do some more work with the other WFC figures!
Thanks for your support.
The only other figure is Megatron with that five bladed thing. I didn’t like the other figures but Prime and Megatron both have to be done!
Mindmaster wrote:
Edit; Just remembered to add this, but a quick question: how was the axe done? It doesn't look like the one FansProject did just recently...
Three sheets of plastic. White inner sheet with the red/yellow fade painted on. Outer transparent sheets are where the details and black fade are painted. The metallic frame is layered over that. The shaft is made from WFC Megatron’s and RotF Skywarp’s missles plus a cog from DotM Ratchet’s mechtech weapon. The sections are joined with magnets so it can be assembled around his hands as parts are too thick for 5mm holes.
Warbreaker wrote: I also admire how you've scratchbuilt the axe, though I must say the shaft looks rather... basic.
That’s because it’s a balance between three things:
- needing plenty of space that the hands can hold on to as his arms are not designed for a two handed weapon
- the need to slide the shaft into the fists as they don’t open
- lack of available cylindrical parts
T-Macksimus wrote:I'll support those who have a varied opinion on this piece just for the fact that it IS their opinion and everyone has the right to a different viewpoint. This is art after all and everyone sees the same piece of art based on their own personal likes, dislikes, tastes, etc...
My own opinion happens to be that I'm VERY highly impressed. As a Cabinet Finisher who has had to do custom work like antiquing, burn-through and even had to "paint" wood grain where none exists…
The trouble with the negative opinions is that they were expressed without explanation. That sort of thing will get you flamed. It also appears to me that their opinion was given without seeing how he looks in the game.
Thanks for your comments. It was an extremely long, arduous and tiring custom. I know it’s not perfect but I’m pleased none-the-less.
BeastProwl wrote: Anywho, your also part of this "Transtopia Masterclass" thing?
You (and I think some others) seem to have misunderstood something. Transtopia Masterclass is not a group. We aren’t a group of people who think we’re great at customising. What happens is this:
- Individual members post their work on the forums for others to see and comment on
- Blurrz sometimes singles out something that he considers to be worthy of spotlighting on the front page
- Blurrz puts it on the front page under the title Transtopia Masterclass (which I still say should read Masterpiece, not Masterclass but that’s between me and Blurrz! )
Transtopia is merely the name for the customizing forums on Seibertron.
Criticisers please note: I have not applied for recognition, I did not ask anyone to front page me, I did not say to anyone “I’m really great at this, this piece is amazing”. It was a complete surprise to find my custom on the front page. By all means suggest improvements but don’t just say “rubbish” and move on.
Posted by vegetacron on June 19th, 2011 @ 5:31pm CDT
I think I need to rephrase then. I wasn’t going for ‘realism’ but screen accuracy. It seems that on Cybertron exhausts don’t have ventilation holes! In the trailer the exhausts don’t have vent holes so I didn’t drill any. For the gun I now realise you refer to the hole at the end, not along the barrel. I considered drilling that out but decided to paint the end instead. Now you’ve brought this up I think I’ll drill a shallow hole and repaint it, as well as redo the eyes. New pics coming soon!
Thanks for the links, I'll look at those later as I’m always looking for ways to improve. Unlike you I haven’t spent thousands of hours painting. I’ve done around 30 customs and figured everything out myself as I sent along.
Ah, well then yeah. If yer mark is for photo realism , then you hit your mark.
But as far as figuring stuff out on yer own, USE THE INTERNET!!! Now a days, theres tons of articles and youtube videos to show you all sorts of different ways to paint these things. People have been modding and painting up Gundam model kits for quite some time as well.
Back when i painted and modded 40k armies, everyone was using win98 and 56k was the fastest internet around. So loading pages full of pics or watching a 'how to' vid was kinda outta the way and a real pain to do. But i was fortunate to have a subscription to White Dwarf and a comic book/hobby shop that kept alot of GW's painting guides in stock, so i had plenty of how to material and inspiration to get me started.
--
The big thing i would personally like for you to take away from the thread as that there is alot out there on the internet and there are whole communities of hobby lovers that like and do the same thing that you do - you just hafta spend some time with Google to find them.
Posted by Mykltron on June 19th, 2011 @ 5:47pm CDT
vegetacron wrote:The big thing i would personally like for you to take away from the thread as that there is alot out there on the internet and there are whole communities of hobby lovers that like and do the same thing that you do - you just hafta spend some time with Google to find them.
Yes, I have looked at tutorials. Here's an example of my 'figuring it out myself': I saw metallic finishes on customs and didn't know how it was done. One day I noticed the texture on the metal dumbells at the gym and realised how to replicate it. That's how I 'invented' drybrushing all by myself, although the process was a little different. After reading a tutorial about it I refined my technique further, although there are still plenty of drybrushing variations to try.
I shall have a look at those links you gave me when I have some time.
Posted by vegetacron on June 19th, 2011 @ 7:13pm CDT
Most miniature painters do a base coat and then layer after layer of paint in order to achieve a build up of variating hues on any given surface, but i found with drybrushing, you can save the time and paint by drybrushing the hell out of something a few times and the pickin out your highlights with a slightly brighter shade of your main color. And if you ever do miniature painting, when you have quite a few miniatures to paint or several squads to paint, its not time efficient to treat each model like a piece of artwork.
Thats a bit different compared to sitting down to repaint a single Transformer figure, as all of your time is poured into perfecting one model. It really makes me curious as to how my current collection of Transformers would turn out if i just sat down and started painting the hell out of them, one by one. But there again, i don't have the money to invest in the paints and brushes, nor the time or workspace. I think ill put that feather in my cap for when i retire. LOL
Posted by starscreamreturns on June 19th, 2011 @ 8:53pm CDT
Posted by germismith on June 19th, 2011 @ 9:12pm CDT
Posted by SKYWARPED_128 on June 19th, 2011 @ 10:09pm CDT
Mykltron wrote:SKYWARPED_128 wrote:
Now before I go any further, I realize I probably don't deserve to criticize any part of this work…
That said, I think you could have gone easier on painting the head. The paint was a little too heavy for my liking. And that's my only criticism here.
Don’t worry, hints from anyone are helpful. Oiling it all up with copious compliments helps!
What do you mean by ‘going easier on the head’ and ‘too heavy’? Do you mean too much damage?
What I meant was that, IMO at least, there seems to be too much paint on the head, making the paint-job look too thick. Looking at the closeup shot, it almost looks as if OP's head were made of papier-mache. It doesn't look metallic enough to me.
It's probably just me, though.
That said, I realize that looking at photos of a figure is very different from seeing it in person, and most of the things that one would never notice with the naked eye just gets thrown into focus using a hi-pixel camera.
BTW, I wonder if you could give me some tips on dry-brushing. See, after DOTM Bumblebee, I intend to drybrush BB Bumblebee as well. Thing is, the two halves of his forearm are different colors; one side's dark gray, and the other flat black. Will the difference in color still show after a few layers of drybrushing? I know I shouldn't be lazy, and just color the two sides the same color, but I'm just curious to see if I could avoid having to paint up the forearm.
Posted by Pot Bot on June 20th, 2011 @ 2:52am CDT
truely a masterpiece in my opinion, especially considering this is my favourite Prime design of them all.
You deserve a HUGE pat on the back imho
great job dude
Posted by Mykltron on June 20th, 2011 @ 5:07am CDT
SKYWARPED_128 wrote:Mykltron wrote:SKYWARPED_128 wrote:
Now before I go any further, I realize I probably don't deserve to criticize any part of this work…
That said, I think you could have gone easier on painting the head. The paint was a little too heavy for my liking. And that's my only criticism here.
Don’t worry, hints from anyone are helpful. Oiling it all up with copious compliments helps!
What do you mean by ‘going easier on the head’ and ‘too heavy’? Do you mean too much damage?
What I meant was that, IMO at least, there seems to be too much paint on the head, making the paint-job look too thick.
The trouble with that is that blue seems to have very little covering power. I found that with Scattorshot which is where I first tried paint chipping. There's the black base coat, silver dry brushing, white base coat, five coats of blue and a coat of clear blue there. Even without that paint the details on his head aren't very clear, they're all rounded.
I've PM'd you about the drybrushing.
Posted by Mykltron on June 20th, 2011 @ 6:37pm CDT
Posted by SKYWARPED_128 on June 20th, 2011 @ 6:50pm CDT
Mykltron wrote:The trouble with that is that blue seems to have very little covering power. I found that with Scattorshot which is where I first tried paint chipping. There's the black base coat, silver dry brushing, white base coat, five coats of blue and a coat of clear blue there. Even without that paint the details on his head aren't very clear, they're all rounded.
I've PM'd you about the drybrushing.
I guess that can't be avoided then. I was about to suggest doing the head the generic way by dabbing silver paint on the edges to simulate paint chips, but then it would stand out too much from the rest of the fig with its realistic chipped paint.
BTW, many thanks for the PM. BTW, your customized BB Bee is awesome! Other customs I've seen tend to go overboard with the weathering. I like your more subtle approach.
Posted by Mykltron on June 21st, 2011 @ 5:43am CDT
SKYWARPED_128 wrote:your customized BB Bee is awesome! Other customs I've seen tend to go overboard with the weathering. I like your more subtle approach.
Are you talking about Final Battle Bumblebee? Cos there is also the pre-battle version called BBBB Sans Damned Monkey Arms (& Other Upgrades). Of course, the latter has no weathering at all so I hope that's not what you call subtle!
Posted by trence5 on June 21st, 2011 @ 3:21pm CDT

Excellent
Any chance you could tell us how you went about making the ultra cool war Ax? I'm drawing out a variation, for my D.I.A. commander, but I'll be using clear blue plastic instead.
Posted by Mykltron on June 21st, 2011 @ 5:15pm CDT
trence5 wrote:Excellent
Excellent

Any chance you could tell us how you went about making the ultra cool war Ax? I'm drawing out a variation, for my D.I.A. commander, but I'll be using clear blue plastic instead.
It's already been explained elsewhere in this thread but as it's getting long I'll forgive you for not reading the whole thing! Here you go:
Three sheets of plastic. White inner sheet with the red/yellow fade painted on. Outer transparent sheets are where the details and black fade are painted. The metallic frame is layered over that. The shaft is made from WFC Megatron’s and RotF Skywarp’s missles plus a cog from DotM Ratchet’s mechtech weapon. The sections are joined with magnets so it can be assembled around his hands as parts are too thick for 5mm holes.
Posted by SKYWARPED_128 on June 21st, 2011 @ 6:59pm CDT
Mykltron wrote:SKYWARPED_128 wrote:your customized BB Bee is awesome! Other customs I've seen tend to go overboard with the weathering. I like your more subtle approach.
Are you talking about Final Battle Bumblebee? Cos there is also the pre-battle version called BBBB Sans Damned Monkey Arms (& Other Upgrades). Of course, the latter has no weathering at all so I hope that's not what you call subtle!
Heheh, I was talking about the Final Battle version. Both were Battle Blade BB's, so I got a little confused.
I've seen some customizers overdo weathering to the point where it looked like it was left in a junkyard for ten years instead of battle damaged.
I also like that you coat the fig with just the right amount of paint. Not too thin, but not too thick. I remember seeing a customized ROTF Longhaul that had such a thick paint job, the fig looked like it was melting.
Posted by KnightStrike on August 9th, 2011 @ 12:20pm CDT
Posted by Mykltron on August 9th, 2011 @ 6:28pm CDT
KnightStrike wrote:I have to say I really love this mold and so I like seeing all the customs of it, but this is hand's down my favorite custom paint. The detail and weathering, the paint scrapes, its all fantastic. Topped off by that killer axe, this thing is just mind blowing.
Thanks! There certainly are a lot of customs of this mold so that compliment really means something!
Would it surprise anyone to read that I've only just gotten around to varnishing him? I think he'll get the final coat tomorrow.
Posted by leobreaker1977 on August 10th, 2011 @ 9:06am CDT


